|
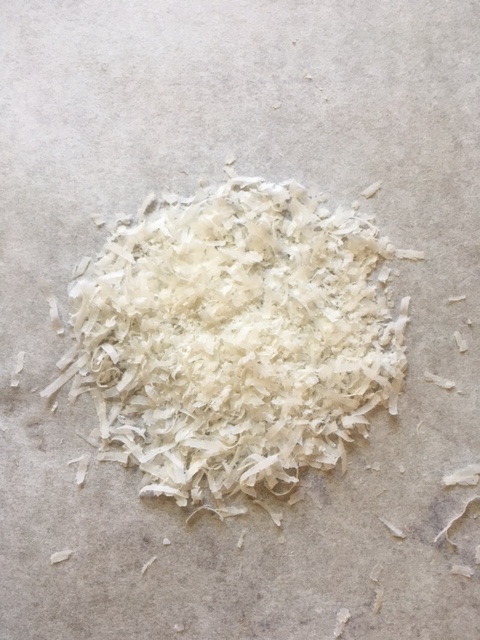
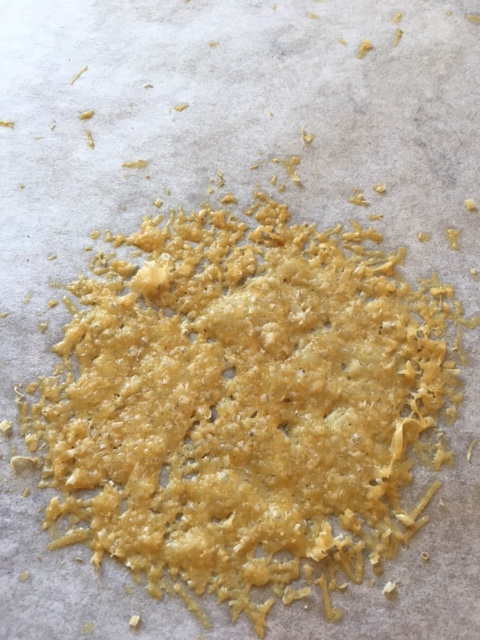
"I live on good soup, not on fine words. " -Moliere One of my first blog posts when I started this thing about a year ago, was an ode to farm fresh tomatoes. You can see those recipes here and here. Truly, a fresh tomato off the vine, picked and sold locally, if not harvested from your own garden, is a treat for the senses that no supermarket tomato can come close to approximating. There are variations in juiciness, sweetness and acidity , size and color. The anticipation of getting these fresh tomatoes mounts and mounts as the growing season progresses. Everyone thinks tomatoes are a summer vegetable (well fruit actually), but the truth is it is quite close to summer's end before the best tomatoes appear, and then poof- they are gone. Recently I was able to get some tomatoes from the local farm I volunteer at and I decided to turn them into Roasted Tomato Soup. This recipe is one I adapted from Tyler Florence. It is so delicious. His original recipe calls for much more fat than I use and also calls for basil. Personally I can't stand basil in tomato soup because it makes me feel like I am eating a bowl of marinara. I grew up on Campbell's Condensed Tomato Soup, did you? And I loved it....at the time, with the requisite grilled cheese sandwich on the side. Now the sweetness of the soup really does not appeal to me, but the memory lingers. This soup is a nice grown up version to appease the memory. It's creamy, fresh, beautiful and delicious, with or without the grilled cheese sandwich. So quick, grab some fresh grown tomatoes and make a batch. Better yet, double it (or triple even if you have a soup pot large enough) and place a container in the freezer for another time. Roasted Tomato Soup- serves 4 2 1/2 pounds of assorted ripe tomatoes (large, small, plum, heirloom...), cored, seeded and halved* 1/2 cup extra virgin olive oil 5 small cloves of garlic, peeled 4 cups thinly sliced onions, packed 1 1/2 teaspoons kosher salt 1 teaspoon coarsely ground black pepper 5-6 sprigs fresh thyme 3-4 cups chicken or vegetable stock (low sodium, if canned) 2 bay leaves 1 tablespoon unsalted butter (optional if vegan) 2 Tablespoons heavy cream (optional) Parmesan crisps (optional) 1. Preheat the oven to 450 Degrees F. Line a baking sheet with foil then lay a piece of parchment paper on top. 2. Arrange the tomatoes on top of the paper (don't you just love all that variation?). 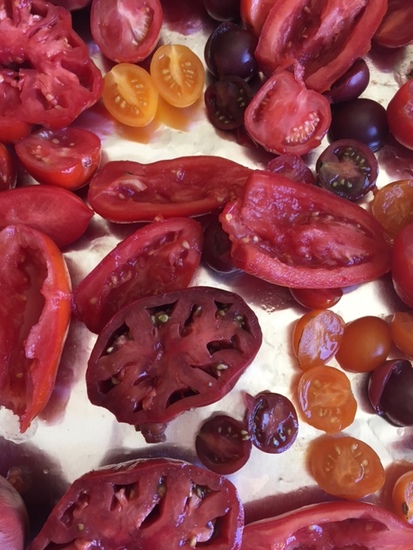 3. Place the sliced onions and garlic on top of the tomatoes. Sprinkle with salt and pepper. Drizzle with olive oil and toss to combine. Top with fresh thyme. 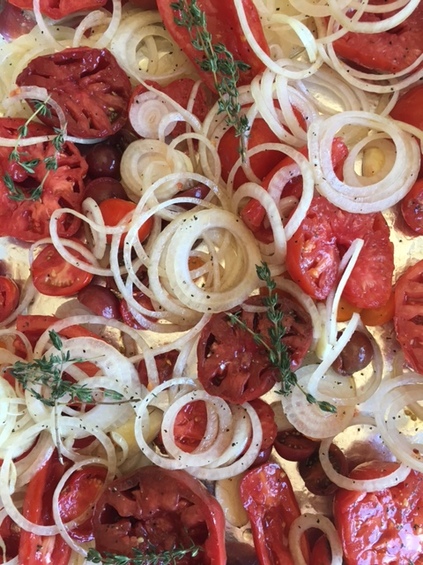 4. Place tray in hot oven and roast for 30-40 minutes until cooked down and slightly caramelized.. If making Parmesan crisps, reduce oven to 375 degrees F. 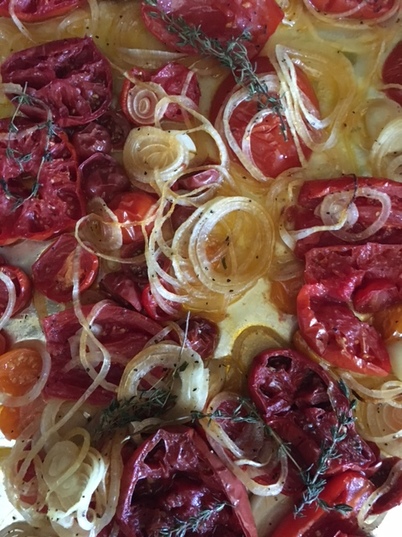 5. Remove the thyme sprigs, leaving some of the leaves only behind with the tomatoes. Transfer the roasted tomato mixture into a soup pot large enough to hold the ingredients. Add in bay leaves, stock and butter, if using. Bring mixture to a boil, then reduce heat and simmer, until liquid is reduced, about 20-30 minutes, stirring occasionally. 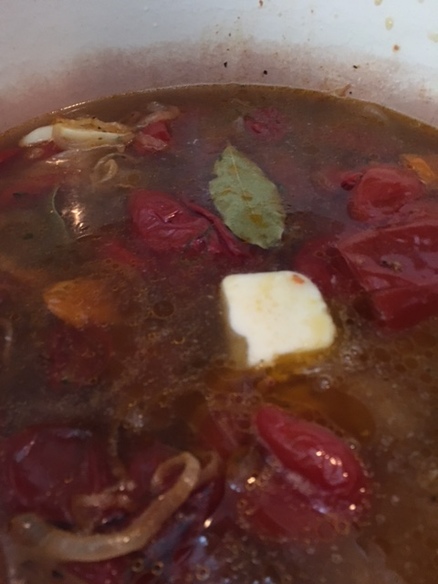 6. Remove the bay leaves and discard. 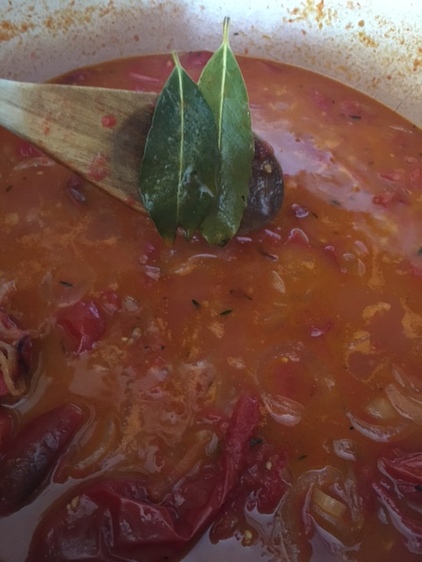 7. Using an immersion blender (one of my favorite tools), puree soup, right in the pot, until smooth. If an immersion blender is not available, carefully use a stand blender, filling jar no more than half-way full. You may have to puree in batches. Be careful, contents are HOT! 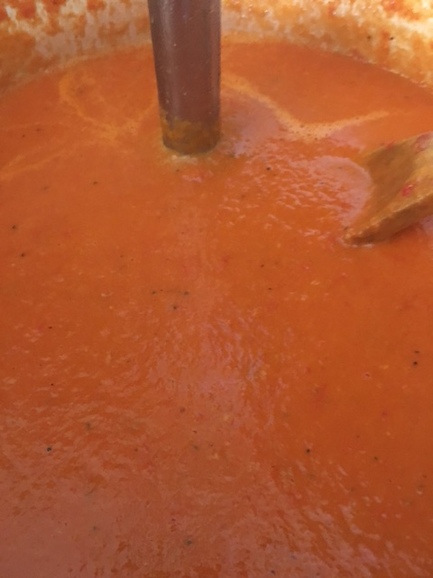 8. Taste for seasoning and adjust to taste. Add in additional stock, if desired, for thinner soup. Stir in cream if using. (I personally think it's not needed at all- sometimes more fat muddies the flavor instead of heightening it IMHO). 9. To make Parmesan crisps, line a baking sheet with parchment. For every Parmesan crisp you'd like to make , place 1 Tablespoon of grated Parmesan cheese onto the baking sheet and pat down into a circle, leaving 2-3 inches between mounds. Bake for 3-5 minutes until golden. Remove from oven and cool completely before removing from tray (they can be a bit fragile).
10. Ladle soup into bowl and float a Parmesan crisp on top. Serve hot!  And it was good to the last drop! ; ) ♥ 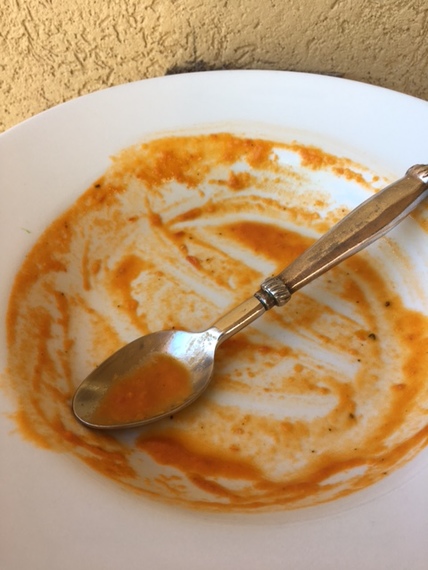 * Note: To seed the tomatoes, core them first (only needed with the larger tomatoes). Cut the tomatoes in half cross-wise. hold the tomatoes cut side down over a bowl or the sink. Give a gentle squeeze and a little shake and the seeds will fall out, not all of them, but most. Good enough.
PS: If you'd like another great fall soup recipe, please visit this link here.
0 Comments
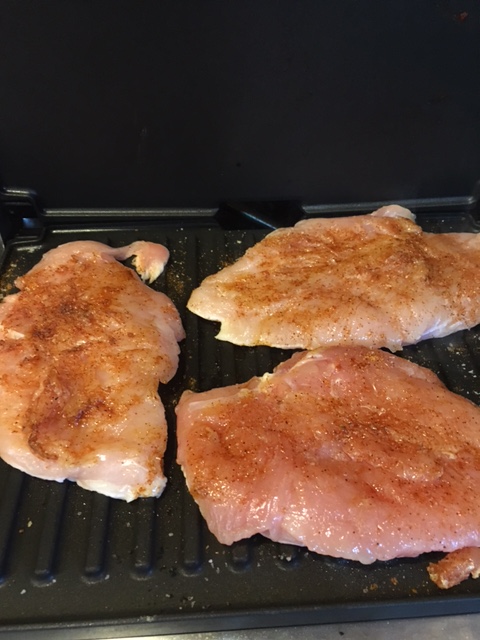
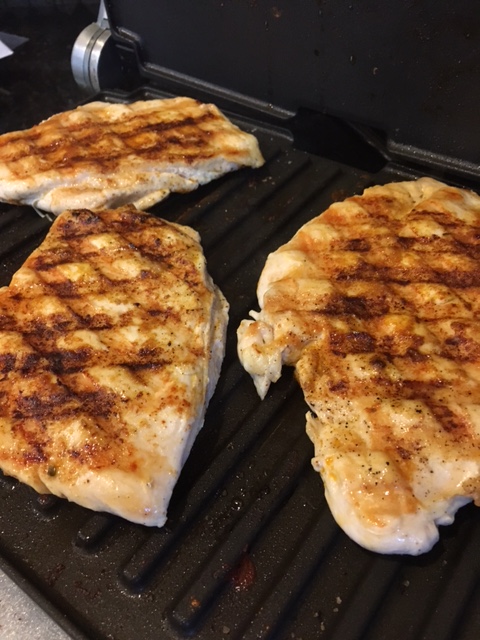
“Pull up a chair. Take a taste. Come join us. Life is so endlessly delicious.” -Ruth Reichl Just came across that quote-love it!! Don't you? So anyhow, just wanted to give you another idea how to use that Cool and Crunchy Jicama Slaw I recently featured. It makes summer meals taste better...really! We had it last night with Oven-Baked BBQ Ribs (finished off the ribs on the grill with some smoking chips). It was perfect because ribs are heavy and rich and the slaw is the complete opposite-light and fresh. Well, here is another idea, a grilled chicken tostada. If you have the slaw made already you are half-way there! If you have left-over grilled chicken from another meal, well, then you have a quick and easy meal with barely any effort! If you are starting from scratch, let me show you how! Grilled Chicken Tostada- serves 4 to 6 Jicama Slaw made with half of dressing, reserve other half 4 split chicken breasts, about 6 ounces each seasoning mix from this recipe 6" flour or crunchy corn tostada tortillas (your choice) 2 avocados, pitted and sliced cilantro leaves for garnish, optional lime wedges for serving, optional 1. Preheat grill. Prepare seasoning mix and set aside. 2.Take two sheets of plastic wrap and place chicken breasts in-between the two sheets. Pound them into an even thickness, no more than 1/2 ". 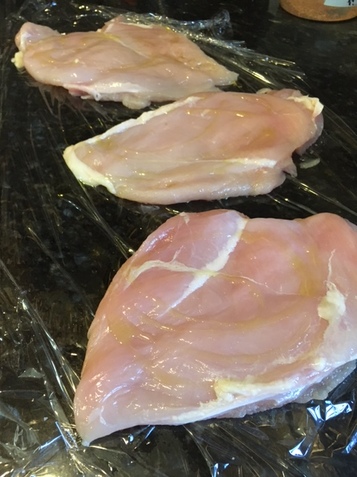 3. Season both sides of chicken with spice mixture (a generous pinch per side). 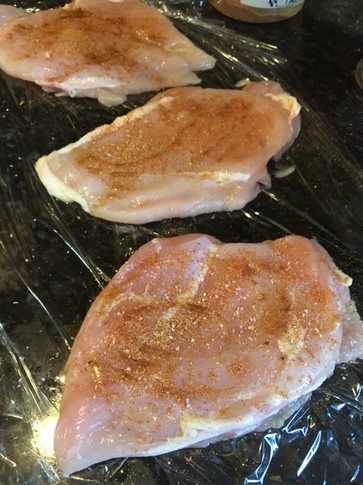 4. Place chicken on hot grill and cook, turning once, til just done, about 3-4 minutes per side. Do not over-cook. Remove from grill and let rest for 5 minutes.
5. Slice chicken in half lengthwise and then into thin strips cross-wise. 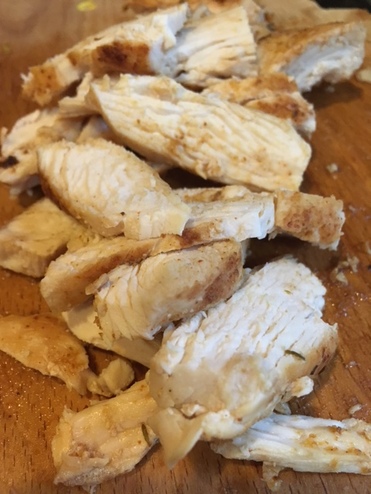 6. If using flour tortillas, grill them until browned and crisp (sorry for the way too blurry shot, but you get the idea). If using crunchy corn tostada tortillas, skip this step. 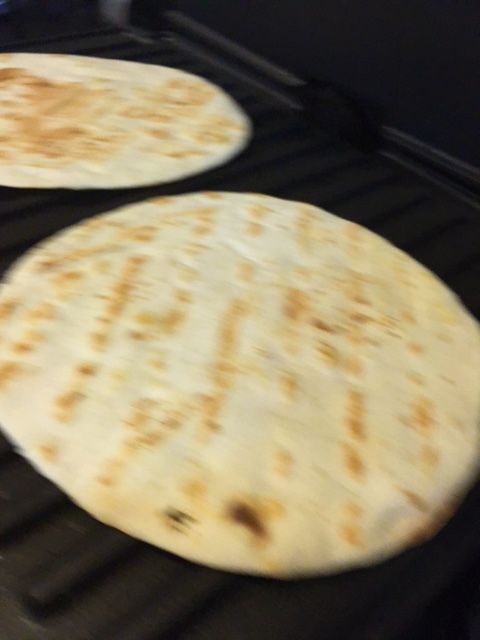 7. To assemble: on each plate, lay down a tortilla. Top with a layer of grilled chicken. Top the chicken with Cool and Crunchy Jicama Slaw, drizzle with a little extra slaw dressing, then garnish with sliced avocado , cilantro leaves and lime wedges, if desired. As they say south of the border- Buen Provecho! ♥ 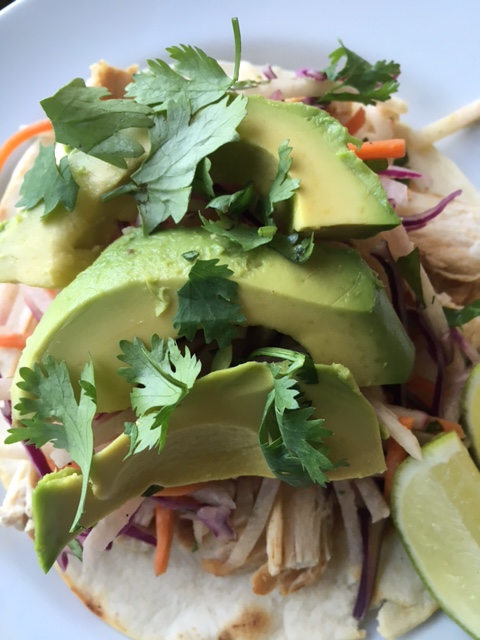 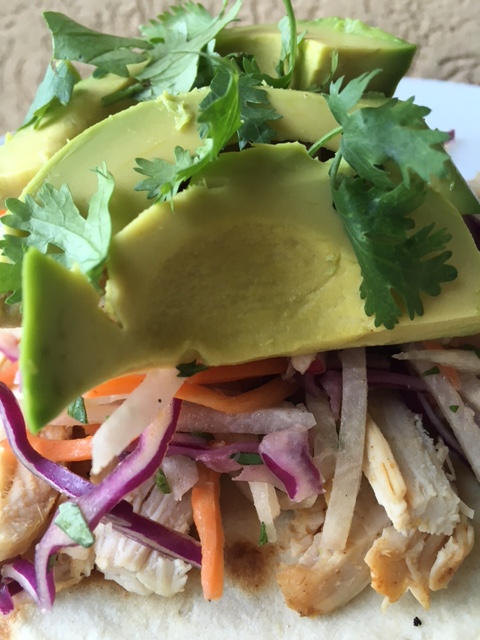 “My love is pizza shaped. Won’t you have a slice? It’s circular, so there’s enough to go around.
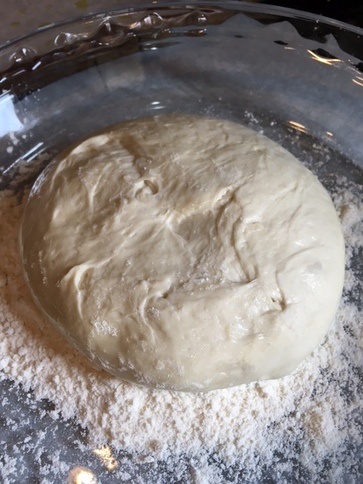
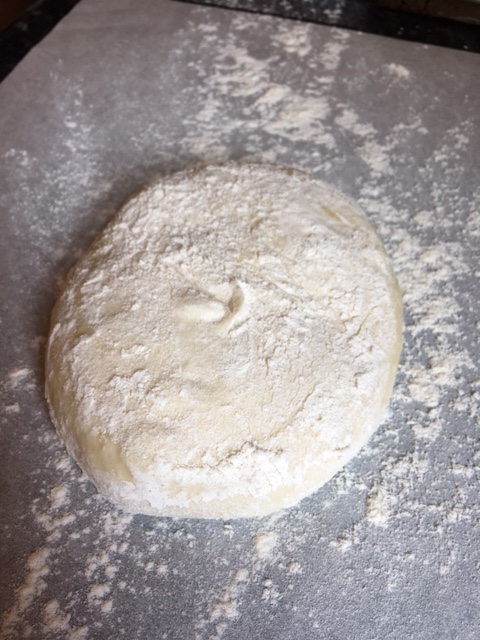
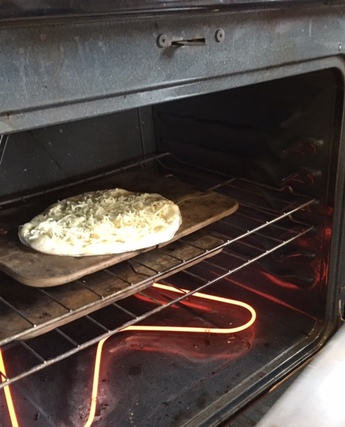
” -Dora J. Arod Last week I was back in Upstate New York where I grew up, helping my mom pack up her house of 51 years. It was at times wonderful, trying, sad and good. Maybe some of you have had a similar experience helping a parent move. I also got to see my brother, sister and their families, which was a delight for me. I don't get back there as often as I would like. One of the highlights was showing my nieces and nephew how to make homemade pizza one night as we celebrated my youngest niece's 11th birthday!. We had so much fun! They took to it like naturals, too. That got me thinking that I hadn't made pizza at home for a very long time. Now that we have a couple gluten free people in my household, we don't make it as often as we once did. So this weekend with some free time on my hands I thought I'd make one of my favorite pizzas-salad topped pizza. It is just baby mixed salad greens tossed lightly in a nice lemony vinaigrette sitting atop a sauce-less cheese pizza. It makes a wonderful lunch or light dinner It is super simple especially if you start with purchased quality dough from your favorite store, pizzeria or Italian deli. I usually make my own dough, but if I didn't plan ahead, I really like to use the fresh dough they sell at Whole Foods. Salad Topped Pizza (makes 2 -10 inch pizzas) 1 lb fresh pizza dough (purchased or homemade) sea salt coarse ground black pepper crushed red pepper flakes 2 cups shredded part-skim mozzarella 2 Tablespoons fresh grated Parmesan cheese plus more for shaving 4 cups lightly packed mixed baby salad greens or baby arugula 2 Tablespoons Extra virgin Olive Oil 2 teaspoons fresh lemon juice 1/4 teaspoon Dijon mustard 1/4 teaspoon minced fresh garlic, peeled all-purpose flour for dusting parchment paper 1. About an hour before making pizzas, place pizza stones inside oven and preheat oven to 550 degrees Farenheit (if you don't have a pizza stone, I have also had good success using inverted, heavy duty baking sheets as my "stones".). 2. Remove dough from fridge*. On a lightly floured surface, divide dough evenly into two pieces. 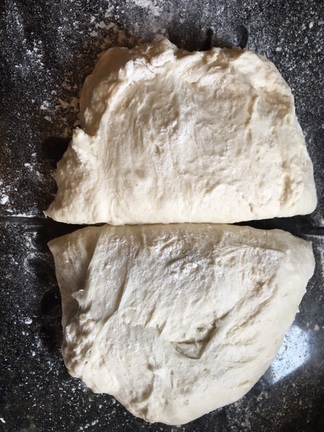 3. Take each half and fold the dough edges into the middle to make a rough ball. With the rough side down, roll the dough, using the counter as an aid, into 2 nice smooth balls. Place the balls on an oiled cookie sheet, several inches apart. Brush the tops of the dough ball with olive oil as well. Let rest on counter for about 1 hour. 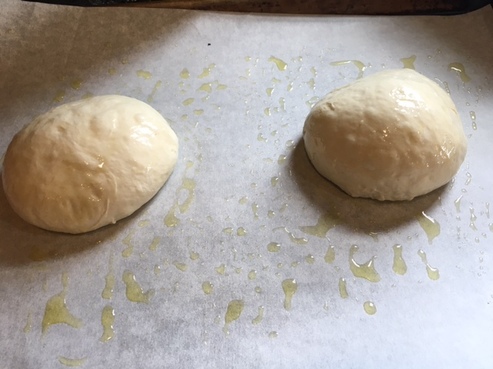 4. After an hour taking one ball of dough at a time, dip both sides of the dough ball in flour. Take a sheet of parchment, sprinkle it lightly with flour. Place the floured ball of dough on it and using your finger tips, dimple the dough.
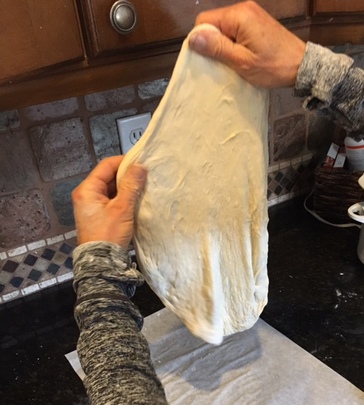
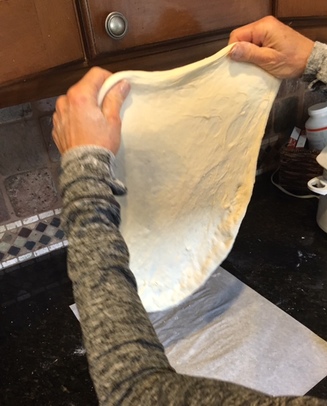
 5. Now pick up the dough with both hands (lightly floured) on the top edge of the dough. Using two hands, lift the dough in the air and letting gravity help you, spin the dough clockwise moving your hands around, until the dough has stretched out to about a 10" round. You can also keep it flat on your floured paper and stretch it by hand on the paper. I think you get a more even crust this way I demonstrate, but do what you are comfortable with. Just remember to keep your hands on the thick outer part of the dough and just allow the pull of gravity to do all the work, keeping the dough round in constant motion If your dough is really elastic. You may have to place the dough down on the floured paper and let it rest several minutes before trying again. Repeat with the other ball of dough. Also do not worry about getting a perfect round. A rustic shape is just as delicious!
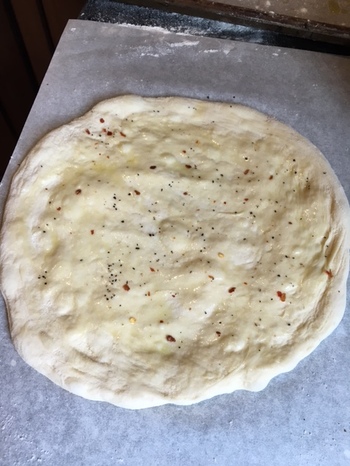
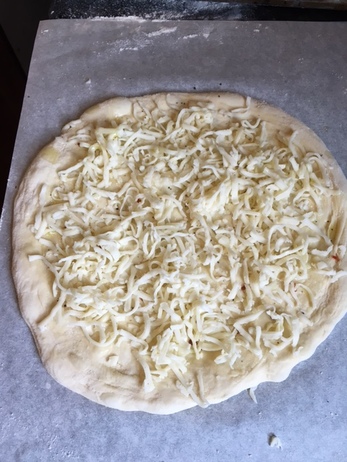
6. Once the dough has reached desired size, lay it gently back down on the floured parchment paper. 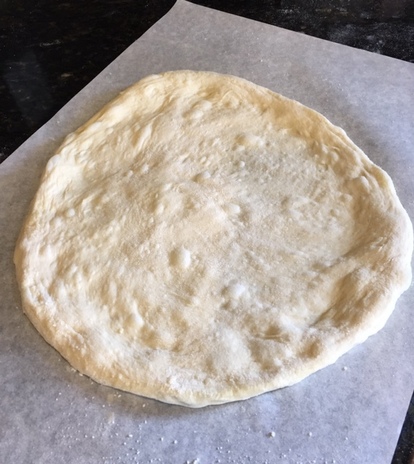 7. Lightly brush the tops with olive oil. Sprinkle each dough round lightly with a small pinch each of sea salt, black pepper and crushed red pepper. Top with mozzarella. Sprinkle each with 1 Tablespoon freshly grated Parmesan and drizzle very lightly with additional olive oil (optional).
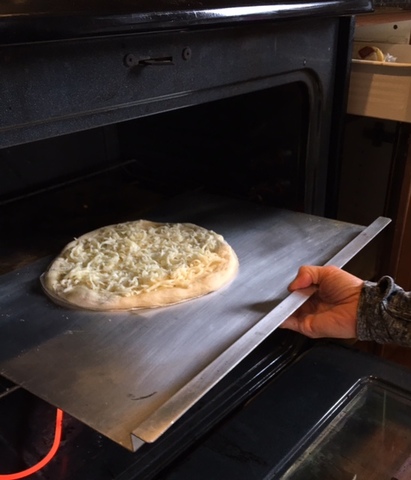
8. Trim parchment with scissors all around dough.  9. Using a pizza peel or rimless baking sheet, transfer pizzas to preheated pizza stones inside oven, parchment paper and all. This is my fool-proof "trick" for building and transferring a pizza into the oven. Works like a charm every time.
10. Let pizzas bake about 6-10 minutes. (Disclaimer: Every oven is a little different, so please check on your pizzas, rotate them as needed from top to bottom (using peel or rimless baking sheet) or rotate them around on their stone to ensure even baking. Your pizzas are done when the crust is golden and crackly, cheese is bubbly and maybe lightly browned in spots, and bottom of pizza is nicely golden. 11. While pizzas are baking whip up salad dressing: whisk together 2 Tablespoons Extra Virgin Olive Oil, lemon juice, pinch each salt and pepper, garlic and Dijon. Set aside. 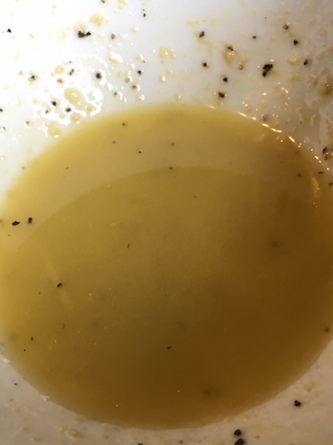 12. When done remove pizzas from oven and transfer to plates.  13. Immediately toss salad greens with dressing to taste. 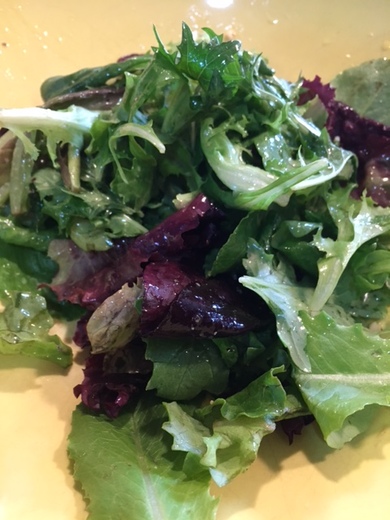 14. Once dressed, top hot pizzas with salad greens. Shave Parmesan cheese on top and serve. Dig in! 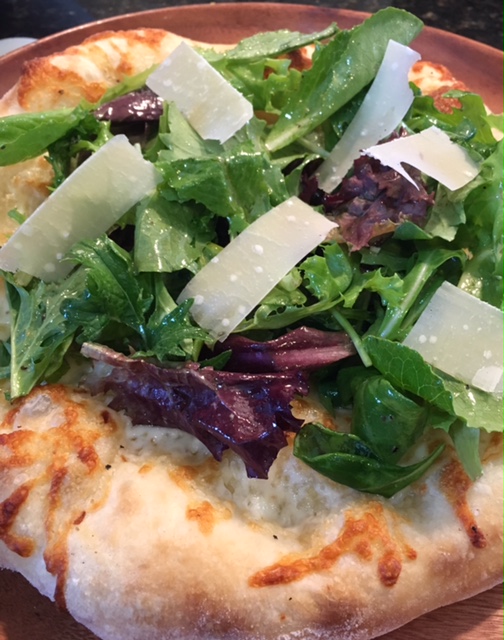 * if you are using home made dough (I have several favorites I will share with you another time) my suggestion is to let it rise slowly in refrigerator for several hours and possibly over-night to develop the best flavor. Don't punch it down, just gently divide the dough and roll into balls as instructed. The time on the counter is less about a second rise than it is about warming up the dough closer to room temp. However, if you have beat down the dough, you may need to let it sit out longer once you form into balls to allow the nice air bubbles to form again. These give the dough great character and lightness.
"I'm so glad I live in a world where there are Octobers," -Anne of Green Gables Do you love fall as much as I do? I look forward to fall all year long. There is something about the way the character of the natural light changes, the cooler weather, the beautiful colors of fall foliage, the earthy smell that just makes me happier than any other time of the year. Although I am not crazy about the dark mornings fall brings, the dark evenings make me happy to have candle-light once again which adds a certain coziness to out home. It just says welcome. And it's apple season! To a girl raised in Upstate New York where there are orchards galore, this is indeed cause for celebration. I can't wait for the local apples to appear at the farmer's market because as good as some apples are year round, ones fresh-picked have a certain quality to them that trumps all others- extra crunchy and juicy and many more varieties to choose from than I typically can find at a local supermarket. Best of all? No icky waxy finish! Fall makes me want to nest more, too. I am eager to cook stews and mostly, soups galore. I make really big batches of Bolognese and marinara sauces along with turkey chili to have on hand in the freezer for cozy cold weather meals. Now really is the most bountiful time of the year at farmer's markets, too.. There are still plenty of tomatoes and warm weather produce and the winter squash are now in. The smell of roasted chiles is always inviting at our markets, and I stock up for my freezer and then use them all year long. Recently I was smitten with some butternut squash, yellow cherry tomatoes and beautiful yellow bell peppers at my local farm stand and came up with a gorgeous soup we will happily eat all season long. Here's the recipe if you care to try it . It can be made with red tomatoes and bell peppers too, and even mushrooms, but let's just say the color won't be as appetizing! Golden Harvest Soup 1 medium butternut squash, halved and seeded (Carefully!) 1 large yellow bell pepper, halved, seeded and cut into chunks 1 medium onion, skinned and sliced into wedges 1 cup yellow cherry tomatoes (or 1/2 pint approx) 1 1/2 cups baby carrots, or carrot chunks 4- 4 0unce links, sweet italian sausages with fennel 3 cloves garlic, peeled and minced fresh thyme sprigs 1/4 teaspoon poultry seasoning 1/2 cup dry white wine 6 cups chicken stock, plus additional for thinning soup, if desired olive oil kosher salt and coarse ground black pepper Preheat oven to 425 degrees F. Brush baking sheet with olive oil. Place butternut squash, cut side down on baking sheet. Place prepared yellow bell pepper, onion, tomatoes and carrots on same baking sheet. Drizzle everything generously with olive oil, sprinkle with salt and pepper and toss gently to coat. Scatter fresh thyme sprigs on top. 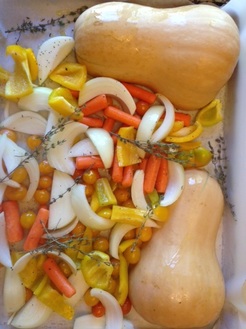 Place tray in oven on middle rack and roast for 30-40 minutes until tender and slightly caramelized. Remove from oven and let cool until squash is cool enough to handle.  Meanwhile, heat 2 tablespoons olive oil in a heavy bottomed soup or stock pot over medium heat. Once oil is hot but not smoking squeeze little balls of sausage out of the casing into the oil. Saute all the sausage in the oil until evenly browned. With slotted spoon remove sausage to paper towels to drain. 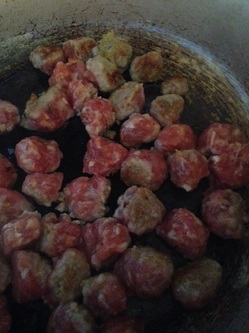 In remaining oil in pot, saute garlic gently until soft and translucent, being careful not to burn. Add in all the vegetables from tray, scooping out all the soft squash flesh with a spoon, being careful not to get any skin. Crumble thyme leaves into pot, discarding stems. Stir vegetables continuously while adding in wine. Cook, stirring until wine is evaporated. Stir in a pinch of salt and pepper , poultry seasoning and chicken stock. Bring to a boil. Reduce heat and simmer, stirring occasionally , for 20 minutes. Using an immersion blender, puree soup right in the pot until as chunky or as smooth as you would like. Add in more broth, as desired. 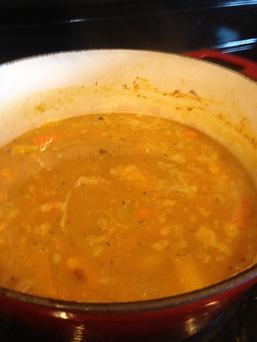 Stir in browned sausage. Simmer soup for another 20-30 minutes. Taste for seasoning and adjust to suit your taste. Serve immediately, sprinkled with a few fresh thyme leaves for garnish. Serves 4-6. Doubles easily. Freezes beautifully! 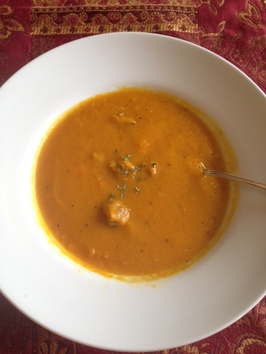 Variation: For vegetarian version, omit sausage and substitute vegetable stock for chicken stock. "Cooking well doesn't mean cooking Fancy." - Julia Child Yesterday I told you about roasting some tomatoes I bought from my local farm stand. I love to do this because they are really a versatile ingredient to have on hand. Roasting them concentrates the flavor and firms them up a bit, but not so they are leathery and chewy like a sun-dried tomato. No, these still remain supple and easy to chew. I like to snack on them out of the container, but here are a few ways to use them to jazz up other things: 1. Add them to a roasted turkey and avocado sandwich. 2. Substitute them for (or use them in addition to) fresh tomatoes in a BLT. 3. Use them as a topping on a bowl of fresh polenta sprinkled with freshly grated parmesan cheese. 4. As soon as they come out of the oven, toss with a little more Extra virgin Olive oil, some shredded fresh basil, salt and pepper and toss with freshly cooked pasta. 5. Garnish grilled chicken or firm white fish with them. 6. Make the best grilled cheese and tomato sandwich with them Ok, let's make grilled cheese! For each sandwich take two slices of good quality artisan bread. Lightly spread mayonnaise on one side and Dijon mustard on the other. Top the mayonnaise side with sliced white cheddar cheese (sharp or extra sharp) and add the Roasted tomatoes. Top with another slice of cheese and place the Dijon mustard side facing down on top of the tomatoes. Lightly butter the outsides of each side.  Preheat a frying pan or griddle to medium. Lay the sandwiches in the hot pan, and cook until golden brown. Flip sandwich and continue cooking until the second side is perfectly golden (I like to cover my pan so the cheese melts more quickly). Remove the sandwich from the heat, slice and serve. Yum!  “Home grown tomatoes, home grown tomatoes. What would life be like without homegrown tomatoes Only two things that money can't buy-That's true love and home grown tomatoes.” -John Denver, 'Home Grown Tomatoes' (written by Guy Clark) I recently discovered a little gem of a farm nearby. It is on the site of what I thought was a dairy farm. However one day I was driving by and there was a sign for chemical- free produce and fresh eggs. I had to stop! Inside they had tables stacked high with freshly picked produce, beautiful eggplants, heaps of kale, piles of summer squash and box after box of gorgeous tomatoes of all colors. I bought several pints of the small ones in every color they had. It's true that there is nothing like a home-grown tomato. The flavors are more complex and you can taste the sunshine in them. Puts a grocery store tomato to shame every time. Now that's it's late summer, they are all ripening and it's prime time to grab some. Last night I decided to roast some of the bounty, which is so easy. I washed and halved the tomatoes and lay them on a parchment -lined baking sheet. While my oven was preheating to 350 degrees, I drizzled them with extra-virgin olive oil, sprinkled them with kosher salt and topped them with fresh thyme sprigs. Then I roasted them for about 40 minutes. They keep covered in the fridge for several days and have lots of uses (that's assuming you don't just eat them right off the tray first)! 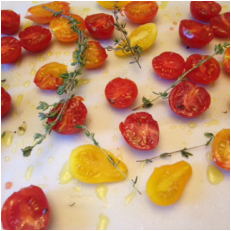 When they are done, they look like this. That caramelization is the good stuff-lots of concentrated flavor. 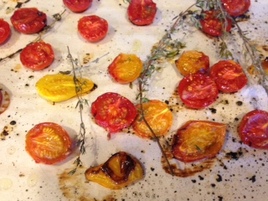 Tomorrow I'll share some ideas on how to use them in your kitchen! Bon Appetit!
|

Archives
December 2019
Categories
All
|

 RSS Feed
