|
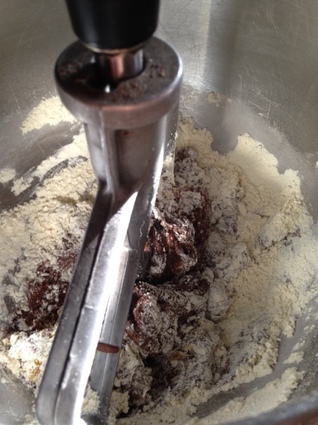
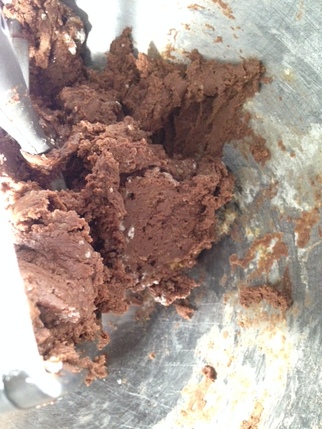
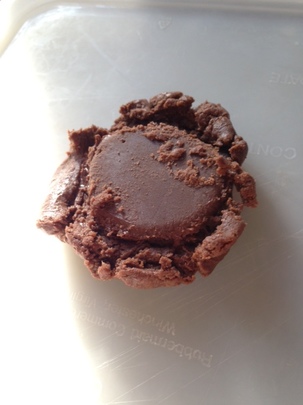
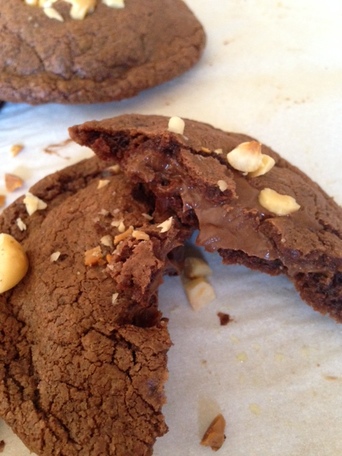
"Number one, I absolutely love making chocolate chip cookies. I mean, it's fun. It's exciting. Beyond the fact that I love making them, I love eating them." -Debbi Fields Last week I came across a video from POPSUGAR of a Mrs. Field's shop owner giving a tutorial on how to make the Mrs. Field's Chocolate Chip Cookie (I posted it on my Facebook page here). I was all ears. For just like Debbi Fields above, I am all about the cookie. If I come across a recipe that intrigues me, even though I have a tried and true one of my own, I break out the Kitchen Aid and get to down to business. Now, it has been years since I've had a freshly baked Mrs. Field's cookie. There isn't a shop near me, not even at Denver International Airport, if I am traveling. I don't think the shops are quite as widespread as they once were, but I may be mistaken. Nonetheless, at one time I was a regular customer if I was at the mall. The fresh baked goodness of a Mrs. Field's cookie was hard to resist, and I was never disappointed (but always slightly aghast at the price, as a baker myself). So eager to try the recipe, I got straight to work. Here is the result: 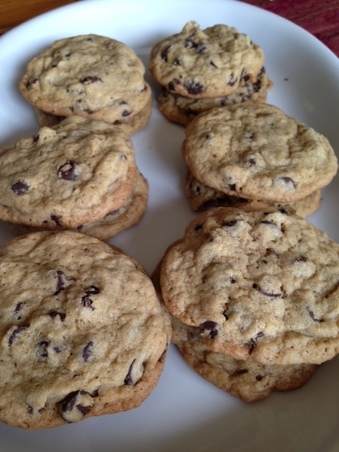 I followed the instructions exactly. They are fine looking cookies, but they do not look like Mrs. Field's cookies. They look like many versions of homemade cookies.
In examining the recipe, I noticed it is pretty much the same recipe that is on the back of the Nestle Chocolate chip bag for Tollhouse Cookies with a few tweaks. When you make that recipe with all butter, if you have ever tried it before, you usually find the cookies spread too much, resulting in a very thin cookie. This Mrs Field's recipe uses all butter. To combat the spreading, three things are done- baking soda is reduced (baking soda also promotes browning, so dark brown sugar is used in this recipe for a deeper color), more flour is added (1/4 cup more) and cold butter/refrigeration is used). Since the recipe uses a low baking temperature (300 degrees F.) to get more consistent texture throughout, spreading is also much more likely to occur, unless mitigated. Yet another reason for the recipe tweaks. So I understand the logic behind the recipe changes. The problem, besides the appearance not being even remotely like a Mrs. Field's cookie, is that the larger amount of flour called for gave the cookies a pronounced starchy-floury taste that I found very unpalatable. The recipe is "authentic". Again you can find it here along with the accompanying video. I don't think they intentionally mislead the viewing public necessarily. Perhaps in scaling back the recipe for the home cook the proportions got upended a bit. For me this recipe is not worth repeating. I have a couple really delicious chocolate chip cookie recipes I can't wait to share with you down the road, I promise. In the meantime, if you try the Mrs. Field's recipe, please report back with your results. I'd be curious to know your thoughts.
4 Comments
“The best meals are those prepared by loving hands.” - Ken Poirot It's mid-week, and things are busy in your house. Am I right? Or maybe you had a busy day at work or school and you don't really feel much like cooking, but still want to put a nourishing meal on the table with minimal effort. With a few pantry items and some leftover chicken, you can do just that! A week ago or so, we had leftover rotisserie chicken and in the back of my mind I thought that Chicken Burrito Bowls would be an easy and delicious way to use that up. It ended up being a big hit with my husband and daughter, and it was super easy.The beauty of it is you can totally customize it to your taste (be sure to check out some variations at the bottom of the post). Here is how I went about it. Chicken Burrito Bowls- serves 4 4 cups cooked and seasoned seasoned brown rice* 4 cups diced left-over roast chicken, reheated gently in the microwave 1/2 cup frozen corn kernels, thawed 3/4 cups black beans, rinsed and drained Your favorite prepared tomato-based salsa Low-Sodium Chicken broth 1 teaspoon taco seasoning** 1 cup shredded cheese (Cheddar, Colby-Jack, Jalapeno-Jack, ) diced avocado -optional chopped fresh cilantro-optional diced fresh tomato-optional sliced olives-optional sour cream-optional guacamole-optional sliced geen onions-optional hot sauce-optional 1. Cook rice according to package directions, substituting salsa for one fourth of the liquid called for and using chicken broth in place of remaining amount of water called for. 2. When rice is done, stir in corn, black beans and 1 tablespoon chopped cilantro (optional). Remove pot from burner and keep covered until ready to use.. 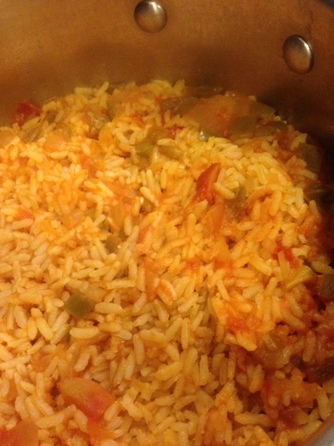 3. Sprinkle diced chicken with taco seasoning; stir to evenly distribute. 4. Into each of the 4 bowls, place 1 cup of the rice. Make a well in the middle of the rice. Into the well place the chicken. 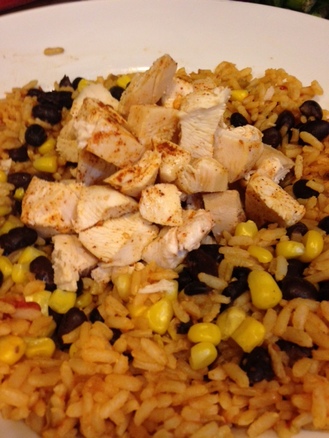 5. Drizzle about 1/4 cup of your prepared salsa on top of chicken then sprinkle each bowl with cheese
6. If desired microwave bowls to melt cheese (or if bowls are oven-proof, feel free to place them under broiler to melt). Top with your favorite garnishes as listed above. Serve with a nice green salad and some fresh fruit.  Variations: Shrimp burrito bowl- Saute 1 pound thawed, peeled and de-veined shrimp tossed with 2-3 teaspoons of taco seasoning in a skillet with 2 tablespoons of olive or coconut oil just until opaque. Squeeze the juice of 1/2 lime over the top. Toss to coat. Substitute for chicken.
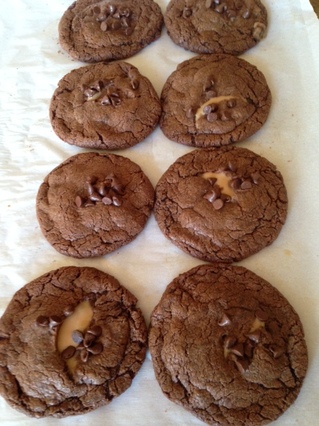
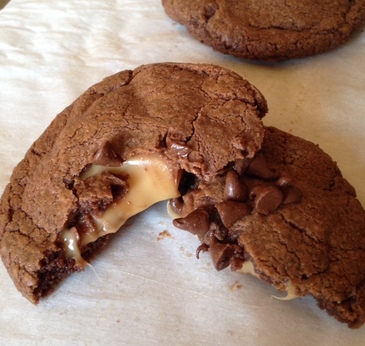
Beef Burrito Bowl: cook 1 pound of ground beef in skillet until browned. Stir in 3 tablespoons taco seasoning (or to taste) and 1 cup of water (if using store bought seasoning, follow package directions). Simmer, stirring until water is evaporated and meat is thoroughly seasoned, about 10-15 minutes, adding more water as needed. Taste and adjust seasoning accordingly. Substitute for chicken. Re-fried Beans: Add 1/2 cup of re-fried beans that have been heated to the bottom of the bowl before adding in chicken.Season if desired with taco seasoning. Or for vegetarian option, use re-fried beans in place of meat; substitute vegetable broth for chicken broth in rice. * Different brands may call for different liquid to rice ratios, so be sure to follow the instructions for cooking rice on the package you are using. You want it to yield 4 cups cooked, approximately. ** Taco seasoning: I make my own, but you can use store bought, if you prefer. 1 Tablespoon chili powder 2 teaspoons onion powder 1 1/4 teaspoons ground cumin 1 teaspoon garlic powder 1 teaspoon paprika 1 teaspoon dried oregano 1/2 teaspoon sea salt Place all ingredients in a bowl. Whisk or stir together well to evenly combine. Recipe can be easily doubled or tripled. Store any leftovers in an airtight container for future use. Stir before using. "You can't make everyone happy. You aren't a jar of Nutella." - unknown It's hard to find anyone who doesn't seem to like Nutella, that European chocolate-hazelnut spread. It was popular in Europe long before it came here and it has really taken the US by storm. Now grocer shelves are lined with the real deal and plenty of knock-offs, too. Have you noticed? Recently, I was going through my Facebook feed and came across a post from King Arthur Flour company for a cookie that turned out to be a prize-winner in their office (imagine the competition there). It looked so good I thought I should try it. They call them Nutella Sea Salt Stuffies, and you can find the recipe here. I adapted it just a tiny bit and made a second variation which was even more well-received by my family. They reported back that the ratio of crispy to fudgy/chewy was better with the caramel filled version.Try both and see what you think. The recipe is super simple and requires just a few ingredients. So grab everything you need and let's get baking! Stuffed Nutella Cookies For the filling: 1/2 cup (5 1/2 ounces) Nutella For the Dough: 1 cup (10 1/2 ounces ) Nutella 1 cup (4 1/2 ounces) all-purpose flour* 1 large egg 1/4 teaspoon instant espresso powder 1/4 teaspoon sea salt 1/4 cup Hazelnuts, toasted and skinned, chopped fine 1. For the filling: Scoop out 2 teaspoons of Nutella into 12 mounds on a tray lined with plastic or parchment and freeze until firm, a few hours or over-night 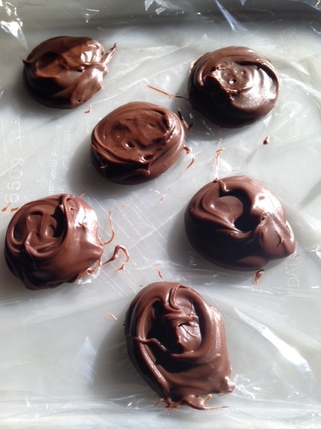 2. For the dough: Preheat your oven to 350 Degrees F. In a stand mixer or by hand, mix together the remaining 1 cup of Nutella, flour, sea salt, egg and espresso powder. Mix until a cohesive dough is formed.
3. Scoop out heaping tablespoons of dough and wrap the dough around a mound of Nutella. Enclosing it completely. Place the dough bundles on parchment-Lined cookie sheet, about 2" apart, and sprinkle each with the chopped hazelnuts. Pat down lightly on the nuts to adhere.
4. Bake cookies in preheated oven for 8- 10 minutes. Allow to cool completely. Take a bite!
Variation: Chocolate-Caramel Filled Nutella Cookies 1. Use the same dough as above. Substitute Caramel filled chocolate , such as Rolos, or Cadbury caramel filled chocolate squares for the Nutella filling 2. Form the cookies the same way, patting down on the dough so they aren't completely ball shaped before baking. 3. Sprinkle the tops of the cookies with mini chocolate chips. 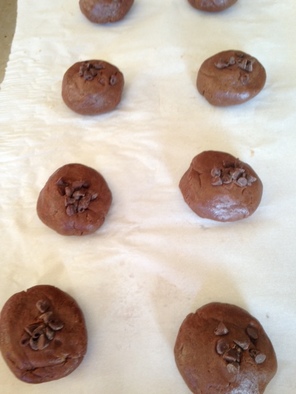 4. Bake as directed above. 5. Swoon with delight when you bite into one. ♥
* I used Einkorn flour for my gluten sensitive daughter. You can find out more about Einkorn here.
"Only the pure in heart can make good soup."- Ludwig Van Beethoven I have been cold all winter, and even though today was fairly mild where I live, it seemed like a soup kind of day. I am temporarily eating a raw, vegan diet though so I had to warm myself up with herbal tea while my family got to enjoy a steaming hot bowl of Creamy Broccoli Soup (it was hard to resist and it smelled so good). I make it a little different than a lot of others. I use chicken broth for some of the milk, which I think gives it more flavor, and I likes specks of carrot in it for color interest. You can always use all milk, if you prefer (just do not let it boil rapidly to prevent any curdling). It's deeply satisfying and tummy warming for sure. Creamy Broccoli Soup 2 cups diced onions 1/4 cup unsalted butter or coconut oil 1/4 cup, slightly rounded (I used Einkorn flour, but you can use regular all-purpose flour) pinch freshly grated nutmeg 1/2 teaspoon kosher salt 1/4 teaspoon coarse ground pepper 1 1/2 cups milk 1 quart (4 cups) chicken broth, homemade or store bought (low sodium) plus additional for thinning soup, if needed 1/4 cups finely minced carrots 1 lb. broccoli florets, frozen and thawed or fresh and finely chopped Shredded cheese to taste 1. In a heavy bottomed soup pan, heat oil over medium heat. When hot, but not smoking, stir in onions. Cook, stirring occasionally until wilted and translucent. 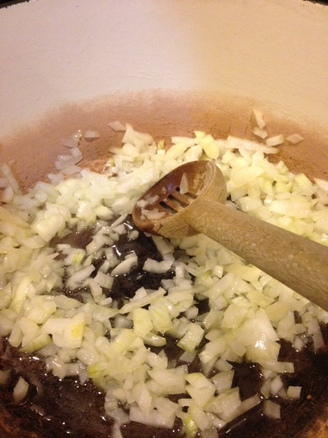 2. Sprinkle onions with flour, stirring constantly. Continue to cook and stir for 3 minutes. 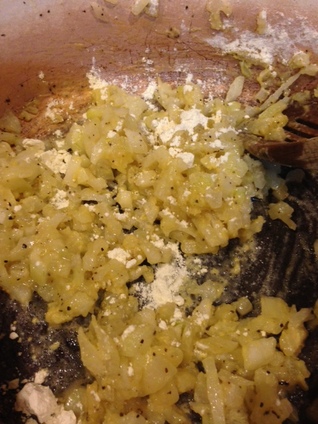 3. Season with salt, pepper and nutmeg. Stir in milk and cook, stirring, until mixture thickens. 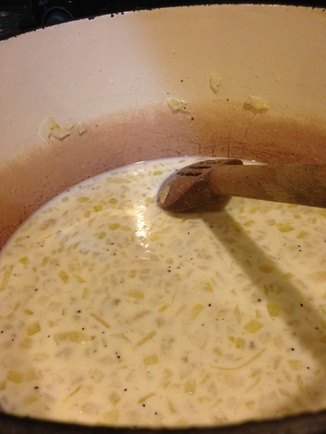 4. Pour in chicken broth and cook, stirring occasionally, until thickened again. Thin as desired with additional broth. 5. Stir in broccoli and carrots. 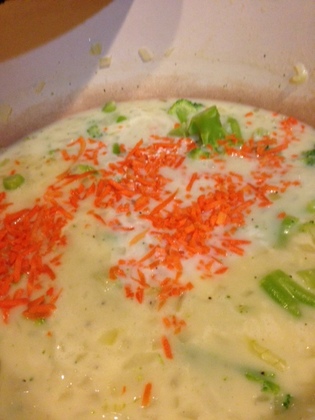 6. Bring soup to a low boil, stirring occasionally. Reduce to simmer and cook, covered, for 30-40 minutes until broccoli is tender. 7. Using an immersion blender, carefully puree soup to desired consistency. If you like it a little chunky, great. If you want it perfectly smooth, have it your way! Taste for seasoning and adjust accordingly. 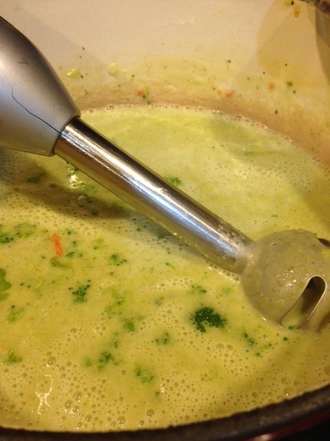 8. Serve it immediately, topped with shredded cheese. Freshly grated cheddar would be my first choice, but I was all out tonight. I apologize for the poor photo image below. The light in my kitchen is not so good for photos at night The broccoli soup is more vibrant looking than this picture suggests. You just have to trust me! ♥ 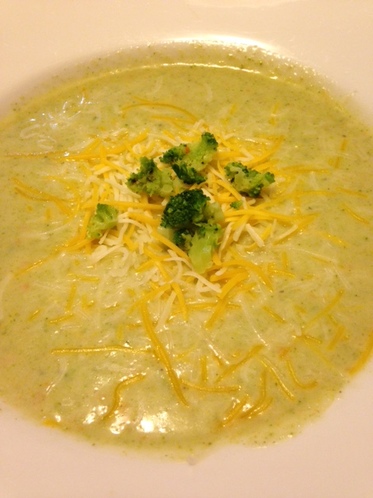 Eat 'em up!
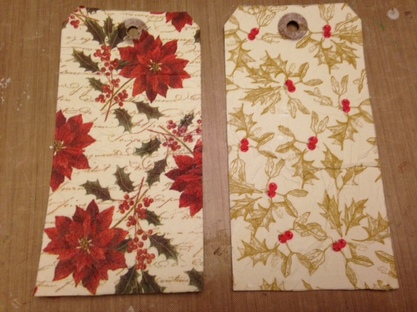
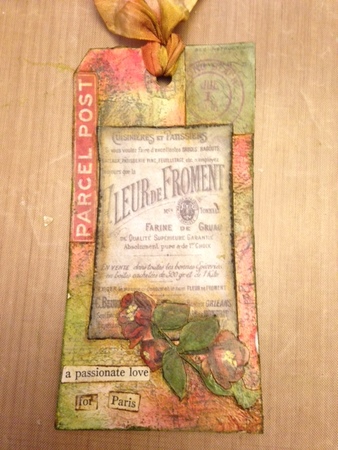
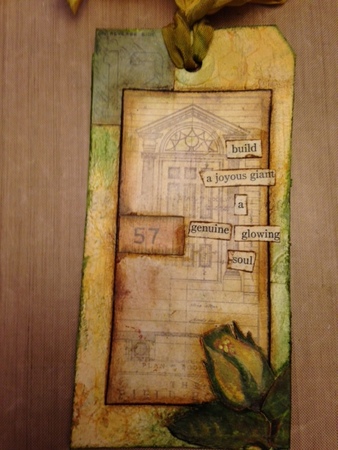
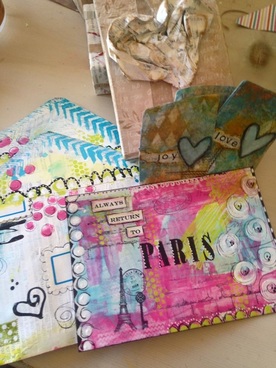
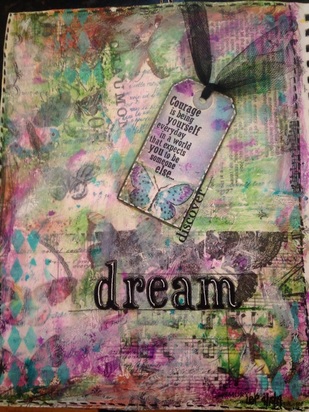
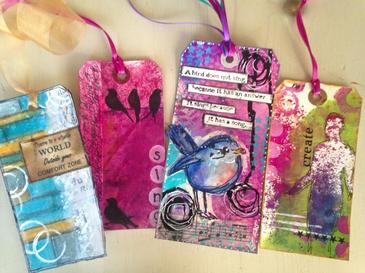
“Art enables us to find ourselves and lose ourselves at the same time.” -Thomas Merton, No Man is an Island Yesterday I shared a little background into my art journey. I had actually intended just to blog about this tag project, but before I knew it, the post was something else entirely. Thus, today's post is all about the tags, my latest art project. In my search for art instruction I actually came across a lot of tag art done by others. For me a tag seemed like a safe canvas. They are neither too big nor too expensive to worry about. If a tag doesn't turn out to my liking, I've lost really nothing. For me a tag became just a fun little experiment to try. Why mixed media? As the name implies, one can use all manner of supplies or found objects to create a piece of art. I love mixed media because it removes to pressure of having to know how to paint or draw something realistically if at all. Mixed media usually has lots of yummy layers of things that come together to create the finished project, and I love all that textural goodness. One day this past year, around the holiday season, I found myself at Cost Plus World Market. On my way to the check-out counter, I spied two packages of purse sized tissues. I bought them specifically for art. I went home and immediately opened them and separated out the sheets so I had just the one thin layer of the ply with the print on it, making it sort of like tissue paper. Using Mod Podge or Gel Medium, I adhered each print to a plain white shipping tag.
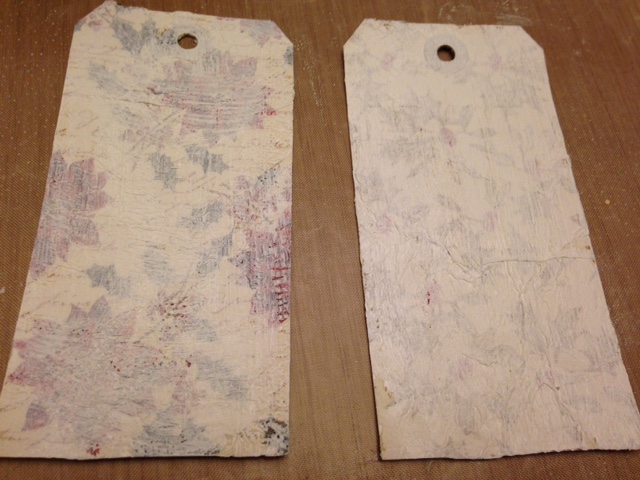
Once the tags were dry, I trimmed the excess tissue off and covered each tag with a thin layer of gesso.
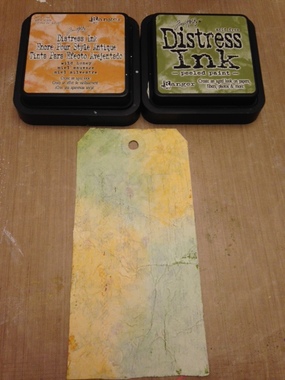
Once the gesso was dry, and several weeks had passed (I just got inspirationally stuck here for a while-it happens!) I used Distress Ink and other inks, to add some color.
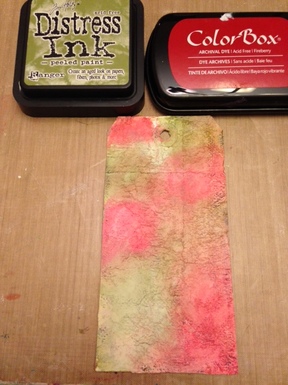
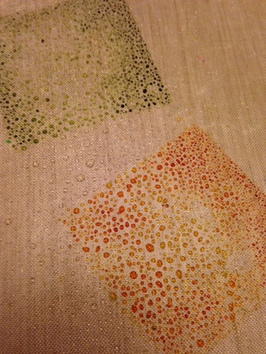
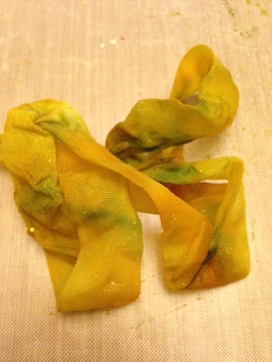
I then stamped on the tags using Archival inks and rubber stamps with texture and script for added interest. Then I distressed the sides of the tag with this paper distresser tool by Tim Holz. Using Archival ink I went around the edges of the tag to give it more definition. 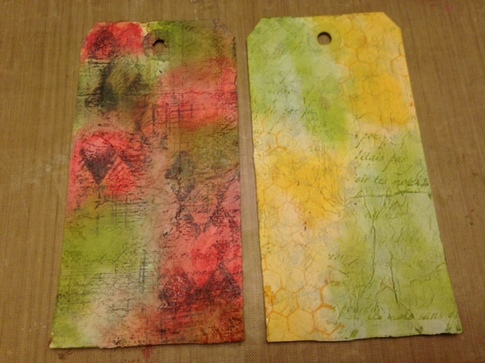 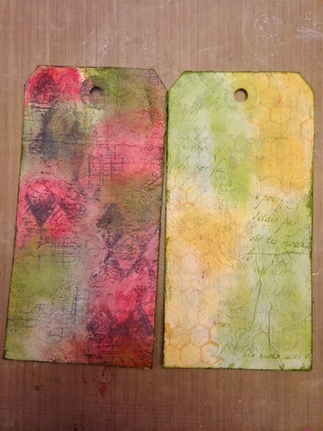 I then gathered some collage items (in this case, scrapbook papers) to decorate each tag with. I again distressed the edges of the focal point on each tag and inked the edges as well. I played around with placement until finally settling on what you see here. I used Mod Podge or gel medium to adhere the pieces in place. 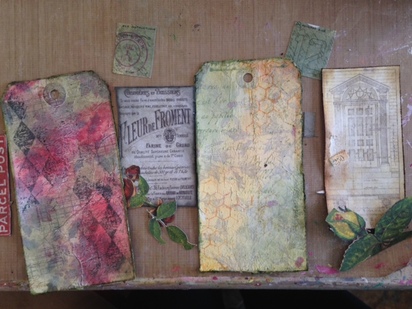 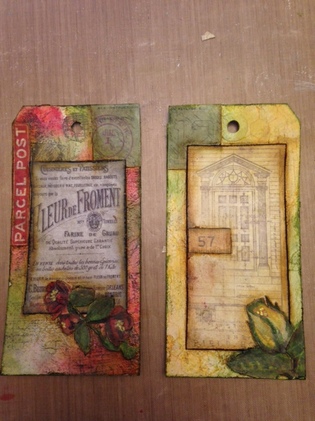 While the mod poge was drying, I worked on the ribbons of each tag, using Tim Holz Crinkle Ribbon . After cutting the ribbon to the desired length, I stamped two different colors of Distress ink onto my craft mat. spritzed them with water and randomly scrunched the ribbon into the inks to dye them.
I repeated the process for the red and green tag using red and green distress inks. I dried the ribbon with my heat tool before adding them to my tag. Red and green kinda make brown, so my red is a little muted . but I still like it. 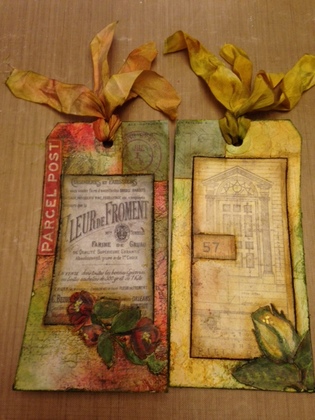 Lastly I flipped through some old books until I found some words to add text to my tags to personalize them and give them a little more meaning to me. You could also type out and print any phrases or words you want.
Overall I am quite pleased with the final results. The fun part is seeing where the inspiration took me, as I started out with no plan whatsoever. I find it fascinating how something comes together seemingly on its own and I am always grateful for that. If you play with art supplies, what kinds of things do you enjoy creating?
all artwork by me, Lynda Byrnes-Copyright 2016. "Practicing an art, no matter how well or badly, is a way to make your soul grow, for heaven's sake." - Kurt Vonnegut, A Man Without a Country Just about two years ago to the day, I began, or more accurately, resumed, my art journey. As a kid I loved to do arts and crafts. I sewed, knitted, did embroidery, but most of all I liked to draw. All I needed was some paper and pencils for that. I remember one Christmas my parents gave me a tackle/art box with real art pencils and paper and a book on drawing. It really meant a lot to me. I never took art classes, fearing I wasn't "good enough" and therefore afraid to get a bad grade. Ah, if I knew then what I know now, I'd have certainly done things differently. As I became older, though I continued to draw here and there, my creative pursuits took me into the kitchen. There cooking and mostly baking, became my creative focus and outlet. I relished my culinary explorations. At one point along the way I took an introductory watercolor class and a drawing class in a local adult ed program. I really enjoyed both, but the demands of working and raising kids didn't leave me much time to practice, so it again went away. Then about 2 years ago I was diagnosed with some auto-immune conditions and told to eliminate dairy, sugar, soy, gluten....pretty much all the yummy stuff. I quickly realized that it would be difficult for me to prepare those foods and not want to gobble them up. So in the interest of my health (a work in progress), I decided I needed some other creative outlet in my life outside of the kitchen. So I decided to go down the art road. I googled art classes in my area and could find nothing. Or I'd find something only to find out it lead nowhere. In my searching I discovered lots of artists not in my area who had on-line presences. People like Dina Wakely, Donna Downey, Stephanie Ackerman, Junelle Jacobsen, TIm Holz, CeeCee and so many others. I began searching YouTube videos for any and all art tutorials, especially in mixed media. Along the way I happened upon an art journaling project that was free called Journal 52. I started that sometime in January 2014. I was really (and I mean REALLY) hesitant in my creating, again afraid to really suck at it, afraid I wouldn't measure up to the other artists out there (and believe me there are some amazingly talented people out there making it all look very effortless). Although I never completed even close to 52 entries, I did what I could and tried new things all over the place. I am still and will forever be learning, a perpetual student. I see I am growing and improving (that is when I am not making something that still looks like a 5 year old's work). Most and best of all, it is exactly what I want to be doing creatively. It fills a void in me that traditional cooking and baking used to occupy, and it isn't bad for my health in any way. When I start working on a project, I completely lose myself in it. Time stand stills and I am connected to something greater than myself. It's heaven. If you have ever felt the urge to get messy with art supplies and create something, I would encourage you with my whole heart to just start. Tomorrow I will post a little mixed media tag tutorial of sorts. In the meantime here are just a few samples of work completed by me in the last 2 years.
all artwork by me, Lynda Byrnes- copyright 2016.
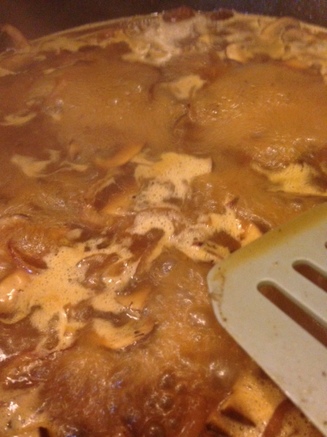
"Bistro cooking is good, traditional food, earnestly made and honestly displayed..." -David Liederman, NY restaurateur Happy New Year to one and all! I hope 2016 has been kind and full of grace for all of you as it begins. So far so good in our camp, thank goodness. 2015 was a rough one, so I am really striving for a bit more (ok, actually a LOT more) smooth sailing this year (fingers crossed, but more importantly, action being taken). My son is home from college for just a couple more days. This break went far too fast for my liking (insert sad face here). I started developing this next recipe with him in mind, but really all of us, except me to be honest, are die-hard beef lovers. My first attempt was very good, but not quite right, so I tweaked it a bit and finally came up with what I think is the perfect steak burger. It tastes just like steak, but at a fraction of the cost for 4 servings, as the ground up steak is combined with lean ground beef. What takes it to the next level is serving it like steak with a pan sauce reduction including sauteed mushrooms and shallots. We still serve it with fries though to keep that casual bistro vibe going. Let me know how you like it! Bistro Steak Burger- makes 4 1 lb rib-eye steak, ground (ask your butcher-will yield slightly less than one pound ground) 1 1/4 lbs. lean (90%) ground beef 8 ounces cremini mushrooms, sliced 1/2 cup sliced shallots 2 tablespoons apple cider vinegar or red wine 1 1/4 cups beef broth, low-sodium 2 heaping tablespoons beef demi glace (optional)* 2 tablespoons freshly minced Italian parsley leaves Kosher salt and coarse ground black pepper 1. Combine ground steak and ground beef in a medium sized bowl. Gently mix the two until well combined. Try not to compress it as you mix. 2. Gently form into 4 large patties (of course you can make them smaller and get more burgers out of it, adjust cooking time accordingly). With your index finger, poke a hole through the middle of each burger (this will help them retain thier shape while cooking). Season both sides liberally with salt and pepper.  3. In a heavy bottomed or cast iron skillet, heat 2 tablespoons coconut oil over medium heat until oil is sizzling but not smoking. Carefully place burgers into skillet. 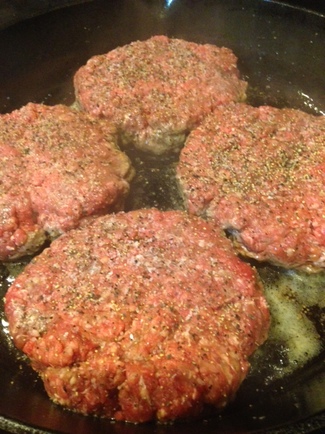 4. Cook burgers about 4-6 minutes per side, depending on level of doneness desired, turning once (an instant read thermometer would be best for most accuracy).We like our burgers medium. I don't recommend cooking these to well done for best results. 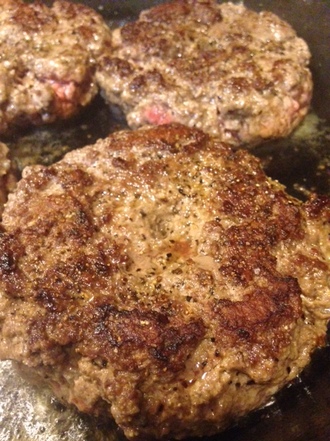 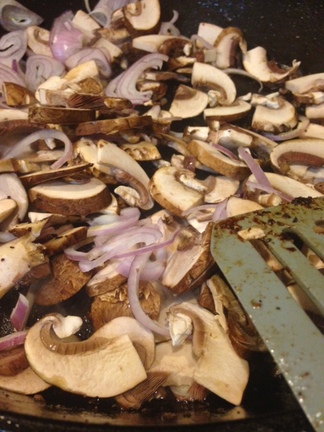 7. Saute the mushroom and shallots with a pinch of salt and pepper until wilted, stirring often. Add in the vinegar or wine and cook until nearly evaporated, stirring, being sure to scrape up any of the browned bits on the bottom of the skillet. 8. Pour in the broth and stir in the demi-glace. Bring to a boil. Continue to cook until sauce is reduced and slightly thickened, about 3-5 minutes. Taste for seasoning and adjust as needed.
9. Plate the burgers, spooning desired amount of pan sauce over the top. Sprinkles each with fresh parsley and serve immediately. 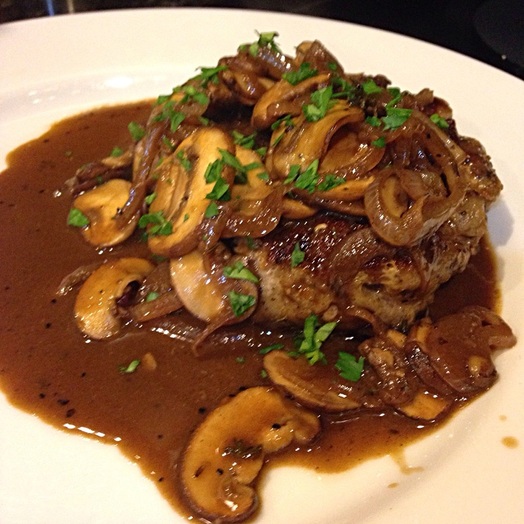 * Demi-Glace is a pricey ingredient but it lends a world of flavor that can't really be imitated any other way. You can order it on-line or perhaps your local gourmet grocer carries it. I have also found it frozen in the meat department at Whole Foods and scoop out what I need straight from the freezer. You can then use any left-over demi-glace for other pan sauces, stews or braises to add tons of flavor. |

Archives
December 2019
Categories
All
|


 RSS Feed
