|
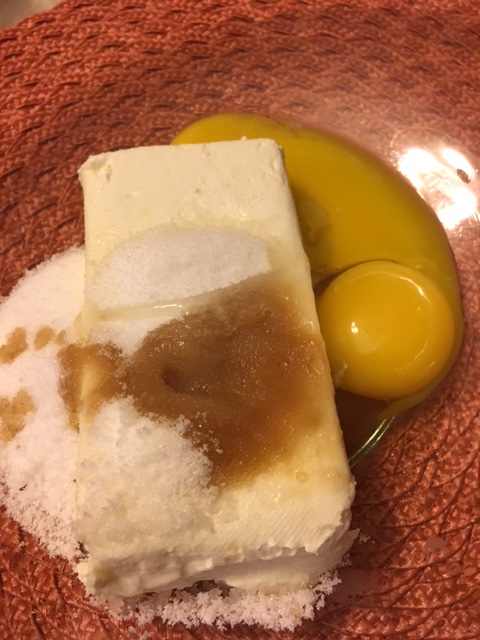
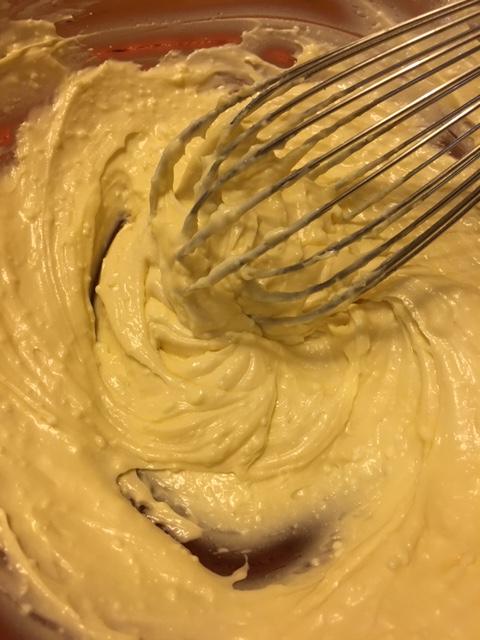
"The only way cheese is dessert is when it is followed by the word cake. " -Michele Gorman, Single in the City It's hard to argue with that kind of logic, Michele! So I hope you are not quite sick of all the sweet posts of late. I promise something savory is on the way, and just in time for Thanksgiving, too! But for now, how about a pan of Cheesecake Swirl Brownies? In fact, any chocoholics on your Thanksgiving guest list will really thank you for thinking of them by having a plate of these for dessert (as opposed to some sweetened vegetable pie- really now). So to start off with you need to make these brownies. I have never tried the cream cheese version with the almond flour version, so can't attest to the results, but the all-purpose or gluten free flour version will definitely work. Once you get the brownie batter in the pan, then get to work on the cheesecake part. Have all the ingredients at room temperature so it will come together quickly. Cheesecake Swirl Batter -enough to swirl through 1-9x13" pan of brownies 8 ounces cream cheese, preferably Kraft Philadelphia brand 1/4 cup granulated sugar 2 egg yolks 3/4 teaspoon pure vanilla extract 1. Combine all ingredients in a bowl with a whisk. Beat until smooth-ish.
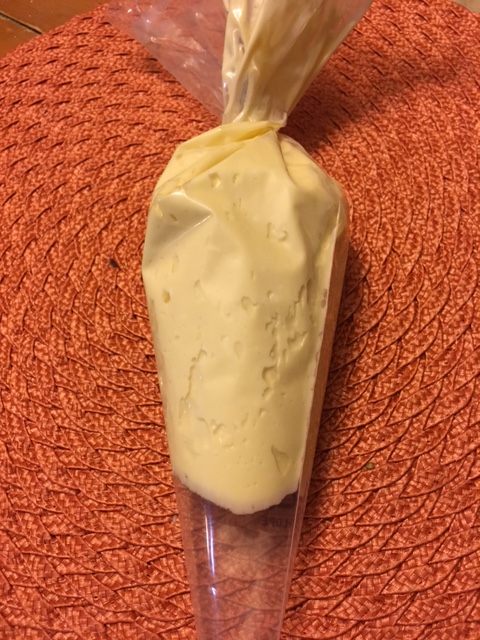
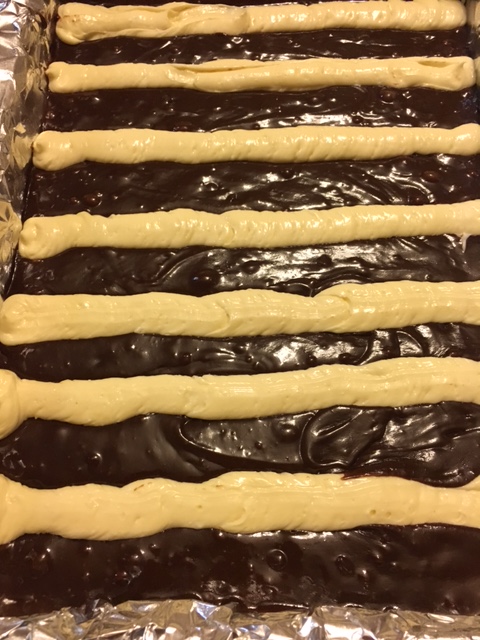
2. Transfer cream cheese mixture to a piping bag or a gallon ziploc bag. Twist to close or seal. Cut off about 1/2 inch at the tip or corner. 3. Inserting tip of bag slightly into brownie batter, pipe evenly spaced rows of cream cheese mixture horizontally across short edge of the pan.
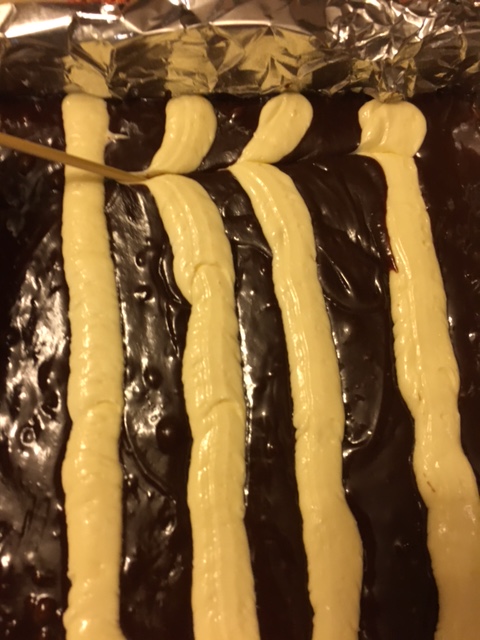
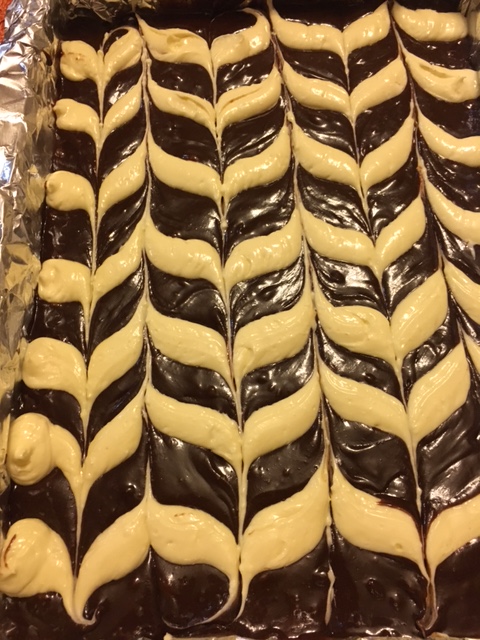
4. Using a toothpick, wooden skewer or tip of a very thin bladed knife, draw the tip through the rows in one direction and then in the alternate direction and so on until a beautiful chevron design is throughout batter.
5. Bake in a preheated 325 degree F oven for approximately 40-50 minutes until brownie is done (moist crumbs are on toothpick inserted in center (do not over-bake).. 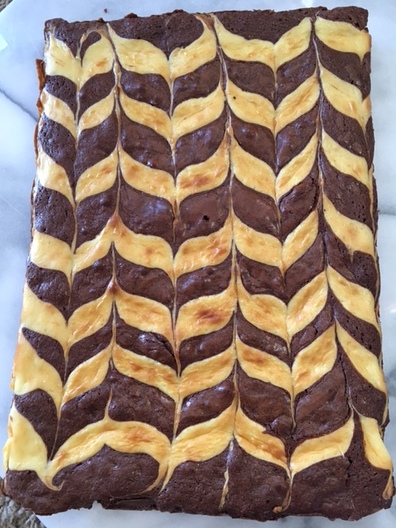 6. Let cool completely before cutting into squares. Store in airtight container in refrigerator for up to a week. 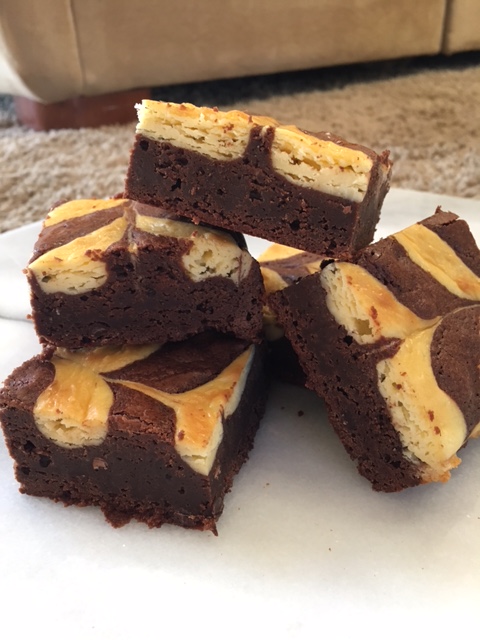  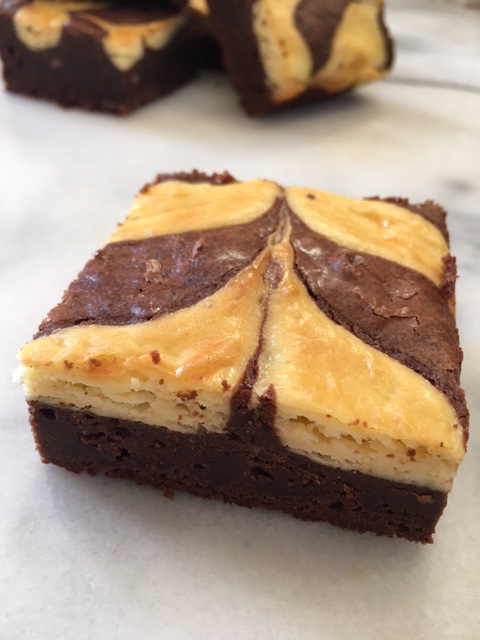 Happy baking! Be sure to share! ; ) ♥
0 Comments
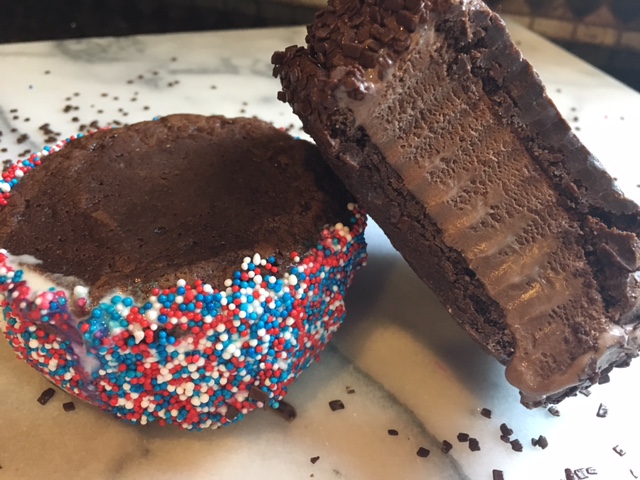
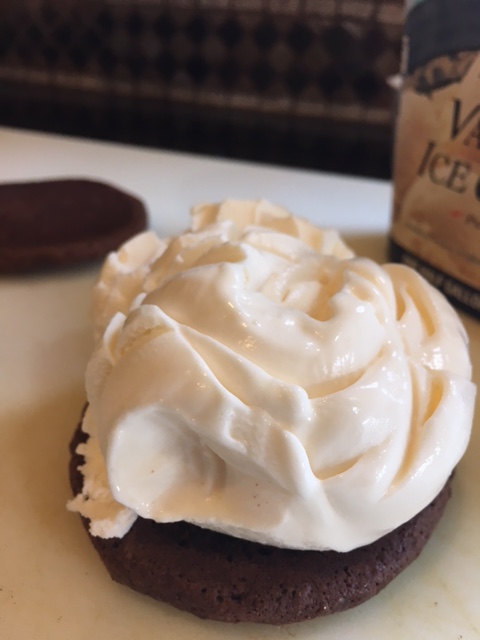
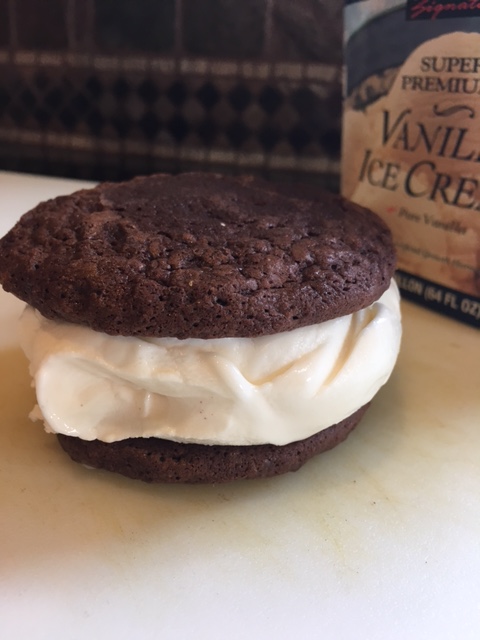
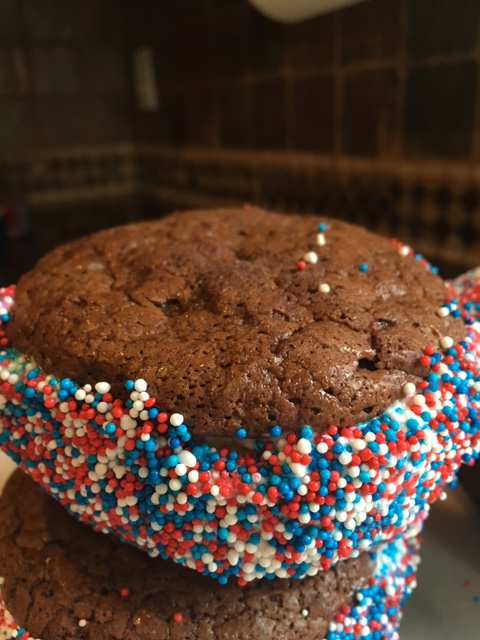
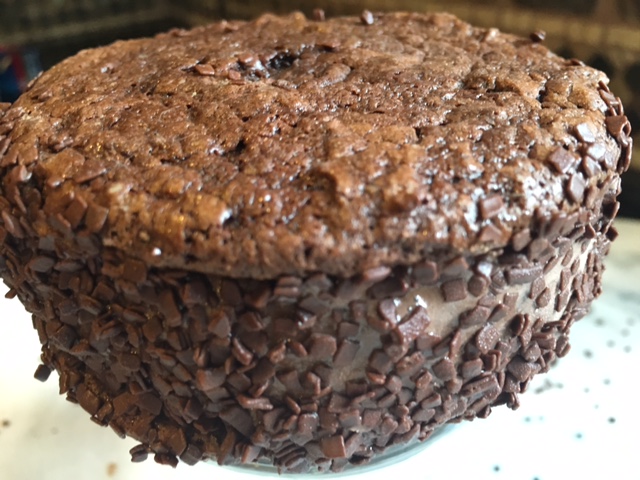
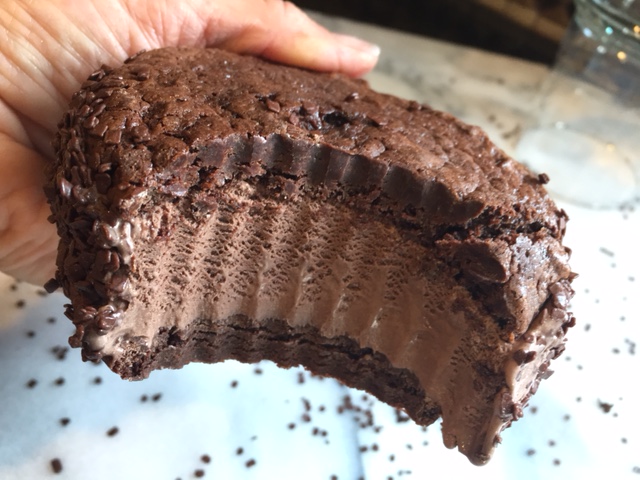
"It is always sad when someone leaves home, unless they are simply going around the corner and will return in a few minutes with ice-cream sandwiches. " Lemony Snicket Ice cream sandwiches...I remember so fondly eating them up as a kid with the soft cakey-cookie outside and the meltingly delicious inside. The only problem is that they weren't actually all that good. Ah, nostalgia! Lol! The idea of them, however, is very good. And they are not so hard to improve upon. I start with a flourless (and therefore gluten free...bonus!) brownie cookie and sandwich premium ice cream in-between two cookies. Roll them in sprinkles and you are good to go. The brownie cookie is a good base for almost all of the flavors you could imagine- from plain vanilla to everything but the kitchen sink (maybe not so great with an apple pie flavored ice cream, but you get the idea- peanut butter, coffee, cookie dough, strawberry, butter pecan, mint chocolate chip....) The brownie cookie stays somewhat soft even when frozen so it makes eating pretty easy. These are pretty big so you might want to split yours with someone special. You can make them any size just watch the baking time in the cookies if you go smaller. As for the decorations, finely chopped nuts, sprinkles or non-pareils, finely crushed candies.... use your imagination for endless combinations. Great project to make with the kids, too, so why not get the whole family involved! Brownie Ice Cream Sandwiches-makes approx 14-16 3" cookies, enough for 7-8 sandwiches 12 ounces 70% bittersweet chocolate, choppped 4 ounces (1 stick) unsalted butter, cubed 3 extra large eggs 1/8 tsp. instant espresso powder 1 1/2 tsp vanilla 1 cup granulated sugar (7 ounces) 3 ounces almond flour 1/2 tsp baking powder 1/4 tsp kosher salt approx 1/2 gallon your favorite ice cream(s), slightly softened sprinkles, nuts or other garnishes for the sides, optional 1. Combine the almond flour, baking powder and salt. Set aside. 2.In the top of a double boiler or in the microwave gently melt the chocolate and butter together. Once melted, stir to combine and set aside for a few minutes to cool slightly. 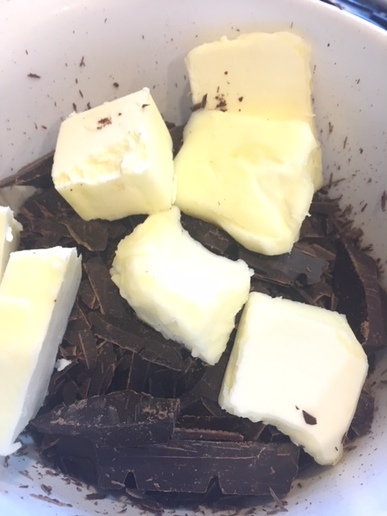 3. Using an electric mixer with the whisk attachment on medium speed, beat the eggs, sugar, vanilla and espresso powder until increased in volume and lighter in color, about 2-3 minutes. 4. Reduce speed to low and drizzle in chocolate. Combine well.
5. On low speed stir in almond flour mixture, until just combined. Remove bowl from mixer and cover with plastic wrap. let set on counter for 45 minutes or refrigerate for up to 30 minutes to firm up a bit. 6. Preheat oven to 350 degrees F. Line two baking sheets with parchment paper; set aside. 7. When ready, using an ice cream scoop that holds approximately 1/4 cup, scoop dough onto parchment lined baking sheets about 3 inches apart. Pat dough down slightly using moistened fingertips.  8. Bake for 10-12 minutes until just set and tops no longer appear wet. Remove from oven and cool on baking sheet. Once cool transfer to freezer for 30 minutes (can be made up to a week in advance, store airtight in freezer for longer storage). Repeat with any remaining dough. 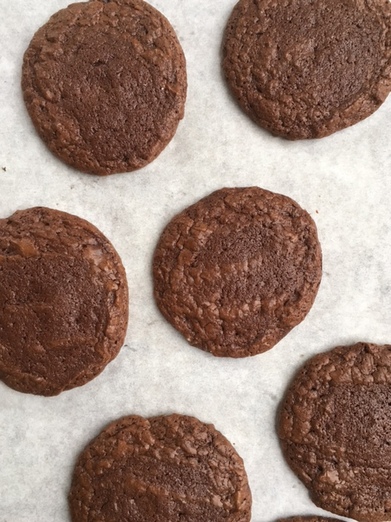 9. When ready to assemble sandwiches, place any sprinkles or other garnish in shallow bowls or pie plates. Remove ice cream from freezer to allow it to soften slightly. Place a parchment -lined baking tray in your freezer. 10. Working with a pair of cookies at a time, scoop a generous amount of ice cream onto the base (Flat side) of the cookie. Top with the second cookie, pressing down slightly to push ice cream to the edge of the cookie.
11. With a small off-set spatula, smooth edges of ice cream, sandwich (Working quickly). Roll edges in desired garnishes (sprinkles here) and immediately place on tray in freezer. 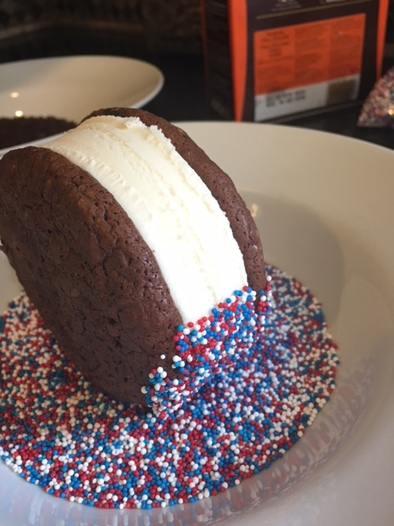 12. Repeat with remaining cookies, until all have been filled and garnished, if desired.  13. Serve immediately or wrap individually in wax paper or plastic wrap and store air-tight in a freezer bag in the freezer for up to a week or two. 14. Share! : )
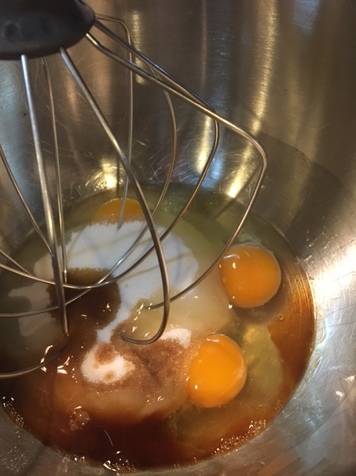
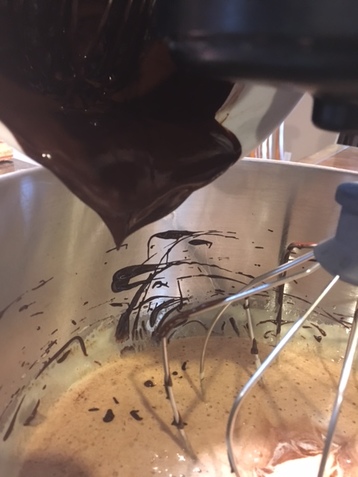
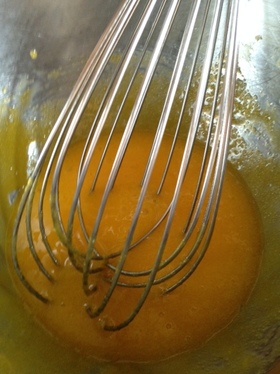
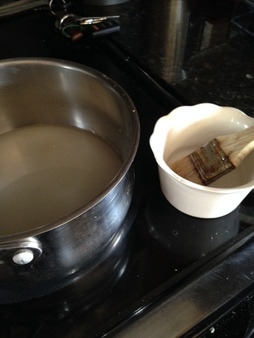
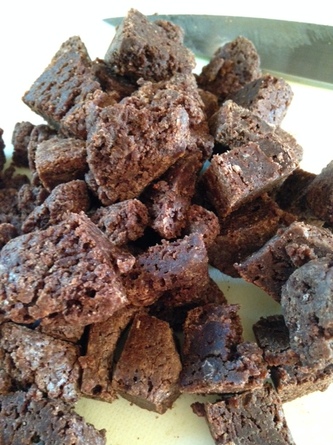
 “And when all of the flourless chocolate cakes & chocolate mousse or ganache cakes have come and gone, there will still be nothing like a fudgy brownie, dry & crackled on top, moist & dense within, with a glass of cold milk.” -Richard Sax Did you try the brownies I featured last week (recipe here)? Well, if not, I bet today's post is going to have you running to preheat the oven! This recipe for Caramel Brownie Parfaits is so good! This recipe is a family favorite and we tend to make them for lots of our special occasion and holiday meals because they are, well, um... caramel and chocolatey , like together! There are a few steps, but all of them are quite simple. Also a little waiting is involved, so plan to start the recipe about 24 hours ahead, especially if you also need to make the brownies. In fact, this is a great make ahead dessert.. The caramel sauce can be made up to a week ahead, store in the refrigerator. The brownies can be made up to 3 days ahead, store tightly wrapped in the refrigerator. Make the caramel cream 24 hours in advance. Assemble parfaits up to 24 hours ahead of serving. Got your game plan ready? The recipe makes about 6 , depending on the size glass you use. They would also be so, so darling (and less caloric) made in little mini portions for a crowd. Whatever size you choose to make them, these creamy, fudgy, gooey parfaits will have you licking the spoons and the inside of the glass for every last bit! So let's get started, shall we? Caramel Brownie Parfaits 3 cups (approximately) of cubed (about 1/2") pre-made brownies 4 large egg yolks 1 1/2 Tablespoons corn starch 3/4 cup plus 10 Tablespoons granulated sugar, divided 3/4 cups milk, divided 1 1/2 cups plus 2/3 cup heavy cream, divided 2 teaspoons pure vanilla extract, divided 1 small pinch sea salt 1 tablespoon unsalted butter 1. Make Caramel Cream: In a medium sized bowl, whisk egg yolks well. While whisking, sprinkle in 3 Tablespoons granulated sugar. Combine well. Whisk in cornstarch and lastly, whisk in 1/4 cup milk; set aside. 2. In a 1 1/2- quart saucepan, combine 7 Tablespoons granulated sugar and 2 Tablespoons water.
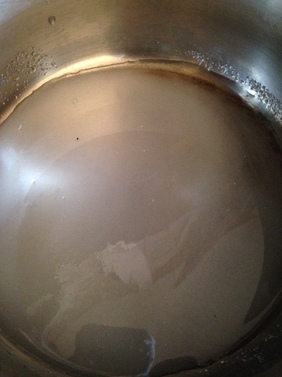
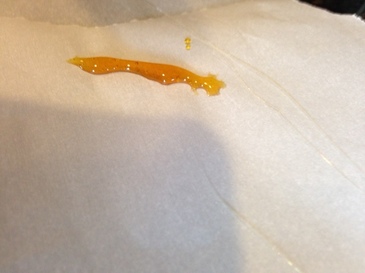
3. Cook sugar mixture over medium to medium heat, stirring. STOP stirring as soon as mixture begins to boil. Before mixture comes to a boil, brush down sides of pan occasionally with a wet pastry brush. Continue cooking sugar, swirling pan gently as needed to cook evenly, until mixture is a medium dark amber color.
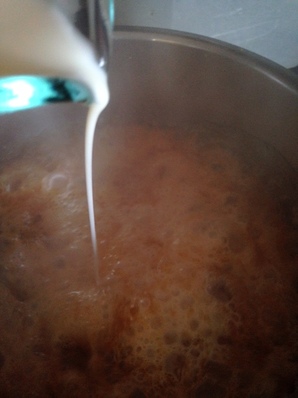
4. Once desired color is achieved, remove pan from heat and immediately yet carefully pour in 1/2 cup of milk. Mixture is extremely hot and will rise up and sputter- exercise the utmost caution here. 5 Return pan to heat and cook over medium-low heat, whisking continuously until caramel is melted and mixture is smooth. 6. Temper reserved egg yolk mixture by pouring about 1/3 of the hot milk-caramelized sugar mixture into egg yolks, while whisking constantly (you don't want scrambled eggs here). Return egg-milk mixture to pan and cook, over medium heat, stirring constantly with a heat proof rubber spatula, until mixture has come to a boil. Cook for 1 more minute, stirring constantly. 7. Immediately strain mixture through a fine sieve into a clean heatproof bowl to remove any lumps then stir in 1 teaspoon vanilla. 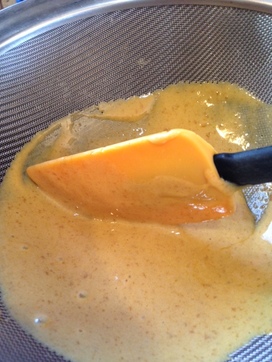 8. Cover mixture directly on the surface with plastic wrap, poking a hole in to allow steam to escape. Refrigerate until very cold at least 1 hour or up to 24 hours. 9. Make Caramel Sauce: in 1 1/2 qt sauce pan, combine 3/4 cups granulated sugar with 3 Tablespoons water. Combine well. As with caramel cream recipe, cook sugar over medium to medium-high heat, stirring, until mixture comes to a boil (brush down sides occasionally with wet pastry brush). 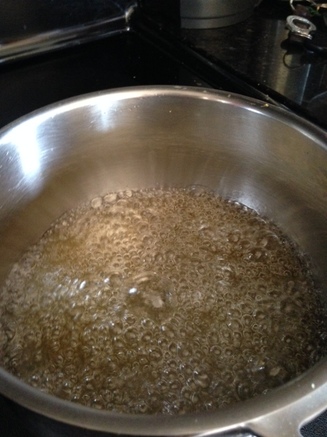 10. Once mixture comes to a boil, STOP stirring. Continue to cook, swirling pan occasionally as need to cook evenly, until mixture comes to that same medium-dark amber color mentioned above.  11. Remove from heat and very carefully pour in 2/3 cup heavy cream (mixture is extremely hot and will sputter-exercise extreme caution).
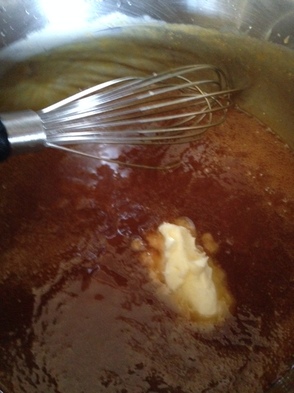
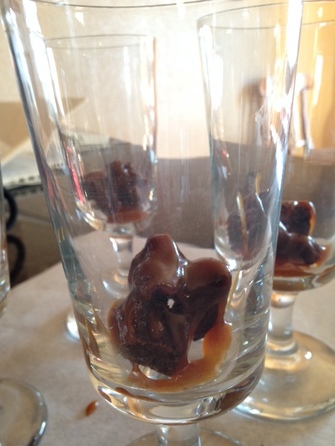
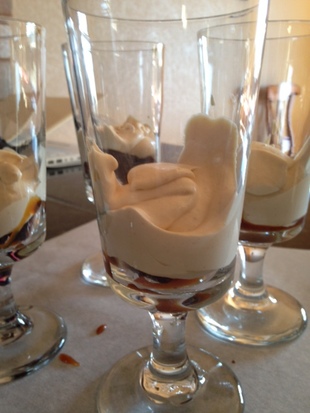
12. Return to heat and cook over medium-low heat until caramelized sugar has melted and mixture is smooth. Remove from heat and transfer to a heat-proof bowl or pitcher. Stir in butter, small pinch of sea salt and 1 teaspoon vanilla. Combine well. Allow to cool at room temperature, then cover and store in the refrigerator until needed. 13. Assemble Parfaits: Remove caramel cream from refrigerator. In a mixing bowl, beat 1 1/2 cups heavy cream with a hand held mixer until medium peaks form. 14. Whisk about 1/3 of cream into chilled caramel cream base, Fold remaining whipped cream into caramel cream; set aside.  15. Remove caramel sauce from refrigerator. Gradually and gently liquefy it at 15-20 second intervals in the microwave on defrost just to a drizzling consistency (you don't really want to heat it it as otherwise the hot caramel will melt your caramel cream. 16. Cut your brownies into cubes, if you have not done so already. Place 3 brownie cubes and 2 -3 teaspoons of caramel sauce in the bottom of each glass (adjust accordingly if you chose to make mini versions).
17. Top with approx. 1/4 cup of caramel cream. Continuing layering brownies, caramel sauce and cream, ending with brownie cubes and caramel sauce as shown.If not serving immediately, cover with plastic wrap and store in the refrigerator.
18. When ready to serve, top with whipped cream, chocolate sprinkles and a small brownie cube, if desired. 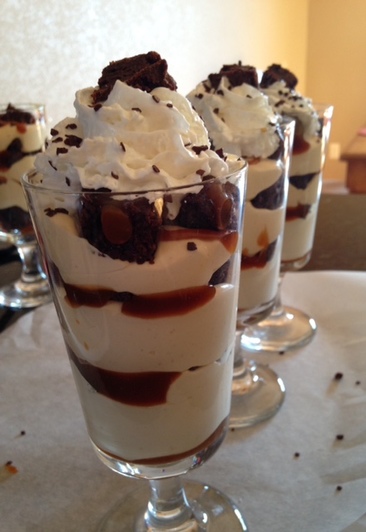 19. Dig in! Store any leftovers in the refrigerator for up to 2 days. 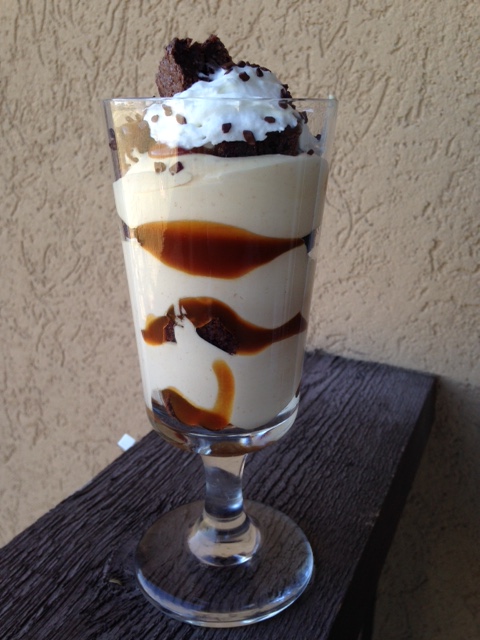 Note: this parfait would also be great with a little added crunch. Try layering toasted chopped pecans or these praline pecans (divine!!) in the brownie layer. Feel free to leave a comment if you try this recipe. I'd love to hear your thoughts!
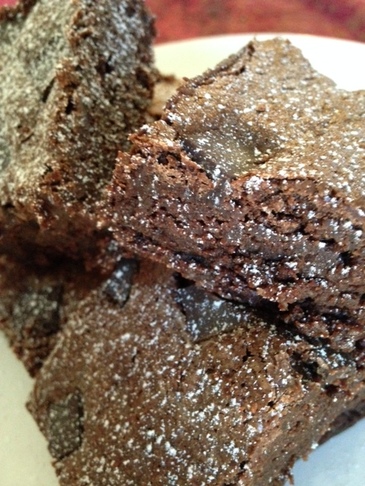
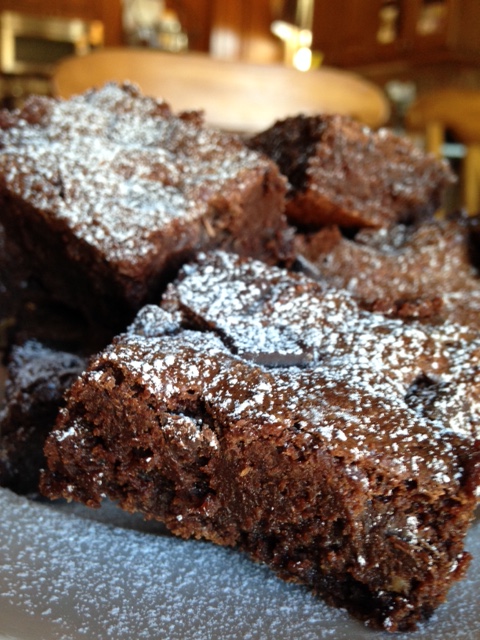
Happy creating! ♥ “There is nothing better than a friend, unless it is a friend with chocolate.” -Linda Grayson I am so all about the chocolate, always have been. I grew up in a home where not everything was chocolate (dad always wanted cherry pie for his birthday for example), but it actually seemed like it was. I was out of college before I even knew what a snickerdoodle was (chocolate chip cookies and brownies in rotation were our most common desserts). Now I enjoy lots of different flavors but chocolate remains my true love. I've been working on my chocolate chip cookie and brownie recipes for quite some time. Up until recently I was pretty happy with my current recipes. Then my daughter was diagnosed with gluten sensitivity, and I was also advised to stay clear of gluten as I try to resolve some auto-immune issues. Personally I am not a huge fan of gluten-free baked goods. I find the taste starchy and off-putting. For some reason I find the gluten free flours bother my tummy a bit, too. I have used Bob 's Red Mill 1 to 1 Gluten Free baking flour with really great results, but again, the taste is just not what I am looking for. It's just my personal experience. You may feel differently, and it's all good. So when I started thinking about gluten free brownies, the thought crossed my mind to make them in the style of flourless chocolate cakes, some of which use ground almonds in place of flour to add structure. So I did just that, and not only are they wonderful, I believe they are now my favorite brownie ever! The chocolate flavor is more vibrant than the version with all -purpose flour (which is an awesome brownie anyhow). So unless you are allergic to nuts, these grain free, gluten free (and decadently fudgey) brownies make one hell of a dessert! If you are allergic to nuts, don't worry, I tell you how much all purpose flour to use if you want to make them the traditional way, and you will NOT be disappointed!. Coming on Monday I'll be sharing an amazing dessert to use the brownies in-so stay tuned! It's a 2 for 1! Best Ever Fudge Brownies- makes 1- 9x13" pan 1 1/2 cups plus 1 Tablespoon almond flour (or you can use 1 1/3 cups all-purpose or 1:1 Gluten Free flour or Einkorn flour, if you prefer) 1/2 teaspoon baking powder 1 teaspoon kosher salt 1/8 teaspoon instant espresso powder 4 ounces unsweetened chocolate, chopped 8 ounces bittersweet chocolate, chopped 2 1/2 sticks (10 ounces) unsalted butter, cubed 2 1/2 cups granulated sugar 4 teaspoons pure vanilla extract 6 large eggs, room temperature 2-3 Tbsp whole milk or heavy cream (optional) 1 cup of chocolate chips or chunks (optional) Powdered sugar for dusting (optional) 1. Preheat oven to 325 degrees F. Line a 9x13" baking pan with aluminum foil. Spray with non-stick cooking spray; set aside. 2. With a whisk combine almond flour (OR all-purpose OR gluten-free flour, as you wish), baking powder, salt and espresso powder in a medium bowl; set aside. 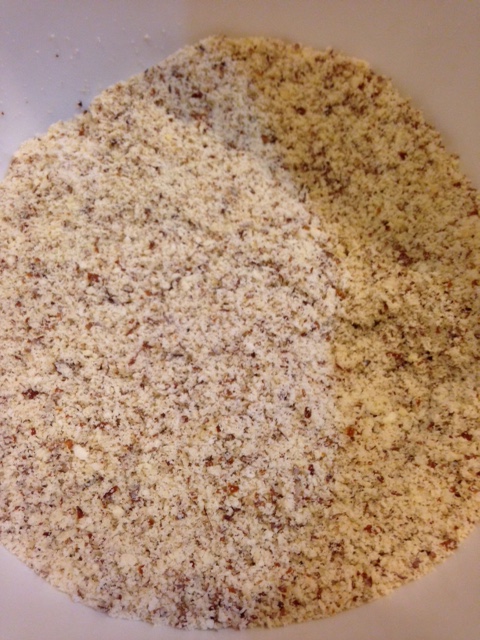 3. In a microwave safe bowl, combine the butter, unsweetened and bittersweet chocolates. Gently melt the chocolate-butter mixture in the microwave, at 1 minute intervals until completely melted and smooth. 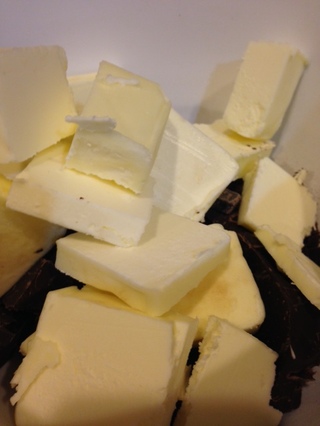 4. Whisk in the sugar until very well combined. Whisk in eggs, 2 at a time, and vanilla. Whisk until smooth. 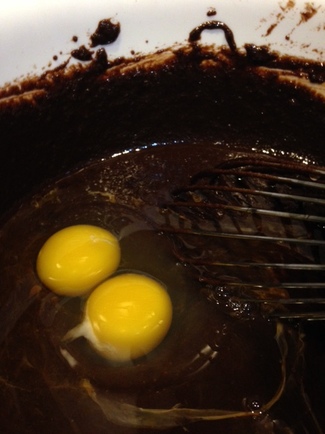 5. With a spatula or wooden spoon, stir in the almond flour mixture (or whatever flour you chose). 6. Dump brownie batter into prepared pan, smooth top to level it out . I like to lightly brush the top with milk or cream to keep it soft (totally optional). Sprinkle chocolate chips or chunks evenly on top if using. 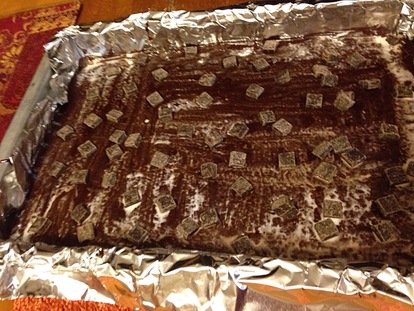 7. Bake the brownies on the center rack of the preheated oven for 30-35 minutes or until a toothpick inserted in the center comes out with a few moist crumbs clinging to it. 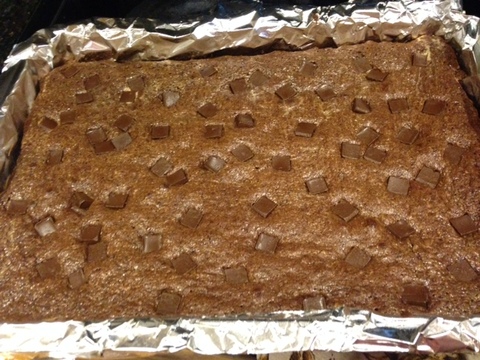 8. Let cool completely, then refrigerate for 3 hours or over-night before cutting. 9. Remove brownies from pan using the foil to help. Remove the foil from the brownies and cut into desired sized brownies. I like to trim the edges for nice neat squares (the pastry chef in me plus you need a snack about now, don't you?). Dust with powdered sugar, if desired. 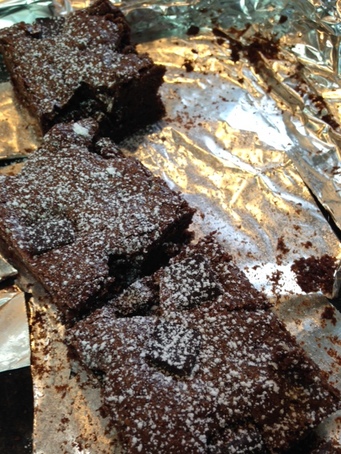 10. Grab a glass of cold milk and enjoy!
Note: I prefer to store these well-wrapped in the refrigerator to preserve freshness longer.
Remember to stop back on Monday for a super yummy dessert you can use scraps or chunks of these brownies in. I can't wait to share it with you!♥ |

Archives
December 2019
Categories
All
|


 RSS Feed
