|
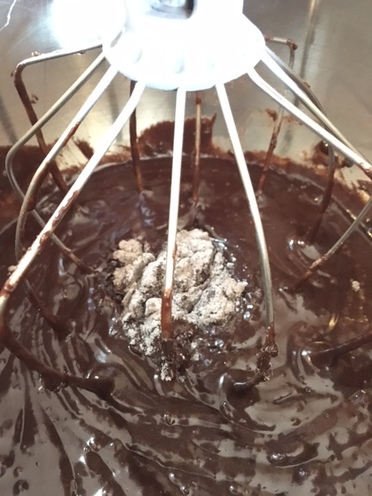
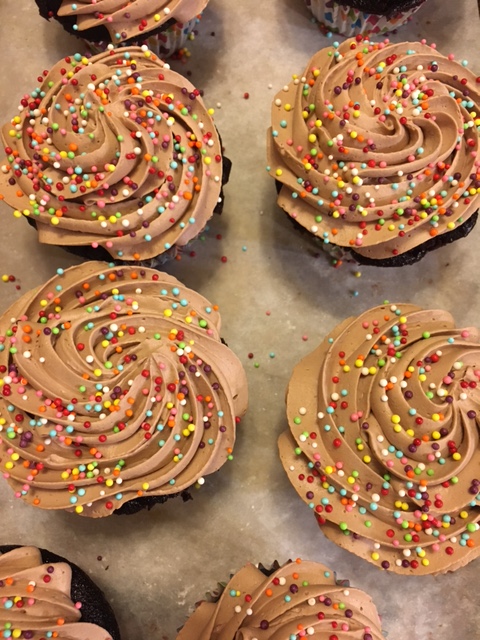
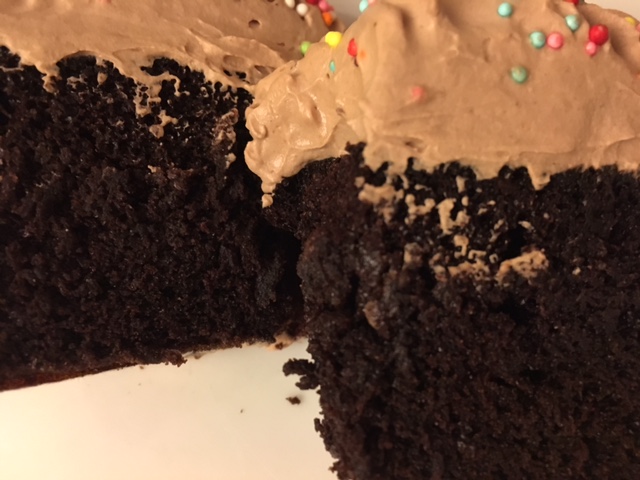
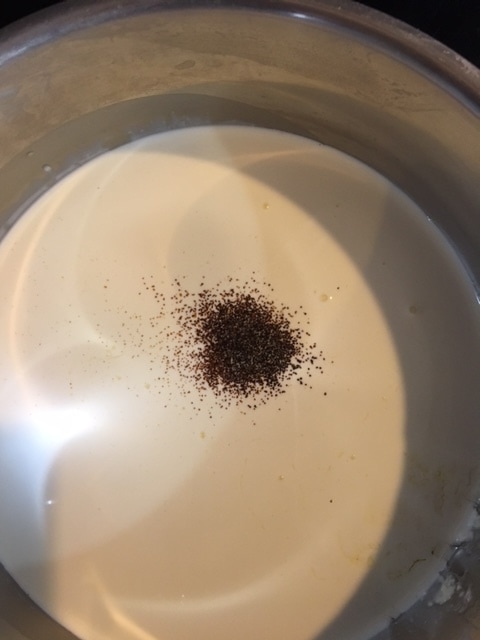
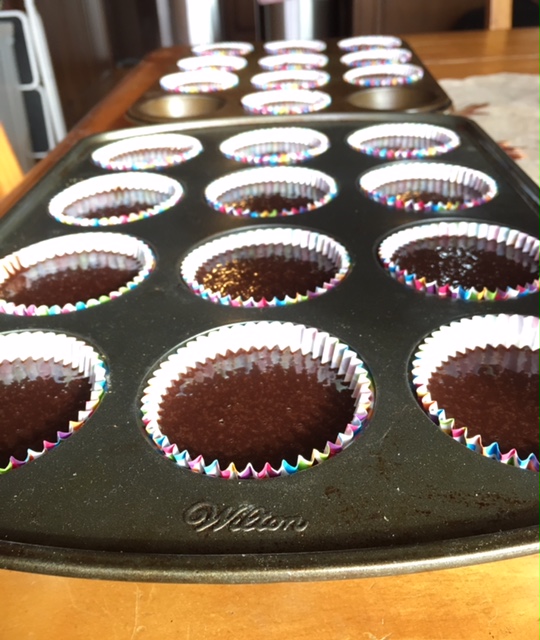
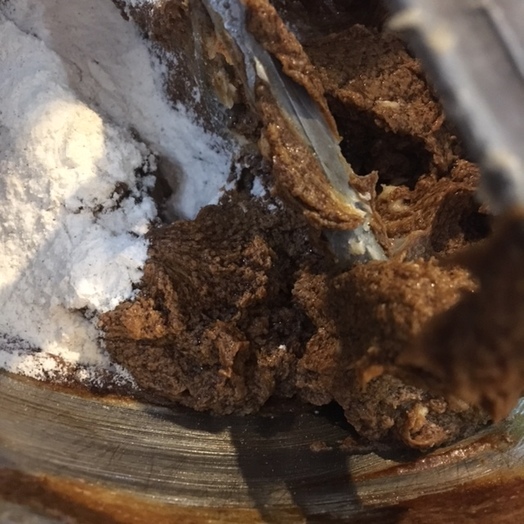
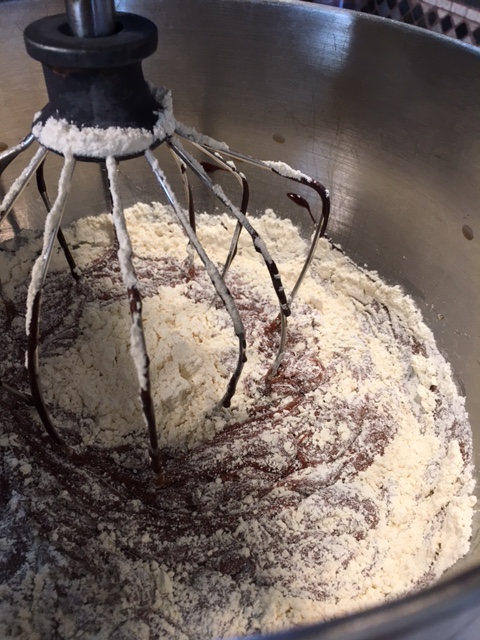
"Come with me, and we'll see if a cupcake can make the world a better place to be." -Unknown It's almost Valentine's Day, and for my that means chocolate (well, just between us, that's my MO on any given day actually). And what could be better than a cream-filled chocolate glazed cupcake? Hand-held happiness right there! Growing up, my aunt and uncle owned a little neighborhood corner store. Besides penny candy they also carried the whole line of Hostess goodies. In my opinion, the only one worth the time to unwrap was the two pack of hostess cupcakes, one for me , and well, the other one for um, me. We saw them several times a year and could eat our fill of all kinds of awful-ly wonderful stuff. But the Hostess cupcakes took the cake (pun intended). Inevitably I grew up and evolved, taste buds included, and the packaged, highly processed delights of my childhood no longer delighted me (with the exception of an occasional vanilla Pop-Tart* and M&M's*, but I digress)., but the memory certainly did. Mock Hostess* cupcakes to the rescue. There are several steps, but don't be intimidated. They are all easy, can be broken down, made ahead and assembled later. Printable PDF of recipe below. Fill your hearts with love and your tummies with treats this Valentine's Day! Mock Hostess Cupcakes- makes approximately 2 dozen Prepared and cooled Chocolate cupcakes (the best recipe is here) Marshmallow Cream Filling (recipe below) Chocolate Glaze (recipe below) Sprinkles specialty equipment needed - Wilton Bismark Piping Tip Piping Bag Marshmallow Cream Filling: 3 Tablespoons plus 1/2 teaspoon cold water 1 teaspoon powdered gelatin, such as Knox 4 Tablespoons softened unsalted butter, cubed 1/2 teaspoon vanilla bean paste OR seeds from 1/2 vanilla bean, split and scraped pinch salt 2 cups marshmallow cream Chocolate Glaze- (adapted from Simply Sensational Desserts by Francois Payard) 6 ounces good quality semi-sweet or bittersweet chocolate, chopped 1/2 cup heavy cream small pinch instant espresso powder 1/4 cup Light Corn Syrup such as Karo (not high fructose corn syrup) 1. Put water into a medium sized, microwave safe bowl. Sprinkle gelatin evenly on top. Let sit 5 minutes to soften. Microwave mixture on high for 30-60 seconds, JUST until gelatin is melted and small bubbles appear at the edge. Remove.
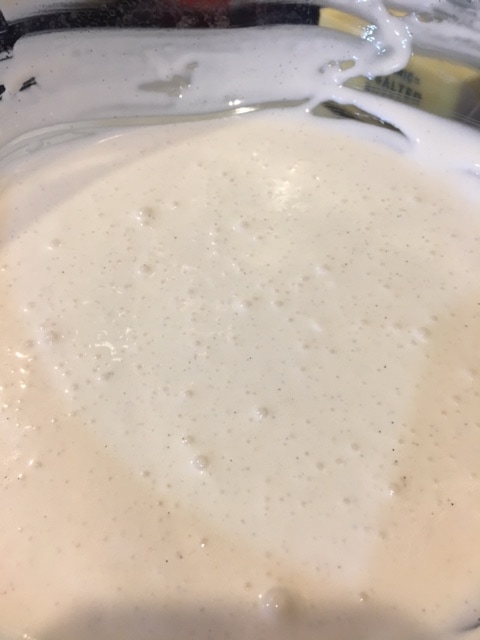
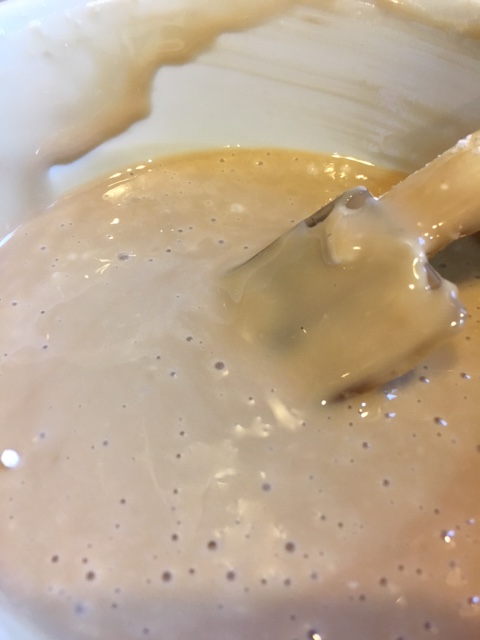
2. Whisk in butter, salt and vanilla bean paste until smooth. This is a little messy but trust it will come together because it will.
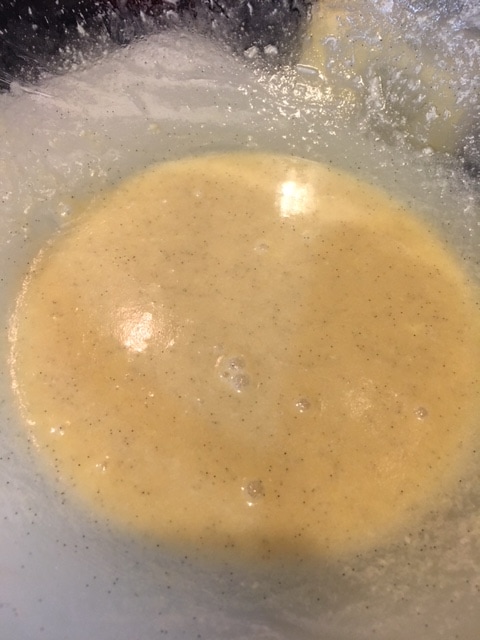
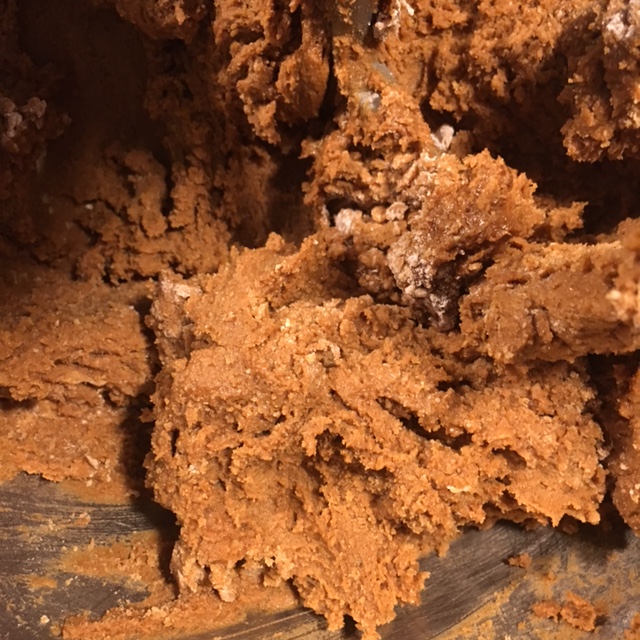
3. Whisk in marshmallow cream. Again, it will come together. Patience and care. Cover mixture with plastic and refrigerate for at least 1 hour (can be made up to 3 days ahead at this point, cover and refrigerate until needed).
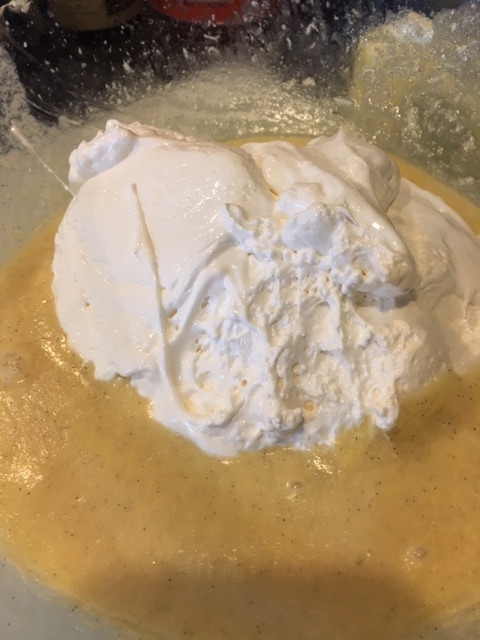
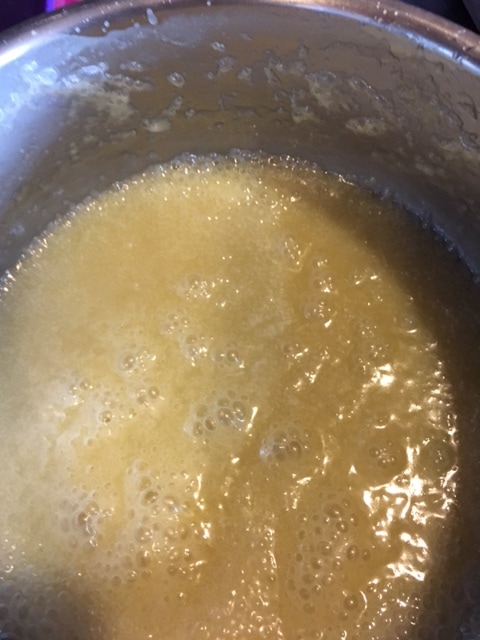
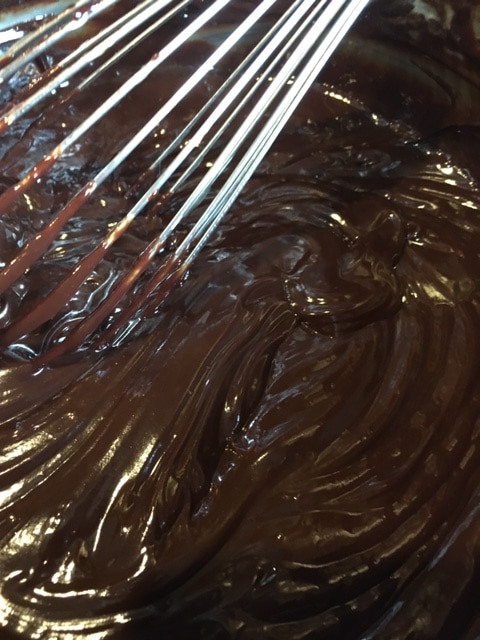
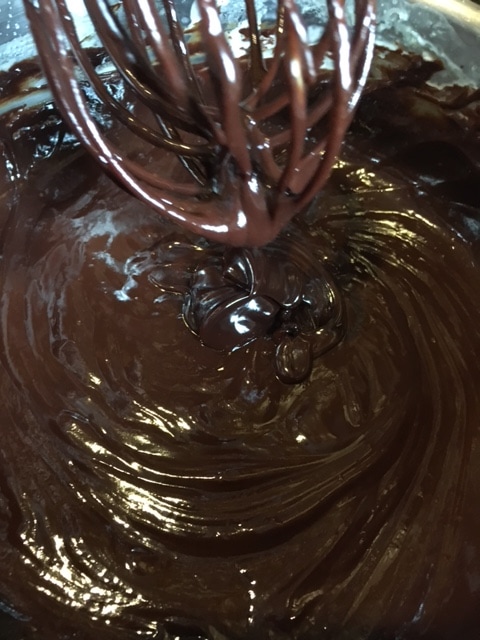
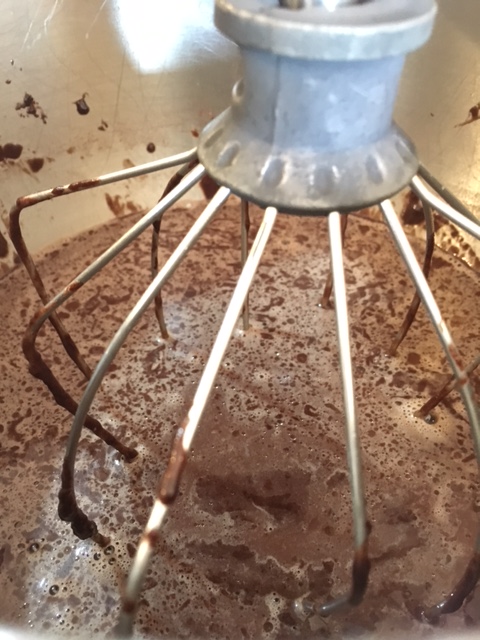
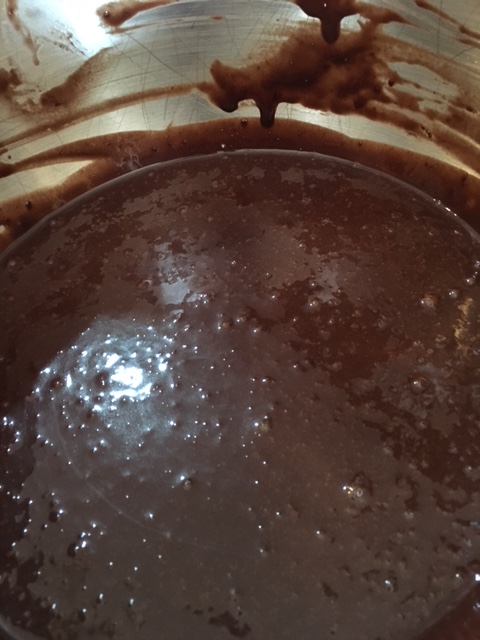
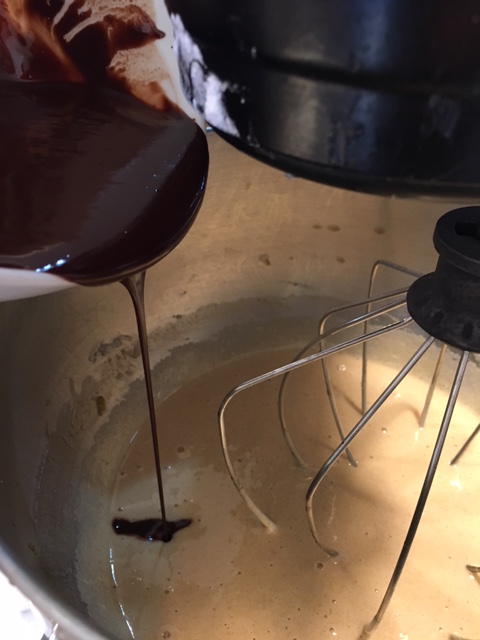
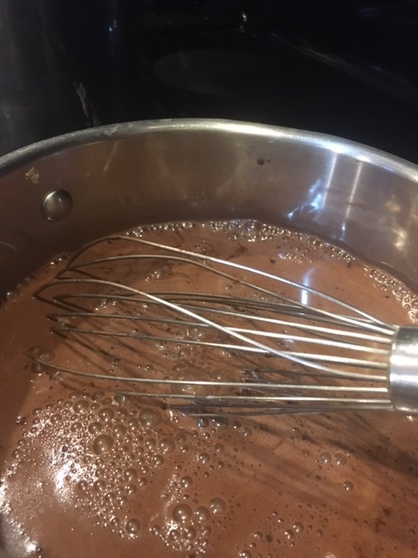
4. Meanwhile prepare chocolate glaze: In a medium sauce pan, combine cream, espresso powder and corn syrup, bring to a boil over medium heat. Remove from heat, stir in chocolate just until submerged in cream, cover and set aside for 3 minutes.
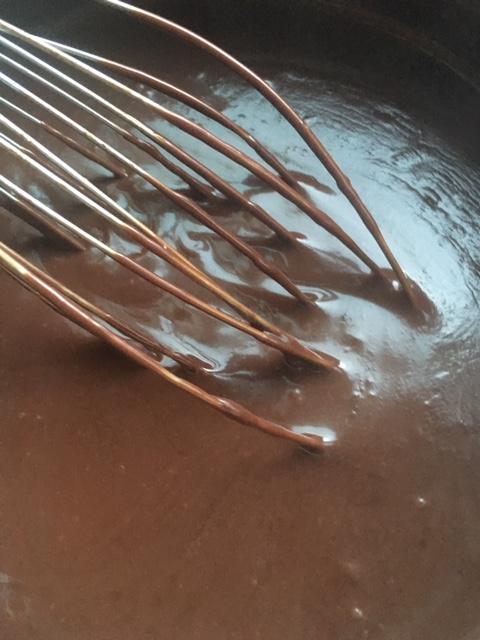
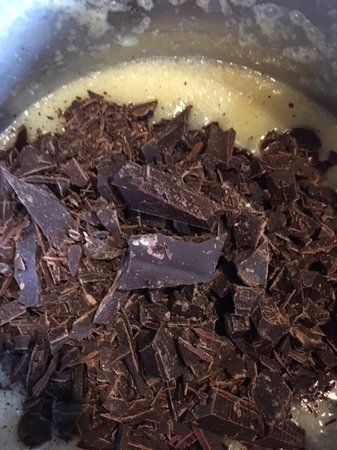 5. Remove cover and whisk glaze until smooth; set aside. (can be made up to 3 days ahead, cover and refrigerate. To use, gently reheat in microwave on half power at 30 second intervals, until smooth and fluid).
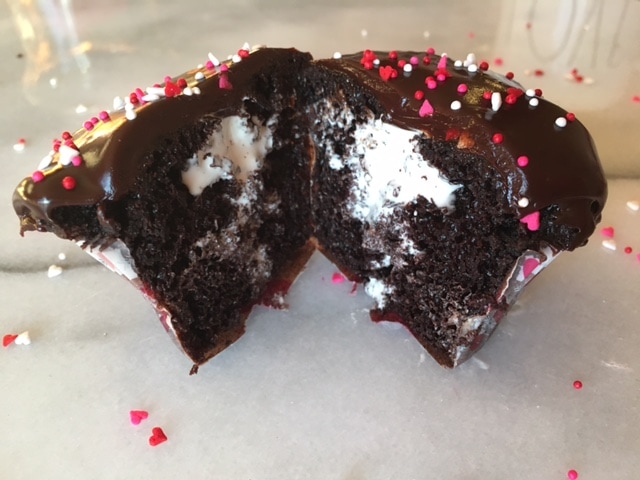
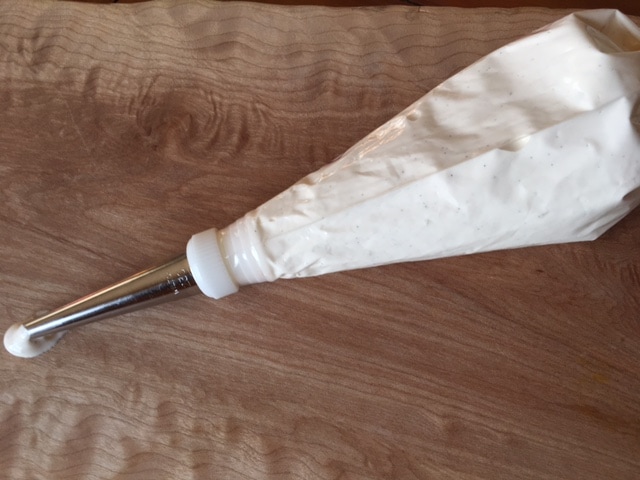
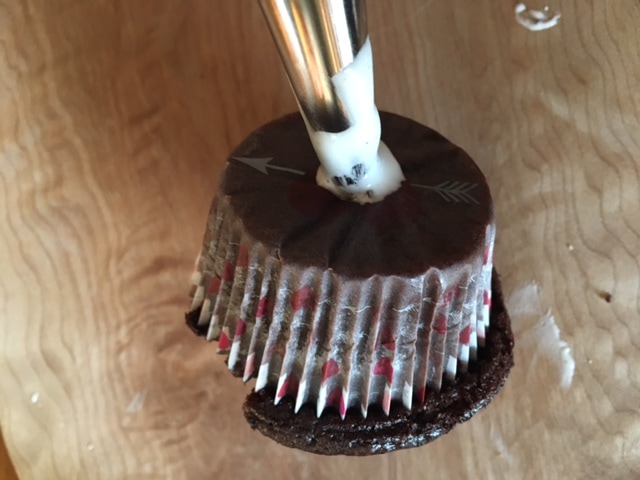
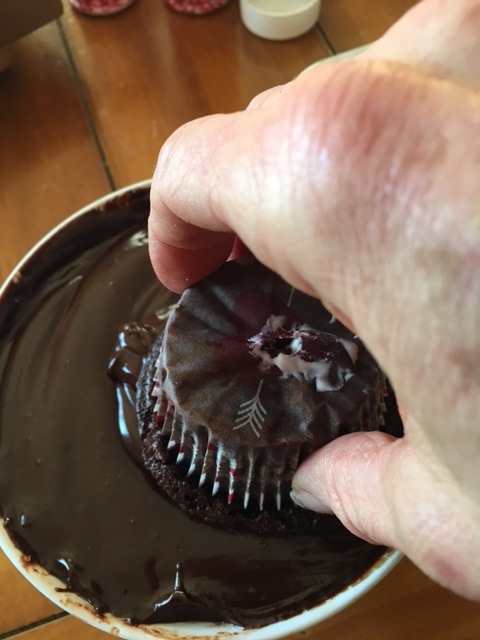
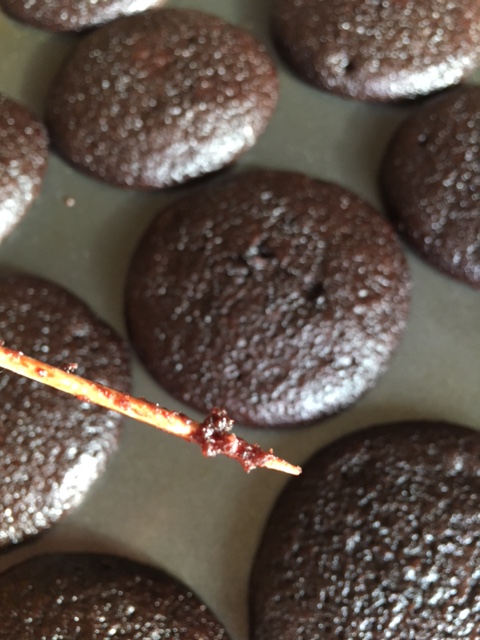
6. Insert tip into piping bag. Fill bag half-way with cold marshmallow cream mixture. Poking a hole through the bottom of the cupcake, pipe filling, applying pressure to the bag while simultaneously pulling it steadily back out as you pipe, finally releasing pressure right before removing tip,until you feel cupcake get slightly heavier. Do not over-fill or cupcake will pop open. This may take a few to get the hang of it, but you'll master it in no time!
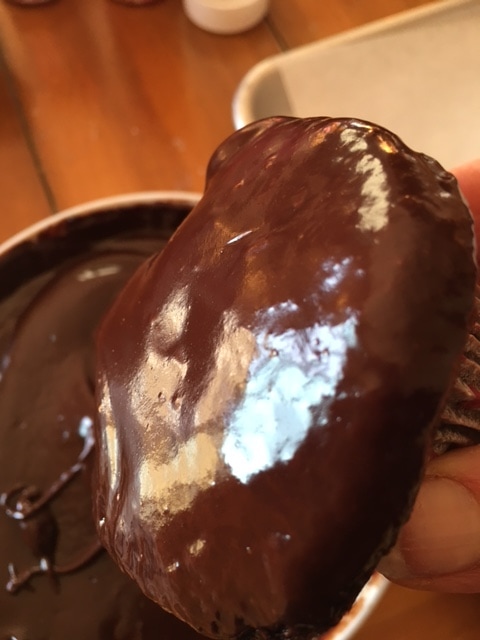
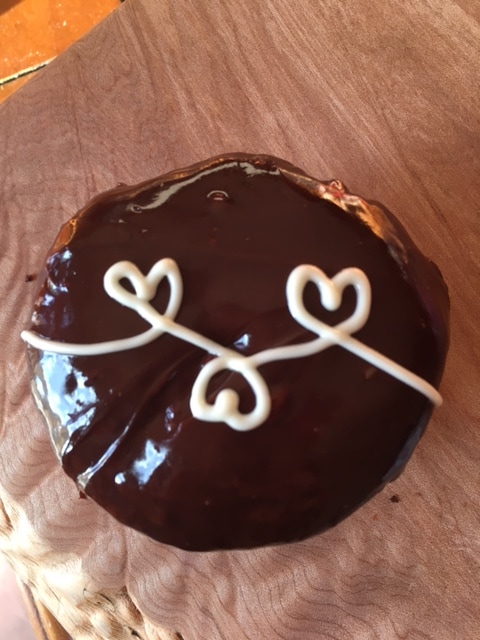
7. Once all cupcakes are filled, dip the tops into chocolate glaze, twisting back and forth a couple of times to make sure it's well coated. As you remove the cupcake from the glaze, holding the cupcake close to the surface of the glaze, give it a little shake to allow excess to drip off. This is a gently motion. Immediately tip cupcake right side up and shower it gently with sprinkles of your choice.Repeat until all cupcakes are finished. Alternately, while glaze is still wet, you can pipe a design with melted white chocolate on top instead, more closely mimicking the whole Hostess thing.
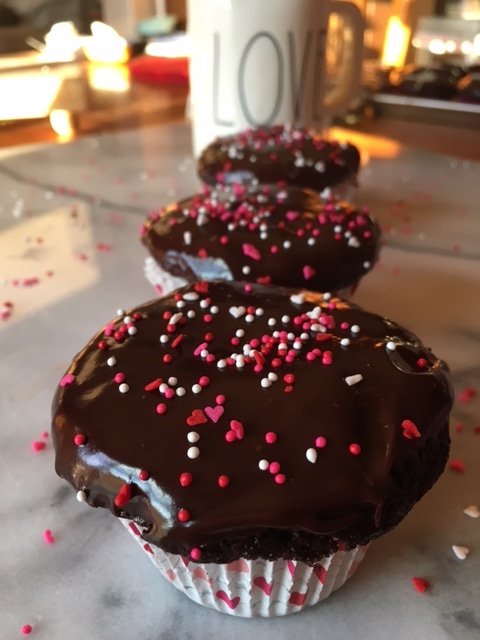  Happy Valentine's Day to you, lovely reader. May your day be sweet and delicious! ♥ NOTE: Cupcakes are best eaten fresh, but may be kept, covered, in the refrigerator for up to 3 days. * Hostess, Pop-Tarts and M&M's are registered trademarks and not affiliated with this recipe at all.
0 Comments
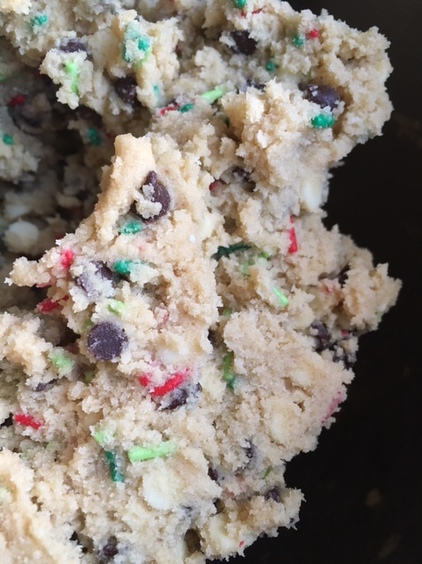
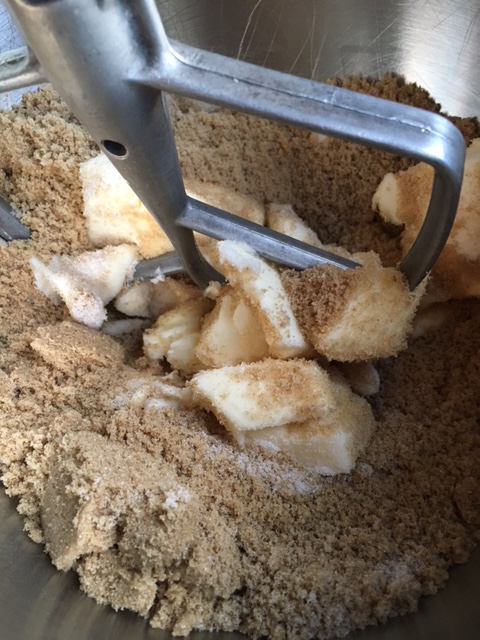
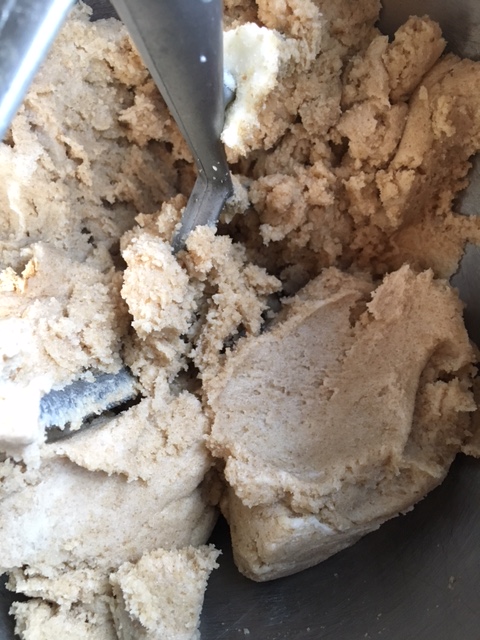
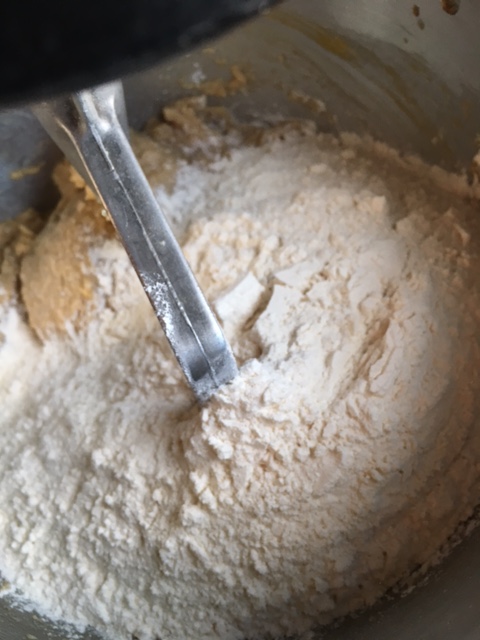
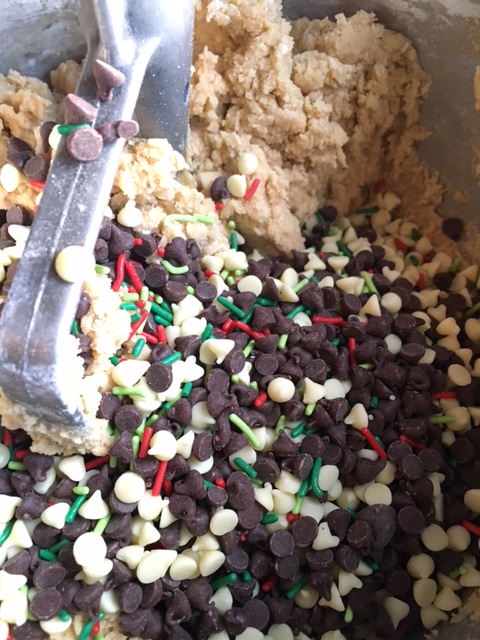
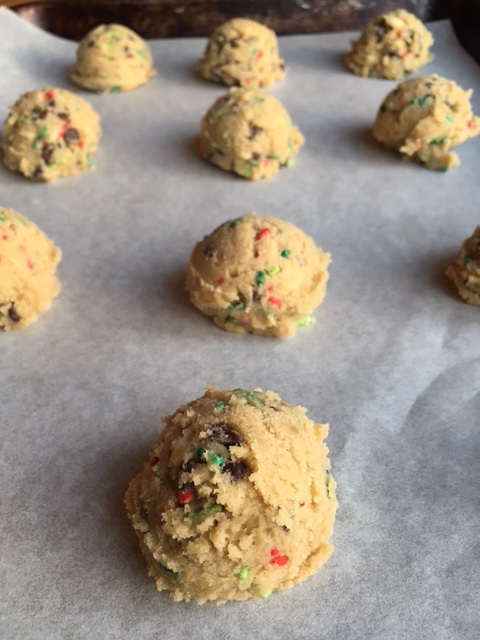
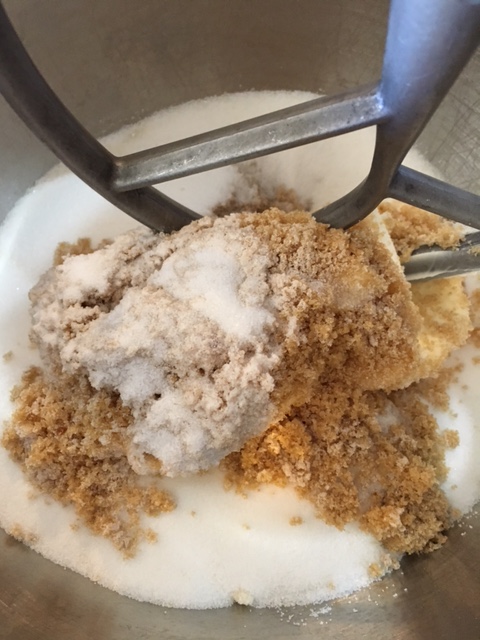
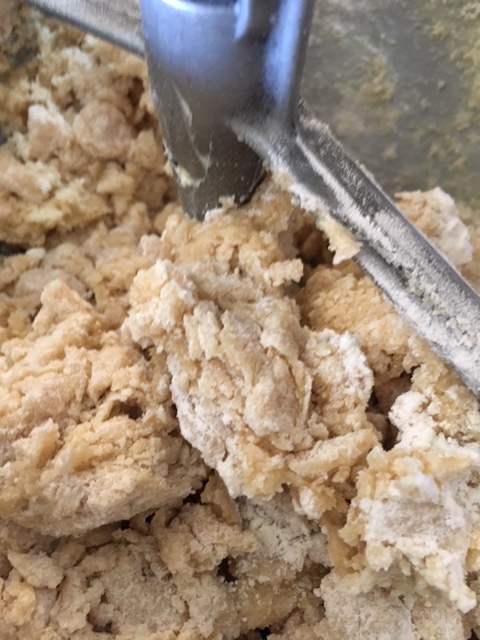
"All you need is love and Christmas Cookies." - unknown I can hardlly believe Christmas is only 19 days away. This year has gone by so very fast to me! And since it's the Christmas season, seems only fitting to offer up a cookie to add to Santa's plate. This is a cookie that's a rif on the Funfetti (PIllsbury trademark) cake that's beloved by children everywhere. You can make them any time of the year by customizing the jimmies (elongated sprinkles) used. In this case I used a mix of light and dark green with red. Festive, no? Last year I made logs of raw dough which I festively wrapped as gifts leaving the actual baking to my friends. It sure saved me a lot of time and it turned out really cute. It's another idea for you to keep in mind if you are gifting treats this holiday season. Some of my other favorite cookie recipes are here. If toffee is your thing, the ever popular Christmas Crack is a sure crowd pleaser, but for now, Confetti Cookies it is! So let's hop on over to the mixer and get this holiday baking going! Christmas Confetti Cookies 11 1/2 ounces( 1 cup 7 Tablespoons) unsalted butter, room temperature 7 ounces (1 cup) granulated sugar 10 ounces brown sugar (1 1/4 cups) packed 2 large eggs 2 teaspoons pure vanilla extract 16 ounces (about 3 1/3 cups) all-purpose flour 2 ounces (4 Tablespoons, plus 2 teaspoons) yellow cake mix* 1 1/8 teaspoons baking powder 1 1/8 teaspoons baking soda 1 1/2 teaspoons kosher salt 3 ounces (about 1/2 cup) holiday colored jimmies 10 ounces( about 1 1/2 cups) mini chocolate chips 6 ounces (about 1 cup) mini (or regular) white chocolate chips** 1 Preheat oven tp 350 degrees F. In a medium bowl, whisk together flour, cake mix, baking powder and soda and salt; set aside.  2. in bowl of a stand mixer, cream together butter and sugars on low speed until well combined.
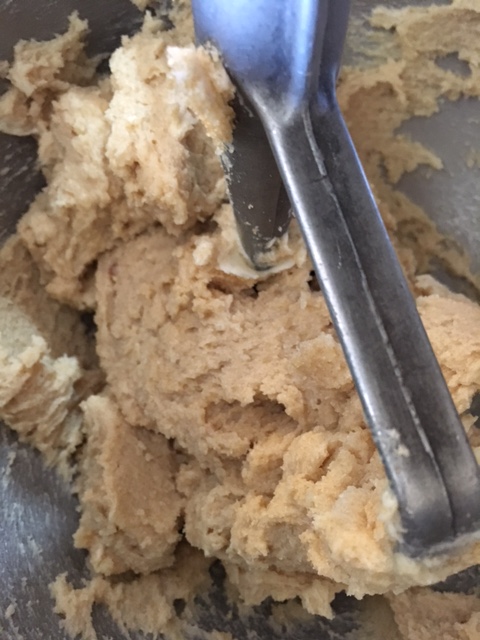
3. On low speed stir in eggs and vanilla. Increase speed to medium for 15 seconds. Reduce speed to low, and scrape down sides of bowl. 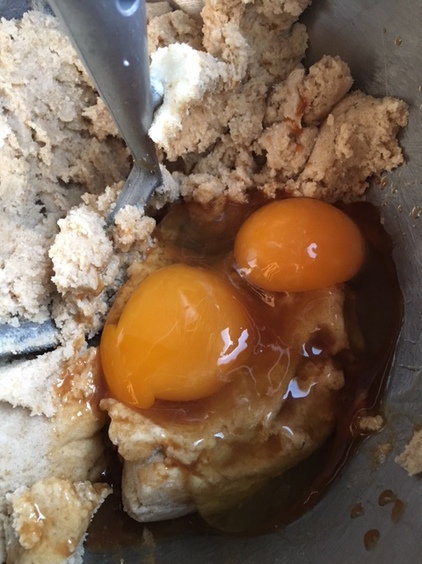 4. Stir in dry ingredients until almost completely incorporated. Scrape down sides of bowl and stir in both mini chips and jimmies.
 5. Scoop dough onto parchament lined baking sheets. Bake for 10-12 minutes until done.
6. Let cool completely before wrapping or storing. can keep frozen, wrapped air-tight for about 1 month. 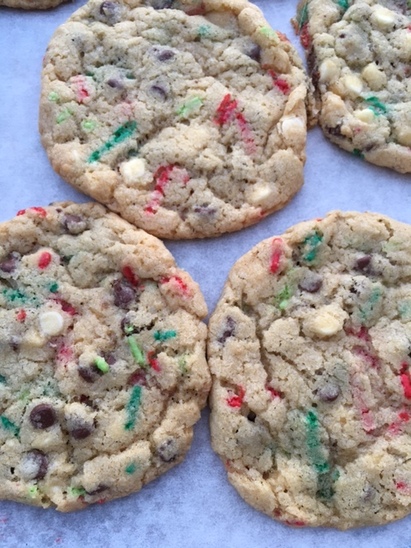 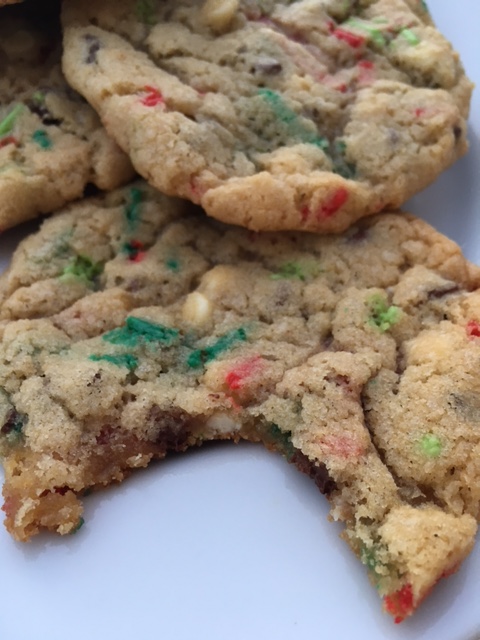 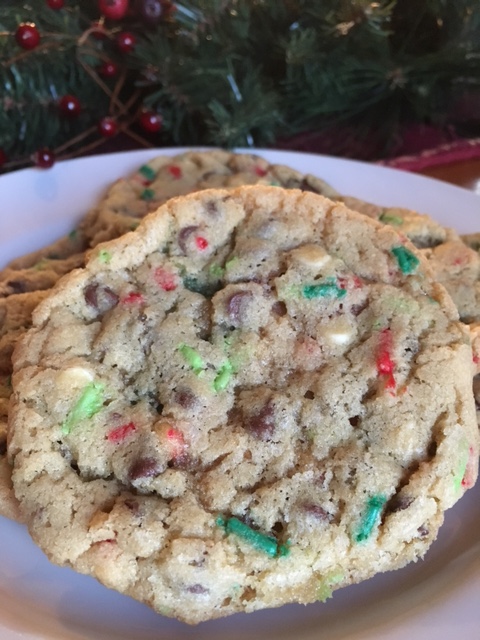 * Keep leftover cake mix wrapped air-tight in the freezer for future cookie making sessions.
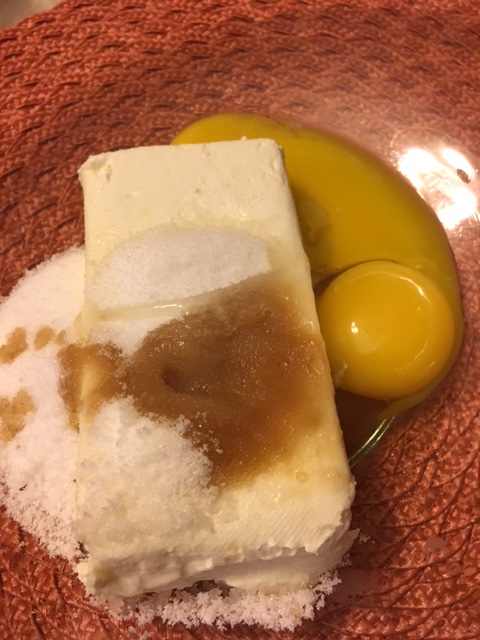
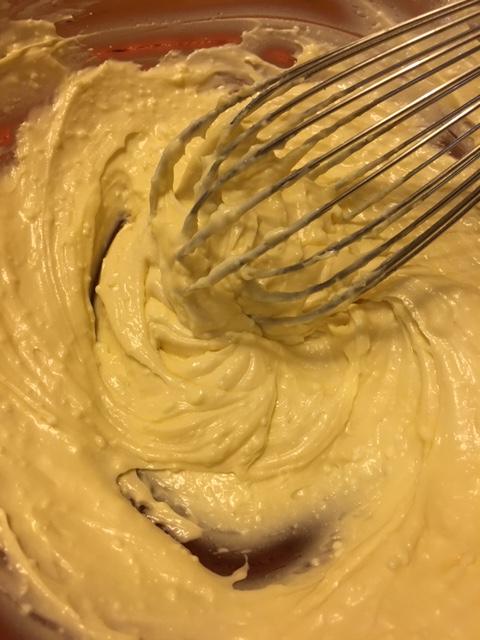
** for best results and flavor, please use the ones that contain cocoa butter and not alternative fats. Happy Baking and sharing! ♥ #cookiesandkindness "The only way cheese is dessert is when it is followed by the word cake. " -Michele Gorman, Single in the City It's hard to argue with that kind of logic, Michele! So I hope you are not quite sick of all the sweet posts of late. I promise something savory is on the way, and just in time for Thanksgiving, too! But for now, how about a pan of Cheesecake Swirl Brownies? In fact, any chocoholics on your Thanksgiving guest list will really thank you for thinking of them by having a plate of these for dessert (as opposed to some sweetened vegetable pie- really now). So to start off with you need to make these brownies. I have never tried the cream cheese version with the almond flour version, so can't attest to the results, but the all-purpose or gluten free flour version will definitely work. Once you get the brownie batter in the pan, then get to work on the cheesecake part. Have all the ingredients at room temperature so it will come together quickly. Cheesecake Swirl Batter -enough to swirl through 1-9x13" pan of brownies 8 ounces cream cheese, preferably Kraft Philadelphia brand 1/4 cup granulated sugar 2 egg yolks 3/4 teaspoon pure vanilla extract 1. Combine all ingredients in a bowl with a whisk. Beat until smooth-ish.
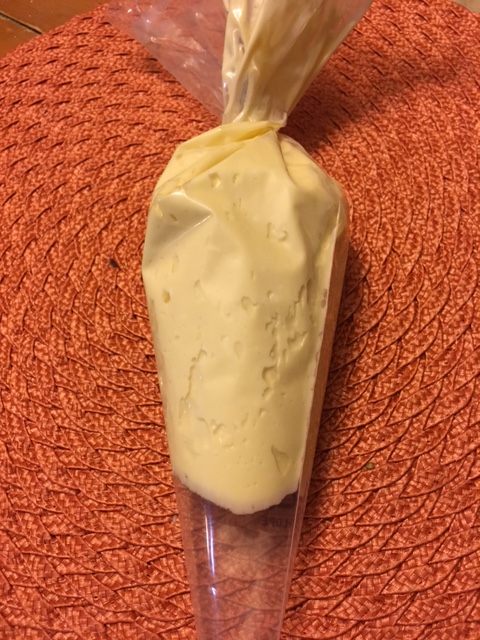
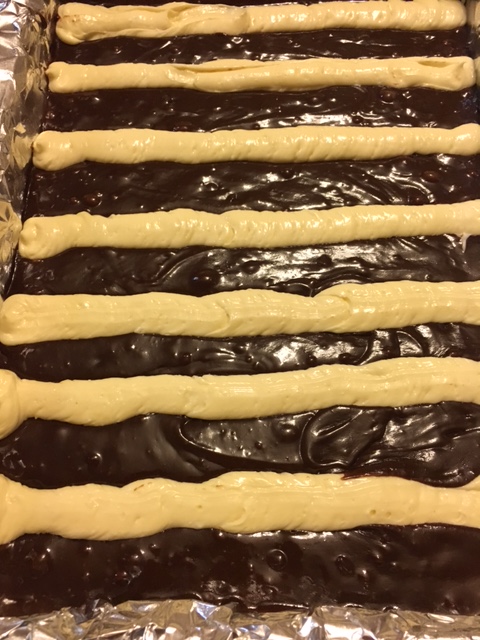
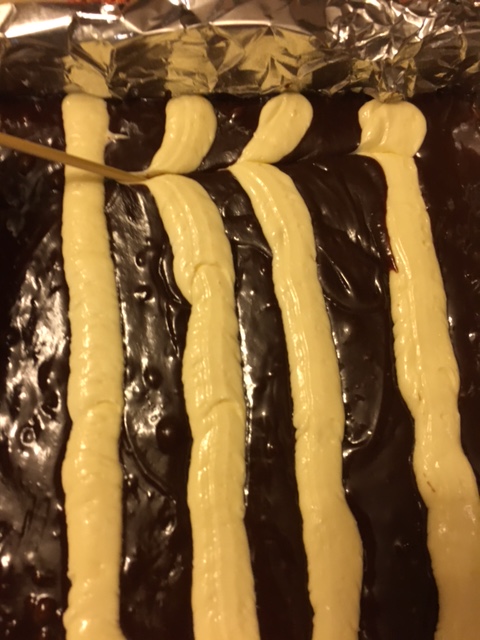
2. Transfer cream cheese mixture to a piping bag or a gallon ziploc bag. Twist to close or seal. Cut off about 1/2 inch at the tip or corner. 3. Inserting tip of bag slightly into brownie batter, pipe evenly spaced rows of cream cheese mixture horizontally across short edge of the pan.
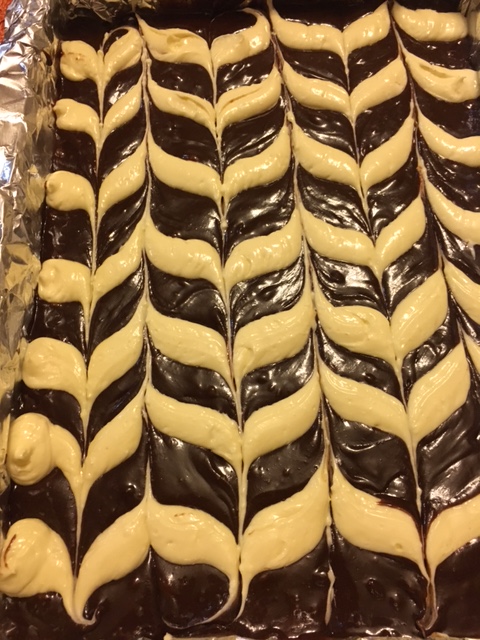
4. Using a toothpick, wooden skewer or tip of a very thin bladed knife, draw the tip through the rows in one direction and then in the alternate direction and so on until a beautiful chevron design is throughout batter.
5. Bake in a preheated 325 degree F oven for approximately 40-50 minutes until brownie is done (moist crumbs are on toothpick inserted in center (do not over-bake).. 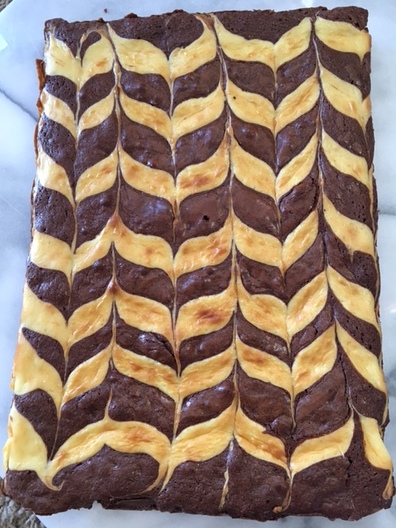 6. Let cool completely before cutting into squares. Store in airtight container in refrigerator for up to a week. 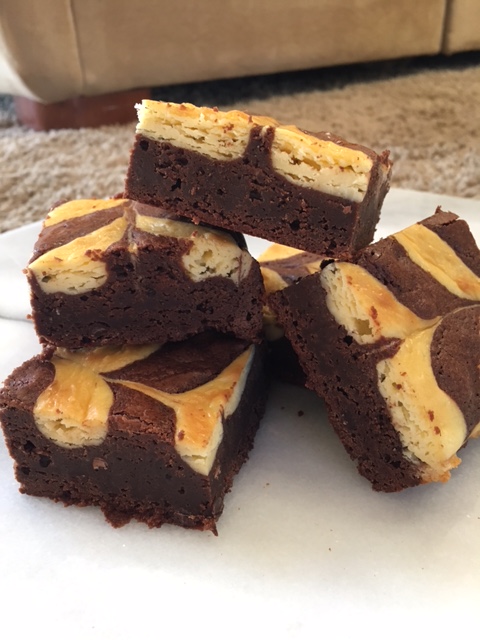  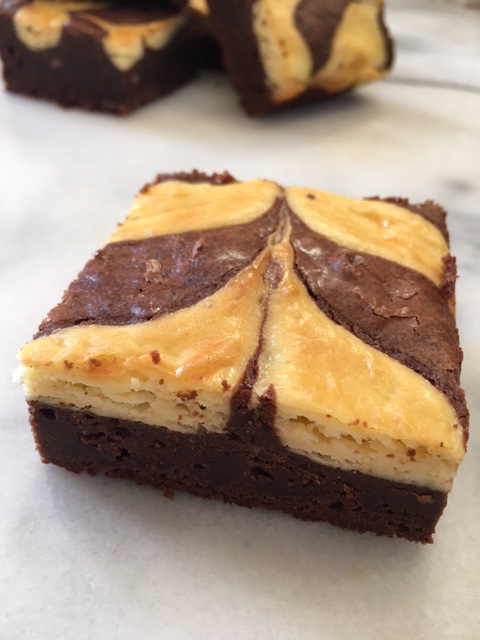 Happy baking! Be sure to share! ; ) ♥
“I've never met a problem a proper cupcake couldn't fix." -Sarah Ockler
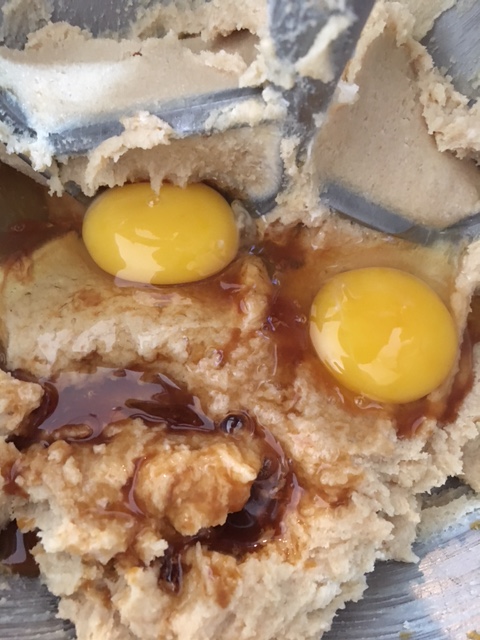
I'm thinking happy thoughts. They say the mind is so powerful if we can change our mind about something then we can change our lives. So happy it is. And what food could be happier than cupcakes, specifically, moist chocolate cupcakes? I mean, who wouldn't want essentially a mini cake all to him or herself? And let's face it, the ratio of frosting to cake is way better in a cupcake than in a slice of cake. We all know the frosting is the only reason to eat any cake anyway. So, all the more reason to love those little joy cakes. This recipe is super easy to make and you can frost it any way you please. My favorite ways are with a dense chocolate cream frosting (shown below) or a delicious , tangy cream cheese frosting. What's your favorite way? Moist Chocolate Cupcakes - yields about 22 regular cupcakes 2 1/8 cups granulated sugar 1 3/4 cup all purpose flour 3/4 cup plus 1 Tablespoon good quality cocoa powder such as Valrhona or Cocoa Barry 1 1/2 teaspoons baking powder 1 1/2 teaspoons baking soda 1 teaspoon salt 1 cup milk 2 large eggs, room temperature 1/2 cup vegetable or melted coconut oil 2 teaspoons pure vanilla extract 1 cup hot freshly brewed coffee or boiling water 1. Preheat oven to 350 degrees F . Line 2 standard muffin tins with cupcake liners (22 of the 24 wells); set aside. 2. In bowl of stand mixer, sift together flour, sugar, salt, baking powder, soda and cocoa powder. Place on mixer and turn on lowest speed. 3. In a medium bowl whisk together the eggs, milk, oil and vanilla ( if using coconut oil, make sure milk and eggs are at room temp or slightly warm) until well blended. Add to flour mixture on low speed and mix for 1 minute on low. Scrape down bowl, increase to medium speed and and continue mixing for 2 minutes.
4. Off mixer, using a rubber spatula stir in boiling water or hot coffee by hand until fully combined.
5. Using a 1/4 cup measuring cup , pour batter into each liner.* Bake at 350 F until cupcakes come out with moist crumbs attached, about 15-20 minutes. Do not over-bake!
6. Let cool completely then frost as desired. If using cream cheese or creamy chocolate icing, keep frosted cupcakes in refrigerator for storage.

Notes: If you live at high altitude (5000-ish ft above sea level like I do), make the following changes:
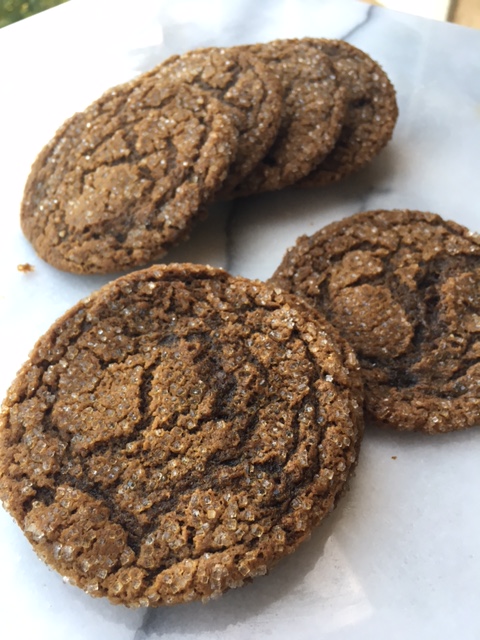
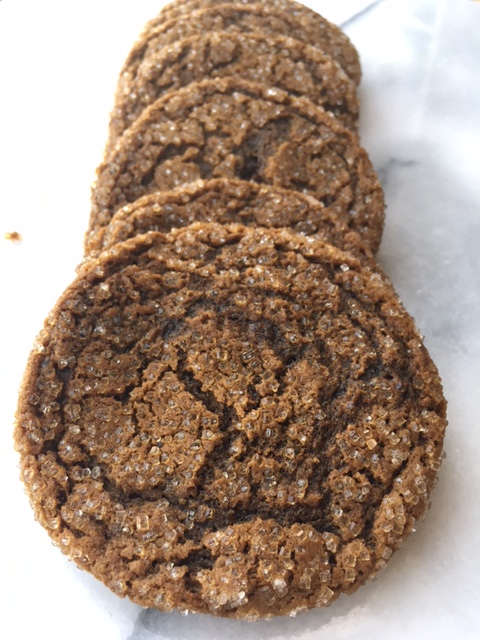
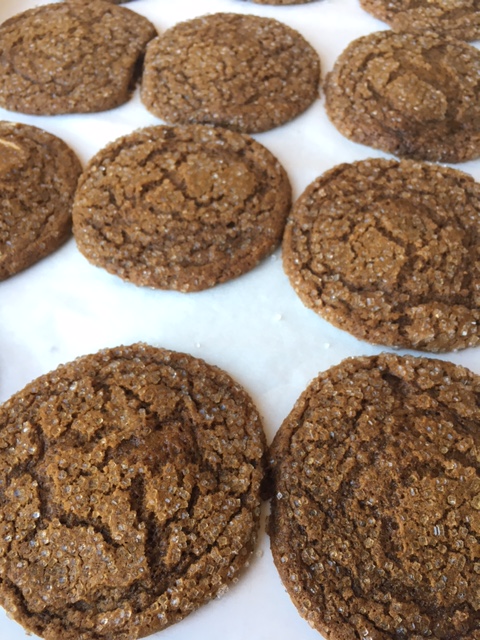
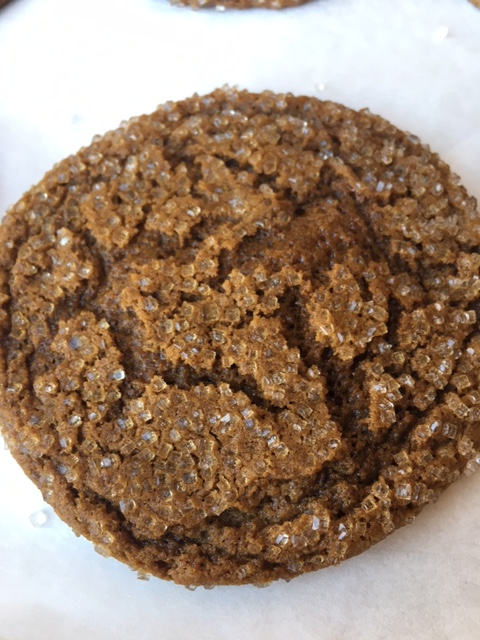
reduce both baking soda and powder to 1 1/8 tsp each, add in 2 Tablespoons unsweetened applesauce with liquid ingredients and increase flour to 1 3/4 cups PLUS 2 tablespoons and reduce sugar to 2 cups. Bake as directed. "Cookies are made with butter and love."- Norwegian Proverb By now you all know October is National Cookie Month, right? So in the spirit of sharing and without further ado, here is my favorite Ginger Cookie. It's got some yummy, fragrant spice to it, perfect for fall.It's crisp around the edges then soft everywhere else with some nice added crunch from the coarse sanding sugar. It also makes a mean vehicle for ice cream sandwiches, if you are feeling like taking it in that direction (lemon or blackberry sorbet would be nice inside, but vanilla ice cream would also be delicious or vanilla ice cream with some lemon curd folded in....just sayin'). I do offer one quick variation at the end, too, if you are looking to dress them up a bit. Chewy Ginger Cookies 2 1/2 cups (11 1/2 ounces) all-purpose flour 1 3/4 teaspoons, scant, baking soda* 1/2 teaspoon fine sea salt 1 Tablespoon ground ginger 1/2 teaspoon ground cinnamon 1/2 teaspoon ground allspice 1/4 teaspoon ground black pepper 2 sticks plus 2 Tablespoons (9 ounces) unsalted butter, room temperature 1/2 cup (3.5 ounces) packed light brown sugar 1/2 cup (3.5 ounces) granulated sugar 6 Tablespoons unsulfured molasses 1 large egg 1/2 teaspoon pure vanilla extract sanding or pearl sugar 1. With a whisk, mix together the first seven ingredients; set aside. 2. In the bowl of a stand mixer with the paddle attachment, cream together the butter, granulated sugar and brown sugar on low speed until well combined. 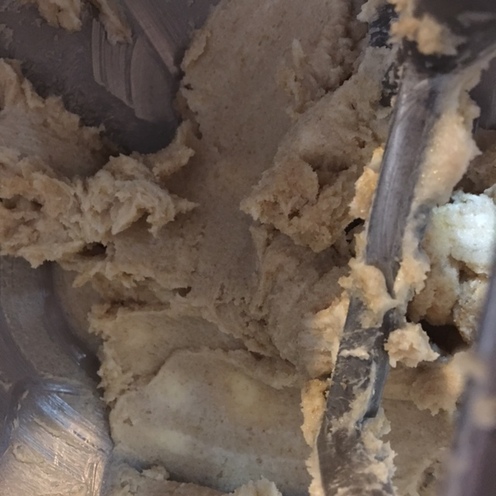 3. On low speed mix in the egg, molasses and vanilla. Increase speed to medium to help combine the mixture well for about 20 seconds. Reduce speed to low. 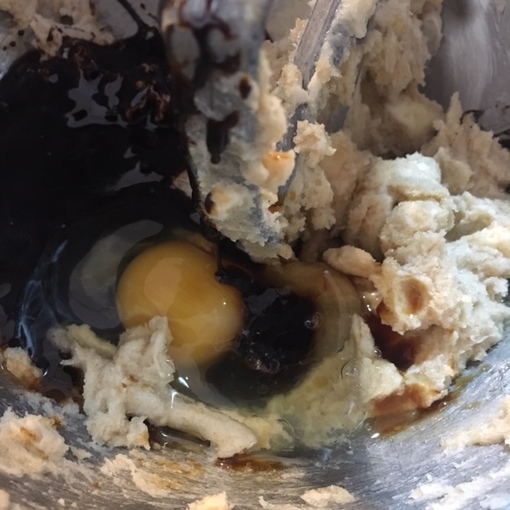 4. Mix in flour mixture until just combined.
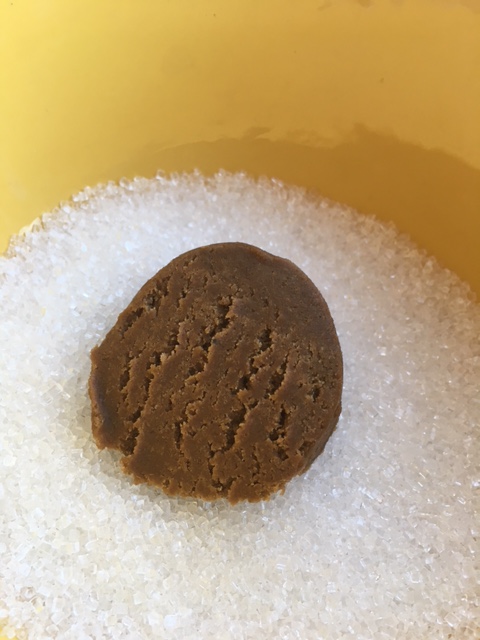
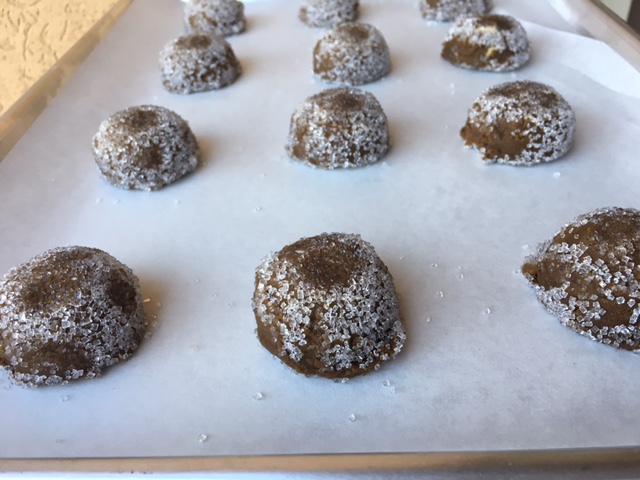
5. Remove bowl from mixer and cover tightly with plastic wrap. Refrigerate dough for 24 hours. This gives all the spices time to really meld into the dough for the best flavor. 6. When you are ready to bake, preheat oven to 350 degrees Line baking sheets with parchment paper. 7. Remove dough from fridge and scoop out using an ice cream scoop to get uniform cookies. Dip cookies into sanding or pearl sugar. Place dough 2" apart on prepared baking sheets. Lightly pat down the tops of the dough.
8. Bake cookies in preheated oven for 10- 12 minutes until edges are golden brown and center seems set and crackles. Cookie will have puffed up, then sank back down.
   Variation: White Chocolate-Ginger Chews: Stir in 1 cup of fine quality, coarsely chopped white chocolate such as Lindt, Callebaut or Valrhona into batter after the flour. Proceed as directed in the recipe. The sweetness and creaminess of the white chocolate is a really nice complement to the spiced dough and looks really pretty , too. 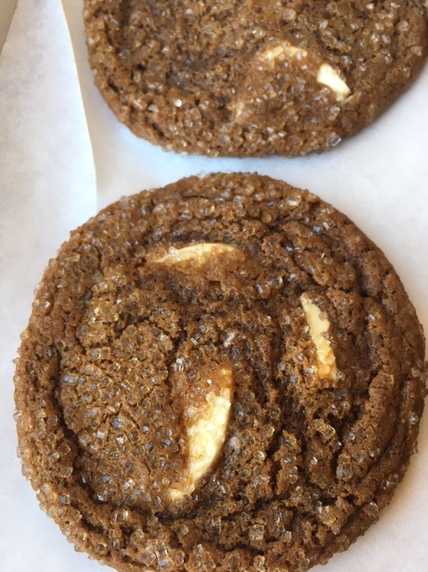 * Note: this recipe is for cooking at high altitude (about 5,000 ft, where I live). If baking closer to or at sea level, increase baking soda to 2 1/4 teaspoons.
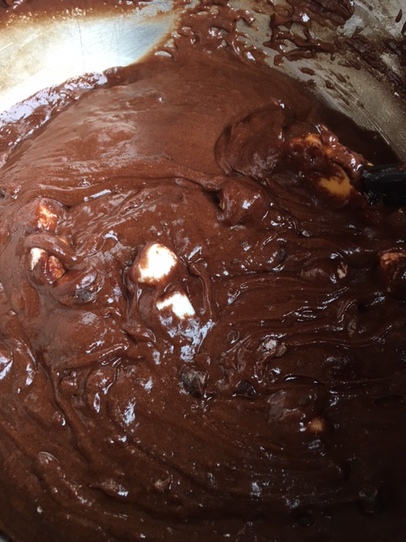
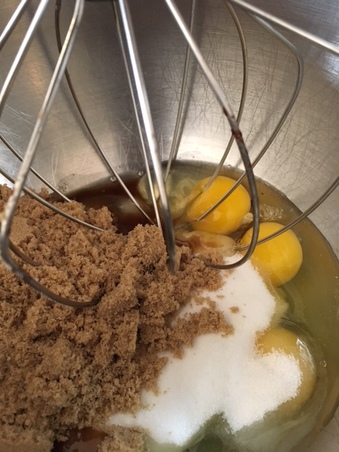
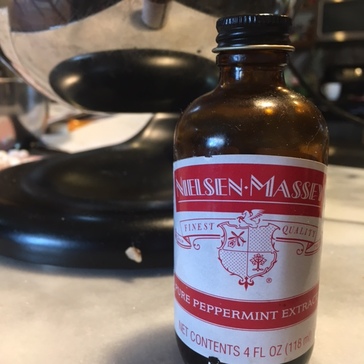
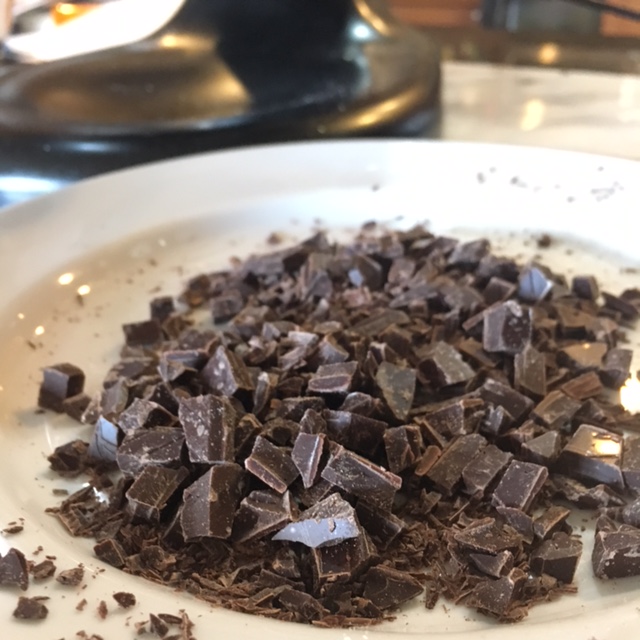
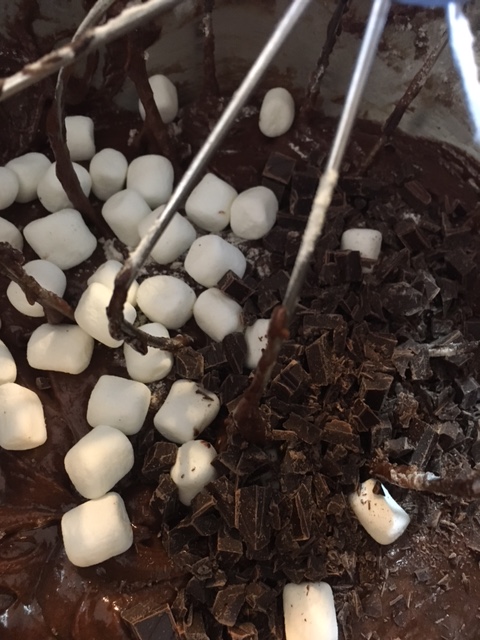
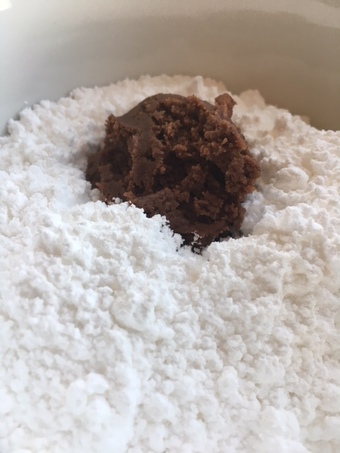
"C is for Cookie. That's good enough for me." -Cookie Monster National Cookie month continues! I posted a picture of this cookie a while back on my Facebook and Instagram feed and it was quickly voted the recipe most of my followers there wanted to see. It is worth their adoration, too. It is fudgy and minty and beautiful. I know it's only a little early to talk about this, but what a great addition to your holiday cookie trays this would be, am I right? They are super easy to make. Just make sure you use good quality chocolate like the mint infused Lindt chocolate bar here. Be sure to check out the interesting variations below. Also if mint and chocolate are your thing, check out these recipes here and here. Mint Crinkle Cookies 2 cups (9 ounces)all purpose flour 1 1/2 teaspoons baking powder * 1/8 teaspoons sea salt 5 ounces unsweetened chocolate, finely chopped 8 tablespoons (4 ounces ) unsalted butter, cubed 4 large eggs 1 cup (7 ounces) granulated sugar 1 cup (7 ounces) packed light brown sugar 1 1/2 teaspoons pure vanilla extract 1/4 teaspoon pure peppermint extract 2 ounces mint infused chocolate such as Lindt 1/3 cup mini marshmallows (stale is even better) Powdered Sugar 1. Melt the chocolate and butter together in a medium bowl; set aside. 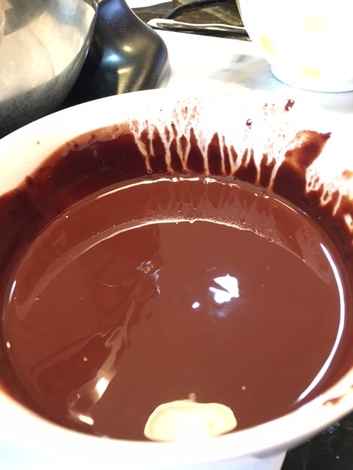 2. Whisk together flour, baking powder and salt; set aside. 3. In the bowl of a mixer whisk together the eggs, granulated and brown sugars and extracts on medium speed until well combined and just slightly increased in volume
4. Stir in melted chocolate on low speed a. Scrape down bowl and then add in flour until almost fully combined.
5. By hand, using a rubber spatula, stir in chopped mint infused chocolate and mini marshmallows until well combined.
 6. Cover dough tightly with plastic wrap and chill for at least 2 hours or over-night. 7. When you are ready to bake cookies, preheat oven to 350 Degrees F and line baking sheets with parchment paper. 8. Remove dough from fridge and using an ice cream scoop, portion out dough into approximately 2 1/2 Tablespoon balls. Coat dough thoroughly in powdered sugar. Space 2" apart on prepared baking sheets.
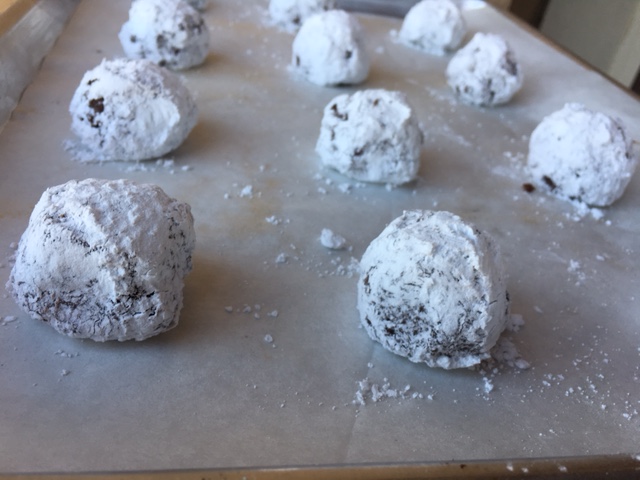
9. Bake cookies in preheated oven for 10-12 minutes until tops are crackled and middle appears set and is no longer glossy. Remove from oven and allow to cool for several minute before transferring to a cooling rack. 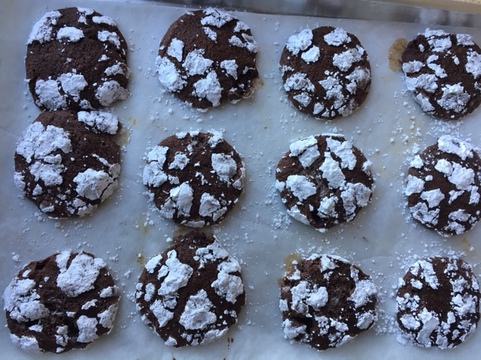  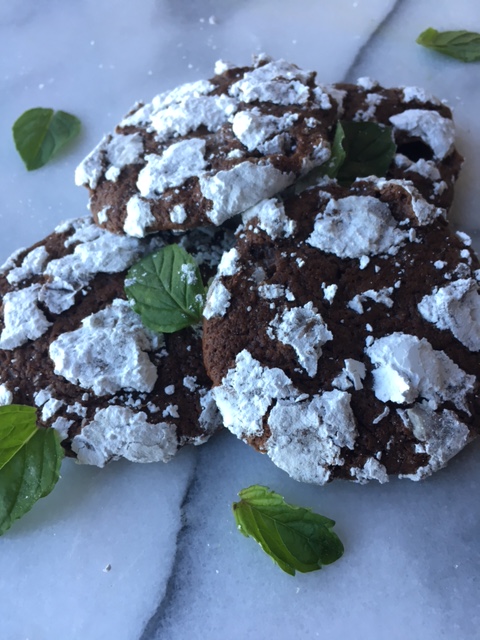 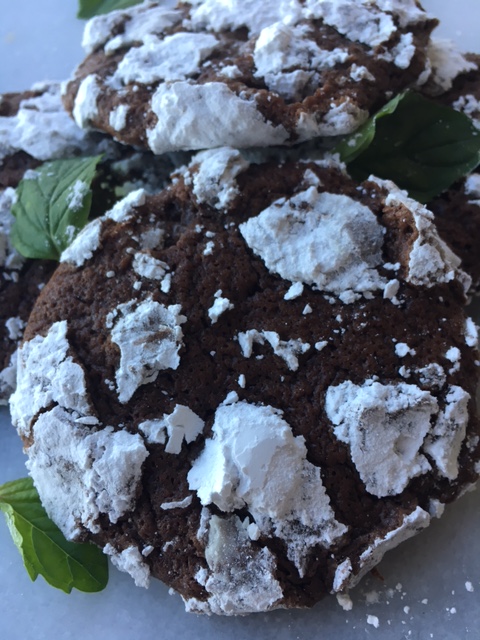 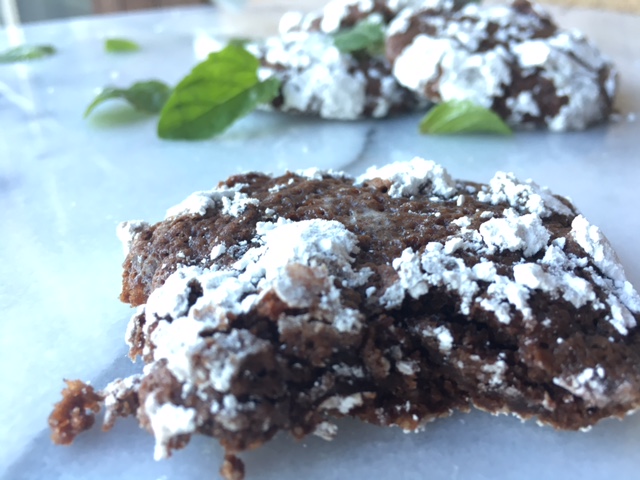 Note:
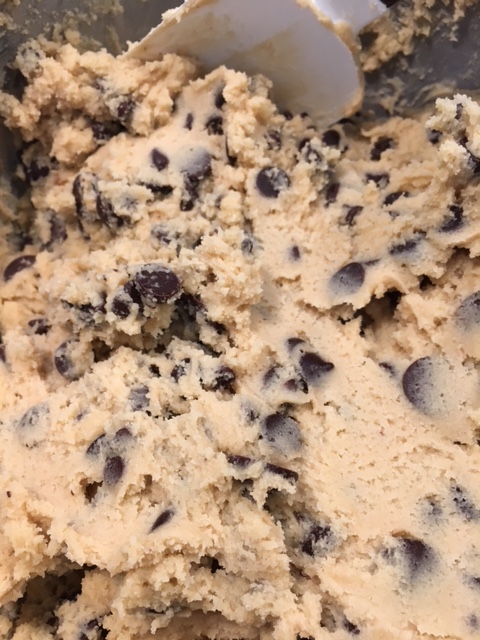
* if baking at sea level (I am at high altitude) increase baking powder to 2 teaspoons. These cookies freeze beautifully, wrapped air-tight for up to 2 months if you want to get a head start on your holiday baking. Variations: Chocolate Orange Crinkles- Omit pepermint extract. Increase vanilla extract to 2 teaspoons, Stir in 1/2 teaspoon fresh orange zest with eggs and sugar. Omit mint chocolate and use 2 ounces Lindt Intense Orange instead. Mocha Crinkles: Omit peppermint extract.Increase vanilla to 2 teaspoons Stir in 1/2 teaspoon espresso powder with vanilla. Omit mint chocolate and use finely chopped good quality milk chocolate instead. Chocolate Chili Crinkles-Omit peppermint extract. Kee vanilla at 1 1/2 teaspoons. Add 1/4 teaspoon PURE chile powder (not a spice blend chili powder) to the dry ingredients. Omit Mint chocolate and use 2 ounces of Lindt Chili Chocolate instead. Dark Fudge Crinkles: Omit peppermint extract. Increase vanilla to 2 teaspoons. Add a little pinch of instant espresso powder to dry ingredients. Omit mint chocolate and substitute mini chocolate chips or chopped up bittersweet chocolate instead. “I want to take all our best moments, put them in a jar, and take them out like cookies and savor each one of them forever.” - Crystal Woods, Write Like No One is Reading If you read my last post you know that here in the US, October is National Cookie Month. Unfortunately, with our Presidential election only weeks away, and all the attention directed toward that, the cookie has been over-looked. I know, it's truly a sad state affairs. For one, if both (which should read all) parties would just sit down with some cookies and commit to the greater good, I am certain things would go a lot smoother. Who writes the policy for that? In any case, here is my second entry for the month....the quintessential Chocolate Chip Cookie. It is buttery, brown sugary and so full of chocolate! I worked on this recipe for a long time and I may still tweak it here and there, but for now, it's better than good. I know everyone says their recipe is the best, but I really mean it! Just kidding....but hey why not try it and see what you think? The worst thing that will happen is that you will make somebody really happy when you pull them out of the oven! Or spread the love by bringing a plate to someone special just because! #cookiesandkindness Chocolate Chip Cookies:-makes a lot* 16 1/2 ounces (2 cups plus 1 tablespoon) unsalted butter, softened 12 ounces (approx. 1 3/4 cup lightly packed) light brown sugar 8 ounces (approx. 1 cup 2 Tablespoon) granulated sugar 1 tablespoon Pure Vanilla Extract 2 large eggs 1 1/2 teaspoon kosher salt 21 ounces ( approcimately 4 1/2 cups) all-purpose flour 1 1/8 teaspoon baking soda** 1/4 teaspoon baking powder 1 pound 12 ounces chocolate chips, chopped bittersweet chocolate or a combination of the two 1. With a whisk, mix together, flour, salt, baking soda and baking powder in a medium bowl. Set aside 2. Cream butter and sugar on low speed of stand mixer until combined.
3. On low speed, add in eggs and vanilla. Raise speed to medium for about 20 seconds, to combine well. Reduce speed to low. Stir in flour mixture and mix until almost combined.
4. Stir in chocolate chips/chopped chocolate (I like to use different kinds mixed together just for fun and variation).
5. Wrap dough tightly with plastic wrap and chill for 24 -48 hours*** 6. When ready to bake, remove dough from fridge about 2o-30 minutes before baking, line baking sheets with parchment paper and preheat oven to 350 degrees. 7. Scoop out dough using an ice cream scoop that holds about 2 1/2 tablespoons. Place them 2" apart on lined baking sheets. Pat down the tops slightly. 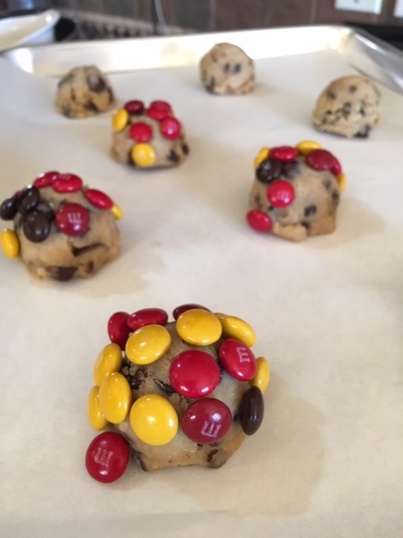 8. Bake cookies for 10-12 minutes until edges are golden brown and middles are set. Let cool a few minutes before transferring to a wire cooling rack and/or devouring them. Hint: try eating them frozen- my personal favorite!! 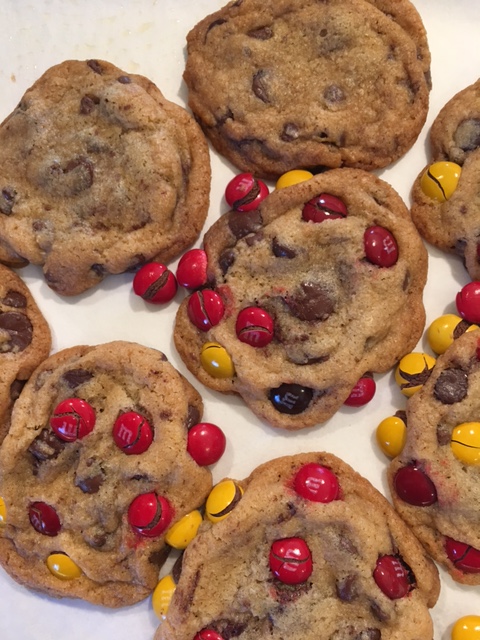 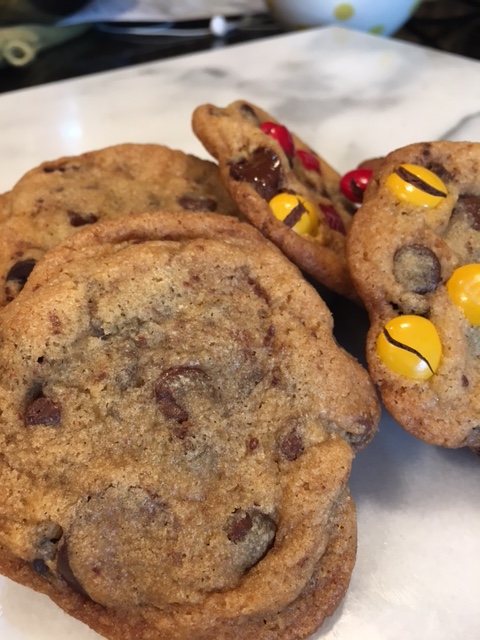 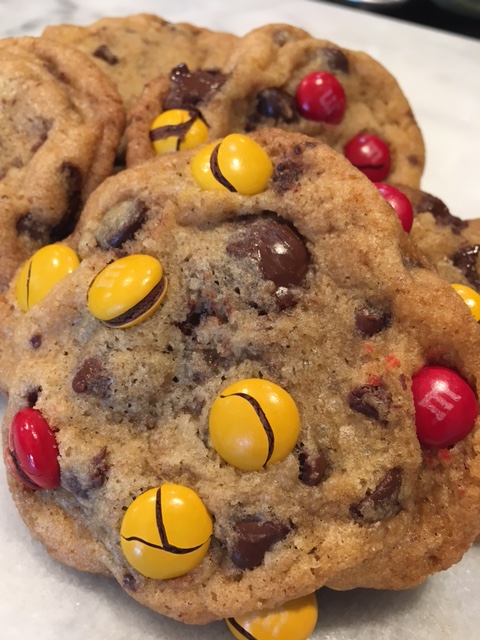 Notes:
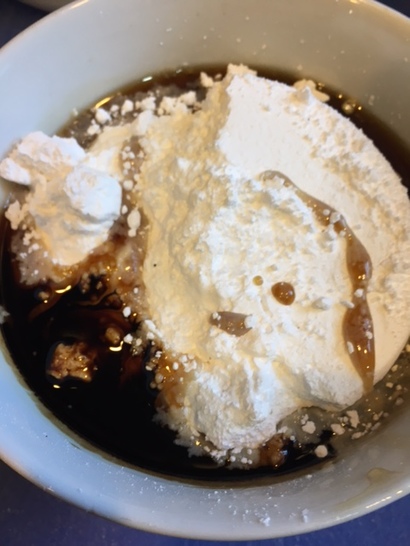
* I like to make this really large batch, scoop out what I want for cookies then scoop out the rest of the dough balls onto a cookie sheet and freeze until firm. Transfer the dough balls to a freezer bag and store in the freezer, as air-tight as possible, for up to 2 months. Then when you want cookies, simply remove some dough balls from freezer, let sit out 2o-30 minutes before baking and you get cookies with little to no effort! ** this recipe was developed at high altitude. If you live closer to sea level you may have to increase your baking soda to 1 1/2 teaspoons, maybe even 1 3/4. Baking powder is just to give it a little lift. Do not change. *** if you chill the dough before baking, this gives all the ingredients time to really meld together and that in turn will give you more golden brown cookies with a more pronounced caramelization of the edges, which tastes so good. IF you can't stand to wait, baking them immediately after mixing will still be fine. Variations: M&M chocolate chip cookies (my favorite): Reduce chocolate chips from 28 ounces to 24 ounces. Dip tops of dough balls into a bowl of your favorite plain M&M's (I love making them using all the seasonal M&M varieties-autumn colors shown here), Mini M&M's are also fun. Bake as directed. Chocolate Chip with Walnuts: Reduce Chocolate chips from 28 ounces to 22 ounces. Stir in 1 1/2 cups lightly toasted, coarsely chopped walnuts along with chocolate chips. Bake as directed. (These remind me of my paternal grandma, Julia Byrnes). ♥ “Empty?! You took all the cookies!. They were crying to get out of the jar... Cookies get claustrophobia too, you know!” -Charles M. Schultz You know what makes me mad? Here it is National Cookie Month and nobody, I mean nobody, is talking about it! There's all this talk about this candidate and that candidate and which celebrity is doing what where, but no one is talking about cookies (well, except for Dorie Greenspan, noted cookbook author, who has a new book coming out at the end of the month on the subject). Cookies deserve a little more respect than that, I think. So I'm here to give it to them. Cookies are magical. They are little discs of flour, butter and sugar in some variation that you can hold in your hand, no matter how young or how old you are. Who doesn't love a cookie? One little cookie can transport you back to your childhood in an instant (think Proust's madeleines), help you make a friend, make a bad day better, are essential to any Christmas celebration worth celebrating and can create world peace (who could be angry over cookies and milk, right?). Name one other food with that much power and influence. Just as I thought.... So here is my first cookie worth celebrating this month. I created this cookie, Glazed Maple Oatmeal Cookie with Walnuts after trying the recipe for Maple Oatmeal scones in The Barefoot Contessa Cookbook by Ina Garten (p 222). Though I love Ina's scones, generally speaking I am not a scone gal. I am, however, a completely devoted cookie gal. I love this cookie with it's chunky texture full of toasted walnuts (I say the walnuts are essential to this recipe- they temper the sweetness and add crunch) and drizzled with that sweet maple glaze. I hope you will love it, too! Glazed Maple Oatmeal Cookies with Walnuts- makes about 2 1/2 dozen 8 ounces ( approx 1 1/2 cup plus 1 Tablespoon) all-purpose flour 3/4 teaspoon kosher or sea salt 3/4 teaspoon baking soda* 1/4 teaspoon ground cinnamon 8 1/2 ounces (2 sticks plus 1 Tablespoon) unsalted butter, room temperature 4 ounces (approx 1/2 cup plus 1 Tablespoon) granulated sugar 7 ounces (1 cup firmly packed) light brown sugar 1 large egg 2 teaspoons pure vanilla extract 1 fluid ounce (2 Tablespoons ) PURE maple syrup (grade B if available) 1/2 teaspoon maple extract 4 1/2 ounces lightly toasted walnuts, coarsely chopped 7 ounces ( 2 cups) old -fashioned oats Glaze: 1 1/2 cups powdered sugar 3 Tablespoons PURE maple syrup (grade B if available) 1/4 teaspoon maple extract teensy pinch (just a few granules) sea salt 1. Preheat oven to 350 Degrees F. Line a couple baking sheets with parchment paper; set aside. 2. in a medium bowl whisk together the flour, salt, baking soda and cinnamon. Set aside. 3. In the bowl of a stand mixer, on low speed, cream together the butter and sugars until combined well . Mix in the egg, syrup and extracts and combine well, increasing speed to medium for about 30 seconds. 4. Return speed to low and stir in the flour mixture until almost completely absorbed. Add in oats and walnuts. Mix well. The results will look like this: 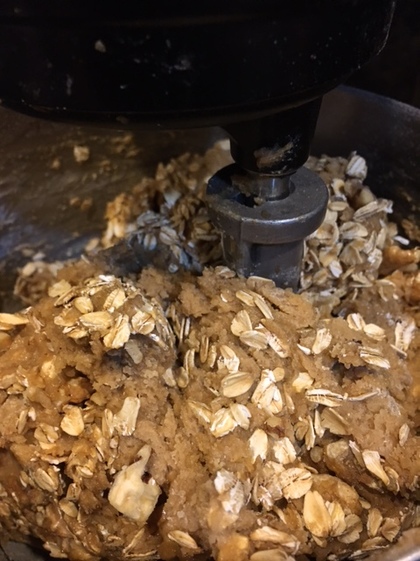 5. Scoop out dough using an ice cream scoop about 3 " apart on prepared baking sheets.**  6. Bake in preheated oven for about 10-12 minutes until edges are nicely golden and middle seems set. Cookies will have puffed up a bit in center and then flattened out. Let cool about 4 minutes then glaze. 7. To make glaze, combine powdered sugar, 3 Tablespoons maple syrup, 1/4 teaspoon maple extract, teensy pinch of salt and enough hot water to make a smooth icing with a drizzling consistency.
8. Using a spoon or spatula, drizzle the tops of the cookies Jackson Pollack style with icing ( as much or as little as you'd like), but you want to see cookie beneath the glaze, not have it completely covered). 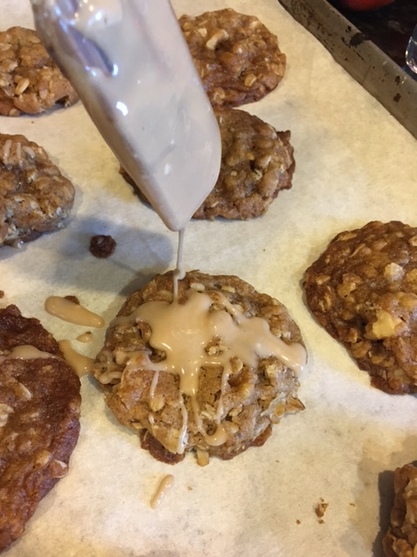 9. Let icing set before eating or storing, about 15-20 minutes (it's ok if you have to try one sooner, I won't tell). 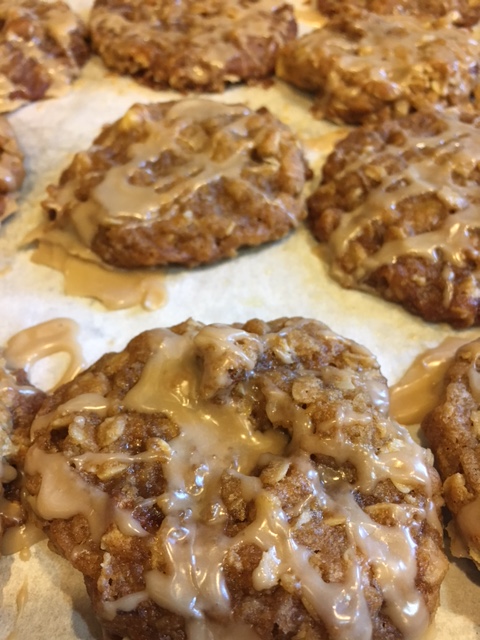 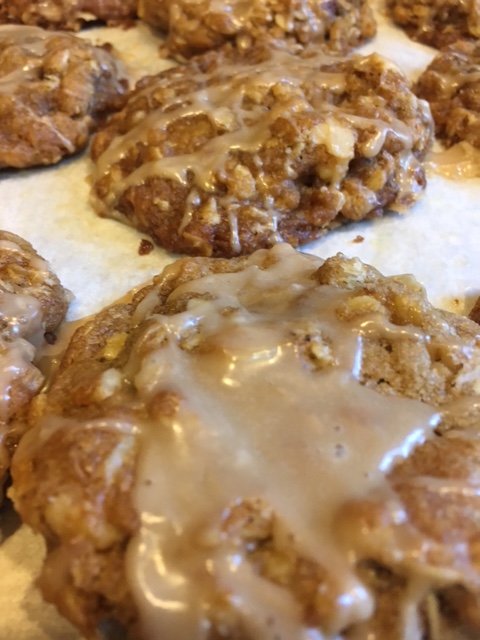 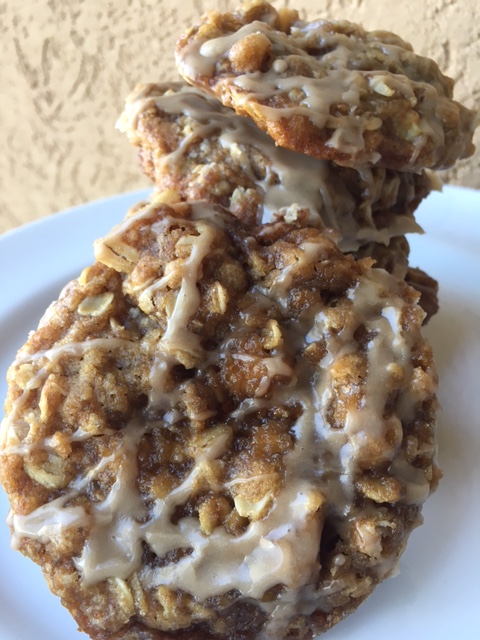 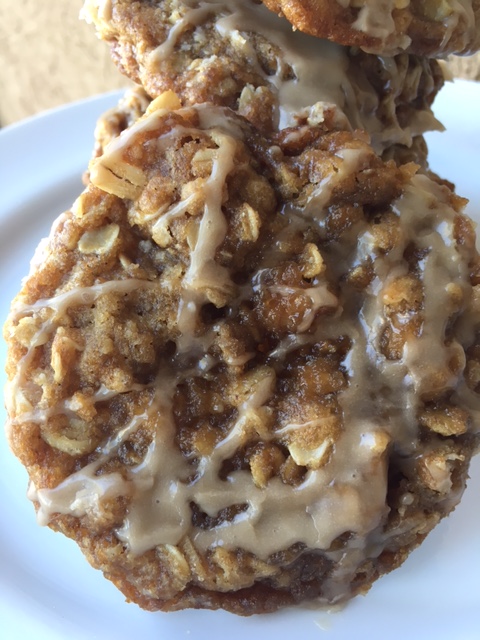 Promise me you'll share some, right? #cookiesandkindness ♥
*NOTE: I developed this recipe at higher altitude ,at around 5000 feet above sea level. If you live closer to sea level and the cookies are not spreading to your satisfaction, you may need to increase your baking soda to 1 teaspoon. Try it and see.They will taste great either way. **If refrigerating the dough before baking, you may need to pat the dough balls down a bit before baking. Try one or two first and see what you think. It's generally what I do. "Chocolate, I am sure, is the concrete manifestation of love. " -Geneen Roth Yesterday was International Chocolate Day. I'm not sure who keeps the calendar of such things, but seems I'm always out of the loop until after the fact. Oh well... And anyways, when it comes to chocolate I'm more in the let's celebrate it often camp. Giving just one day to the original "food of the Gods" hardly seems adequate. So in the spirit of all things chocolate and seeing it was a rainy, chilly day around here yesterday, stirring up a pot of chocolate pudding (because it is delicious warm, too) seemed like just the right thing to do. Divinely Delicious Chocolate Pudding- serves 2-6 (well, yeah) 2 1/4 cups whole or 2% milk* 3/4 cup whole or 2% milk 1/4 cup plus 2 Tablespoons Lightly packed brown sugar 1/4 cup plus 1 1/2 teaspoons granulated sugar 1/4 cup plus 1 1/2 teaspoons cocoa powder** 1/4 cup plus 1 1/2 teaspoons Cornstarch (non-gmo preferably) 3/8 teaspoon sea or kosher salt 6 ounces high-quality chocolate (60-62% cocoa content is my preference), chopped 1 1/2 teaspoons pure vanilla extract 1. In a medium sized bowl whisk together the 3/4 cup of milk, brown sugar, granulated sugar, cocoa powder, cornstarch and salt until smooth. Set aside. 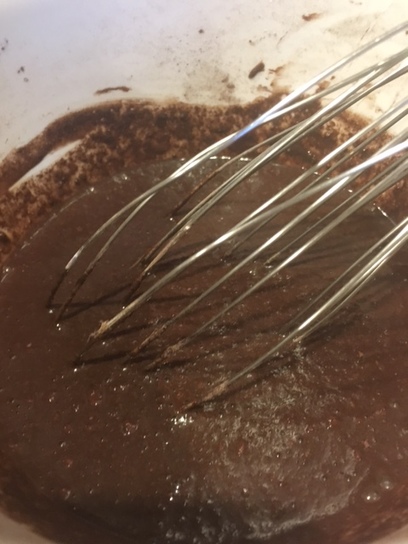 2. In a medium sized saucepan, bring the 2 1/4 cups milk to a simmer over medium heat. 3. Whisk in cocoa mixture and continue to cook, whisking constantly until mixture come to a boil and is thickened, about 3-5 minutes.
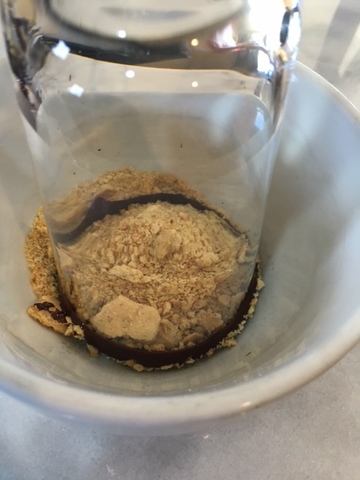
4. Remove from heat and stir in chocolate and vanilla. Whisk until smooth. 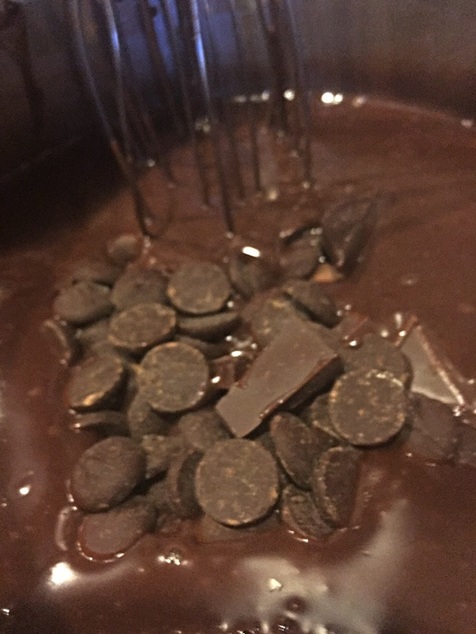 5. Immediately pour it into heat safe serving glasses, a serving bowl or even into a large graham cracker crust (it's so very yummy as a chocolate cream pie).  6. Refrigerate to firm up (a must if making a pie)***, or let it cool off a little bit and eat it warm. It's delicious either way. 7. Top with whipped cream and serve! 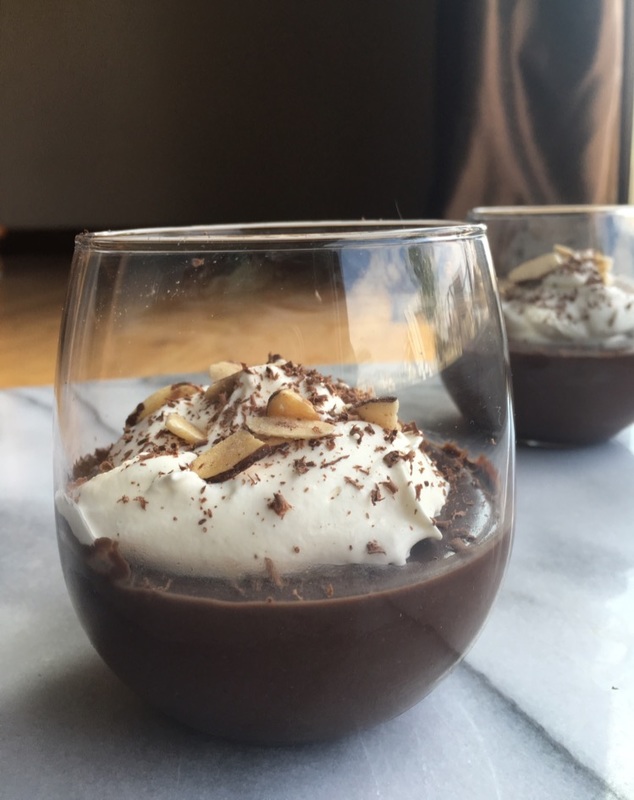 oh, man, was that ever good! 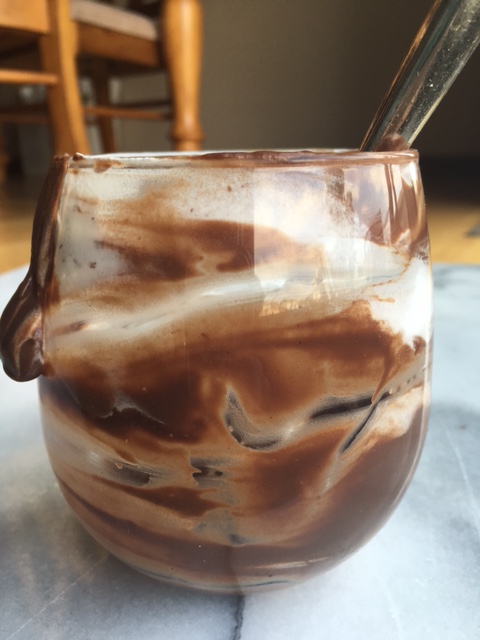 Tips/Comments:
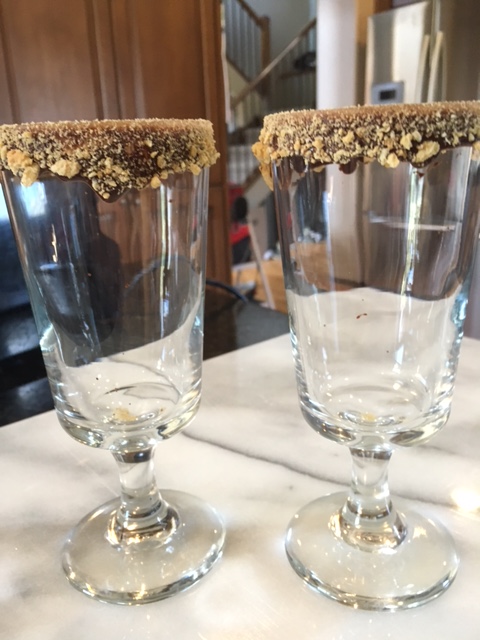
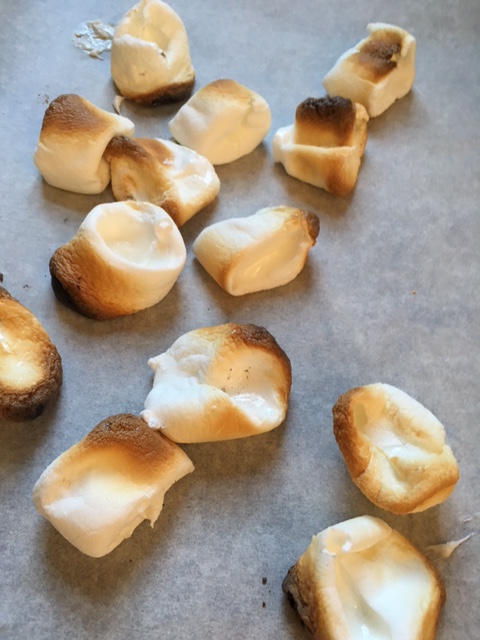
* I have never tried the recipe with dairy-alternative milks, so can't speak to the success that might have. ** Please seek out a really good cocoa powder. I love Valrhona and Cocoa Barry Extra Brute. *** I LOVE pudding skin. If that's not for you, once you pour the pudding into its final resting place, press plastic wrap directly on top of pudding, piercing with a knife in a couple places to allow heat to escape, before refrigerating. "Don't cry me a river. That's stupid! Cry me a milkshake." -unknown When I was young, for several summers my family was invited up to an Adirondack lake called Follensby Clear Pond by some family friends. The family shared some of their family cabins on a small island with us. There was no electricity, we had to pump our water, bathe in the lake and use an outhouse among other wonderful adventures. We all fell instantly and permanently in love with the place. We swam, fished, water skied, fed the chipmunks peanuts, and every night, weather permitting, we had a campfire with singing, popcorn and our most favorite treat of all, "shutemuppers" (pronounced: shut 'em uppers). I had never heard of them before then and have never heard of them since. They were basically s'mores with the addition of a Kraft caramel square inside. I believe the adults coined the name "shutemuppers" as the children's mouths were too busy chewing through the gooey sticky layers to speak thus affording the adults a moment, maybe two, of quiet. Isn't that a great story? I have only the fondest , most beautiful memories of that very simple, wonderful time. So this shake is my nod to that campfire treat of long ago. But maybe now the Shutemupper part is that it is so tasty you will be speechless, if only for a moment! I hope you enjoy it as much as I treasure my memory. ; ) Shutemupper Shake -makes 2 large 2 ounces melted semisweet or bittersweet chocolate* 1/8 cup coarse graham cracker crumbs 2 cups chocolate ice cream 2 cups vanilla ice cream 1/2 cup whole or 2% milk 16 very well toasted marshmallows (I like Jet Puff better than store brands)** 2 double rectangles of Hershey's Milk Chocolate (or better) 2 tablespoons caramel sauce (see step #9 in recipe) 1. Dip the tops of your glasses into the melted chocolate and then into the graham cracker crumbs. Place in fridge to harden. 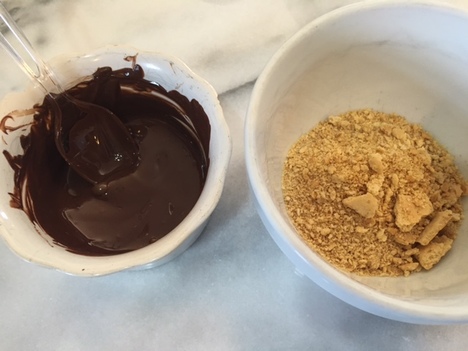
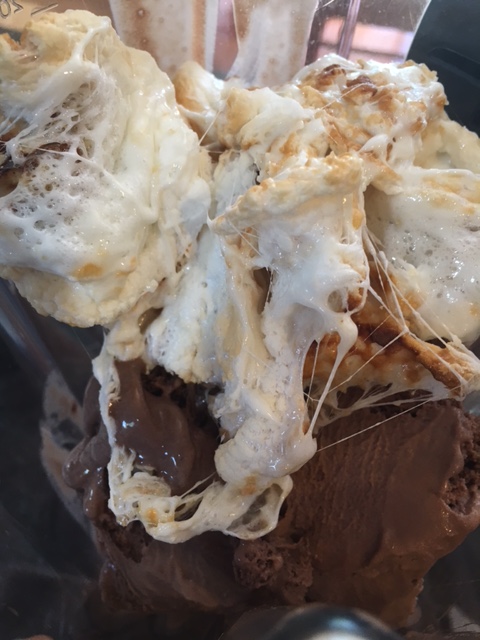
2. In jar of blender, pour in milk and scoop in both flavors of ice cream and 12 of the toasted marshmallows (i know....). Reserve the other 4 for garnish.
3. Right before blending shake, drizzle 1 tablespoon of caramel sauce down the sides of both glasses. 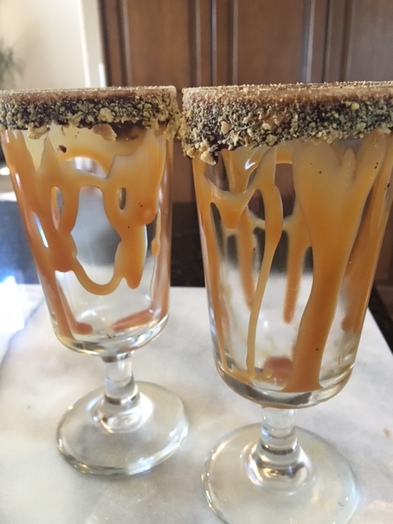 4. Blend the milkshakes well, according to your blender instructions, until thick and smooth. Pour into prepared glasses. Top with reserved toasted marshmallows and chocolate squares. Serve immediately! 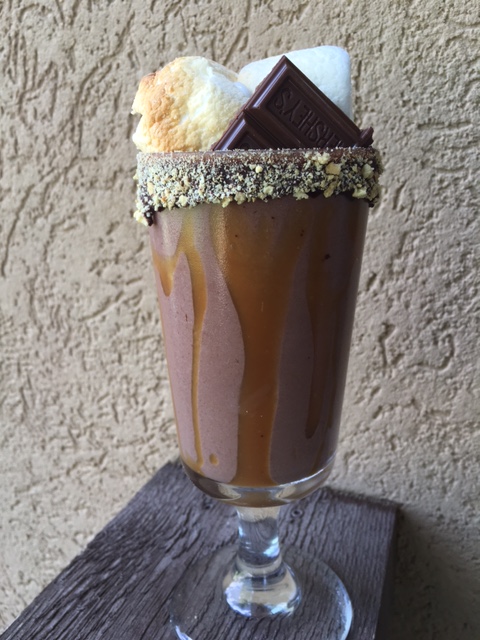 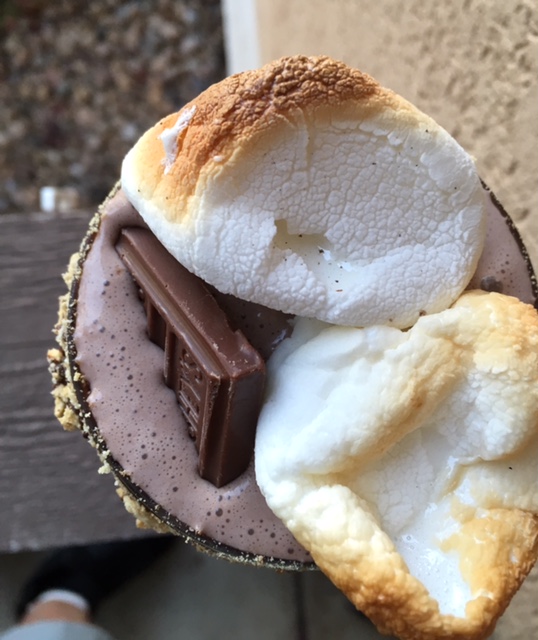 * I melt the chocolate in a small bowl, just large enough for the rim of my glass to fit in so it is deep enough to coat about 1/2" of the rim.
** you want to have your marshmallows very well toasted for flavor, but not burnt. If your grill isn't available you can broil them carefully in your oven, but keep an eye on them. It can go from perfect to bad very quickly! A small kitchen torch could also be used, with care of course, to toast the marshmallows. Remember they will be hot, especially the molten center-handle with care! Cheers! ♥ DISCLAIMER: This is a total sugar bomb. I don't recommend indulging often. You can obviously scale down the portion to make 4-6 small ones. You can also reduce the sugar coma effect by omitting the marshmallows from the shake mixture and using them only for garnish. Enjoy in moderation as with all things! xo |

Archives
December 2019
Categories
All
|
||||||||||||||||||||||||||||||||||||||||||||||||||||||||||||||||||||


 RSS Feed
