|
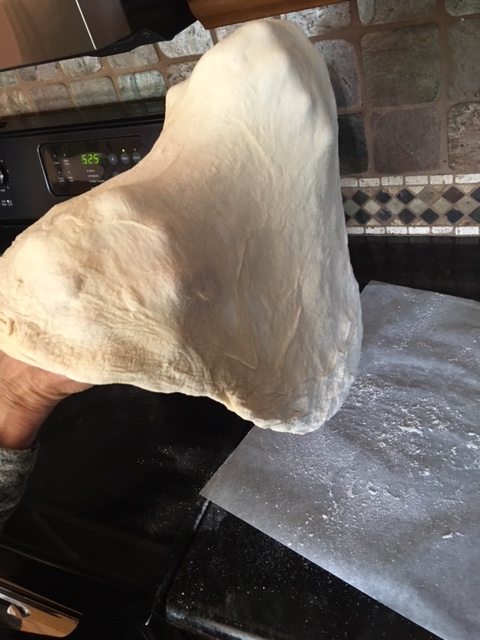
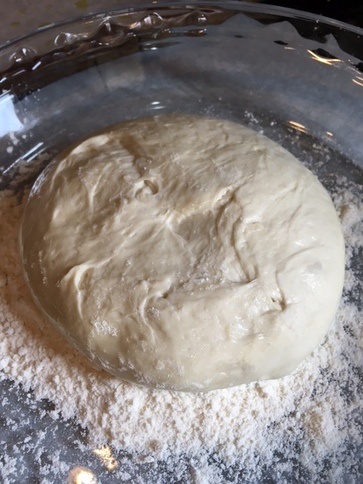
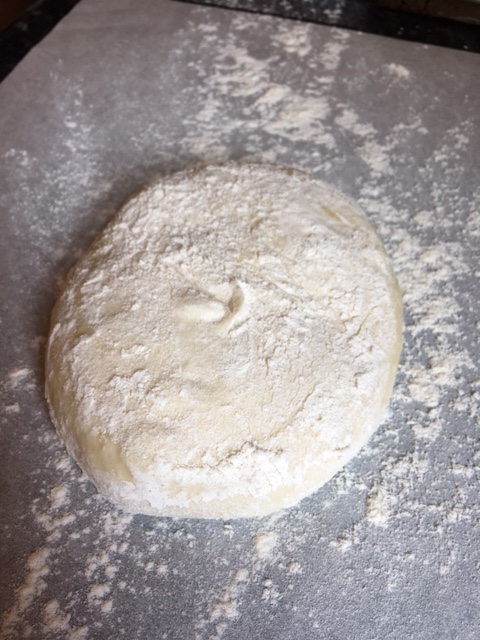
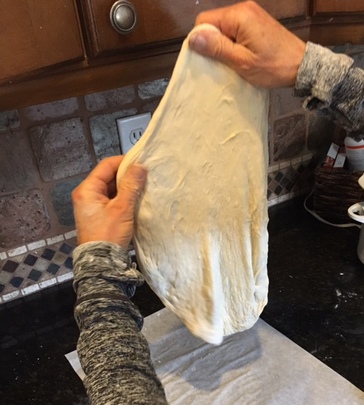
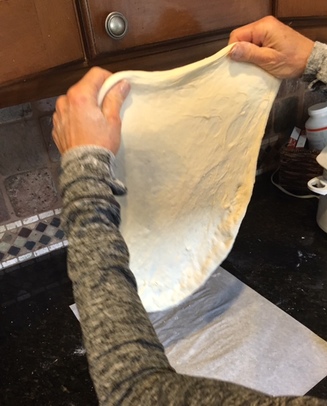
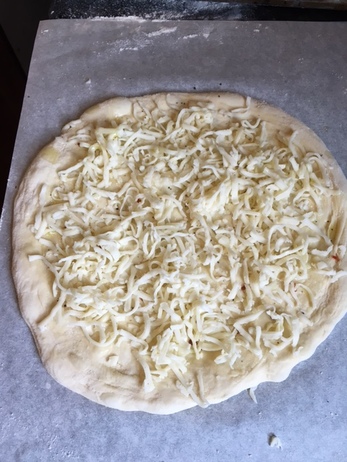
"Unless you are a pizza, the answer is yes, I can live without you. "- Bill Murray I think I agree with Bill Murray on this one. Pizza eating has been tops on my list forever, since eating pizzas (round, no thank you to Sicilain style-blech) from the now shuttered Joe's Pizzeria in Rotterdam, NY not far from where I grew up. It was exceptionally wonderful, made by "imported hands." It was so wonderful in fact, that we actually had it along with other Italian fare for our rehearsal dinner when we got married. It wasn't until I moved to California that I discovered how bad pizza could be made. That has since changed, of course, but nearly 30 years ago, California wasn't doing pizza all that well in a wide-spread fashion. For me any pizza won't do. It has to be excellent. The thing is, it isn't difficult to achieve pizza excellence, especially at home, if you follow a few simple rules. I have been doing it this way for years and years with consistently good outcome. Pictorial instructions follow. 1. Use good dough. It can be store-bought or homemade, but make sure it's high quality. If you are buying it pre-made, seek out an Italian deli or pizzeria that you know has good dough. I sometimes like to buy the dough from Whole Foods, if you happen to have one near you. Most of all I like to make my own. This is my favorite recipe .* What isn't good dough? Avoid tubes of pizza dough you pop open from the refrigerated case at the supermarket, pizza dough mixes and frozen bread dough thawed to use as pizza dough, and any recipe that says the dough will be ready in a couple hours. Stop. Just don't even go there. No. 2. Preheat your oven to 550 degrees (good idea to make sure the oven is clean first) an hour before you plan on baking the first pie. 3. Use a Pizza Stone (or two, if you have them) and preheat it in the oven for the hour above. The pizza stone is part of the oven, not part of the assembly process. You don't make your pizza on a cold stone and tranfer it to the oven. You slide (more on that later) your assembled pizza onto a preheated stone to bake. That's what makes it cook fast and helps avoid doughy middles by transferring the heat from the oven quickly to the pie. If you don't have a pizza stone you can still obtain pretty good results using an inverted half sheet pan (I buy mine at Sam's Club), but it doesn't need to go in the oven 1 hour in advance. 15 minutes before baking will do. If you have a commerical oven like Viking or a Wolf, for example, you may be able to fit a full size sheet pan in your oven and increase your baking surface. Just note , the baking sheet may warp at that high temperature. It won't affect baking, but may not be suitable for using for things you want to bake level , such as cake layers, in the future. 4. Shape your dough out by hand. Never roll it out with a rolling pin! Ever! The yeast in the dough, whether homemade or purchased has worked very hard to make wonderful little gas bubbles in your dough. This is what gives a great dough character and lightness. Handle the dough gently and you will be rewarded with great texture. You use a techniqe that uses gravity to help you by spinning it around like you are turning a steering wheel and then using the backs of your hands/knuckles to further stretch it out. All the beautiful air "blisters" stay intact. It's a beautiful thing! Pictures of techniques below. 5. Shape and assemble your dough on parchment paper. If you've read any of my baking entries here, you know that I am a fan of parchment paper. It is essential for baking. Yes, I know paper burns at Farenheit 451 and your oven is set for nearly 100 degrees F above that. Here's the thing, you trim the paper so that it is not exposed to the heat. The dough is insulating it. I have been using high heat and parchment paper to make my pizzas for years and years and have never once had a fire in my oven. This is the secret to figuring out how to transfer the pizza to the oven easily, no cornmeal, no worries about it getting stuck on the counter. It makes all the difference in the world. You'll see. 6. Season your dough. I know- how elementary! But it will taste even better with a pinch of kosher or sea salt sprinkled lightly over the top of the dough before adding your other toppings. If your topping are excessively salty, you may skip this step. 7. Use great toppings. Just like the dough, if you settle for sub par ingredients, you will get sub-par pizza as a result. Use the best quality ingredients your budget will allow, especially on the cheese. Shred your own cheese, use fresh herbs, all meats should be pre-cooked. Use fresh veggies, thinly sliced. If you are using anything with a lof of moisture (pineapple, canned olives or jarred artichoke hearts, for example) drain and pat it as dry as possible with several layers of paper towels first. 8. Top sparingly. This one is a golden rule. You want the top and the bottom of the pizza to cook at about the same speed. If the pizza is heavy with toppings,. the bottom crust will not bake as fast as it should. This will result in a doughy, undercooked and possibly soggy pizza. Just say no! Put your favorite things on the pizza, but limit the quantity. Less is definitely more in this case. 9. Use a rimless baking sheet or metal pizza peel. THe easiest way to get your pizza in (and out) of the oven and onto the stone is to slide it off one of the two. Think of it as a giant spatula. Only caveat? make sure it's large enough to accommodate the diameter of your pizza. When removing the hot pizza from the oven onto the rimless baking sheet, using a good pair of stainless tongs is a good idea for safety. Here's the pictorial I promised: 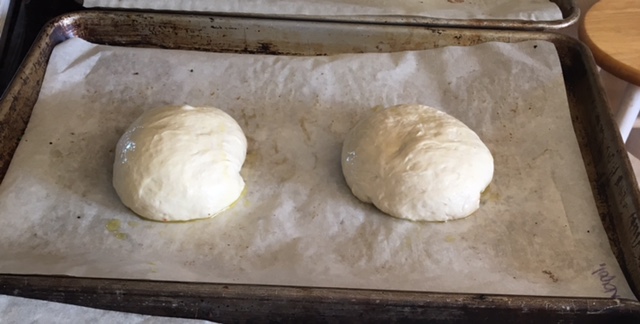 Use good dough. Let it sit at room temperature for an hour or so before shaping and baking. These are approx 8 ounce balls of dough (I coated them lightly with olive oil), which make about a 10" round pizza each. 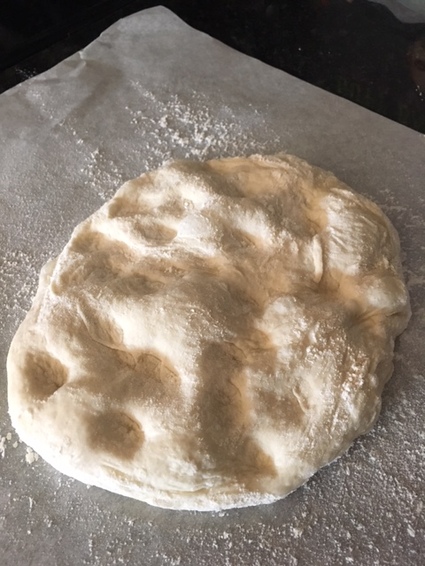 When ready to shape dough, place on a piece of parchment paper which you have sprinkled lightly with flour (in professional circles we call this "bench" flour, in case you want to throw some terms around-lol!). Gently dimple the tops of the dough with your finger tips to get started. You want to leave all those air bubbles in tact.
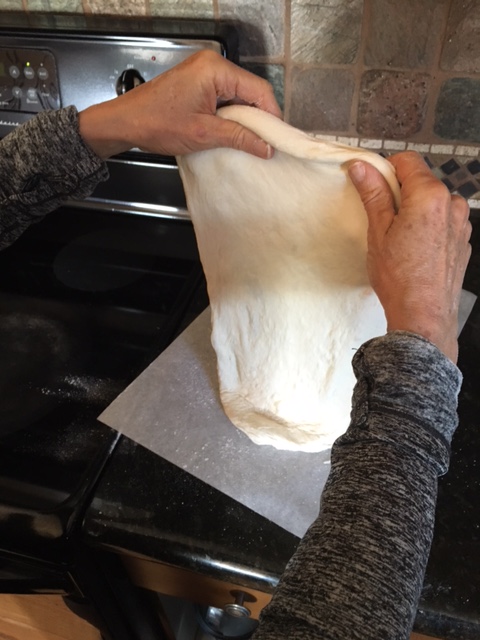
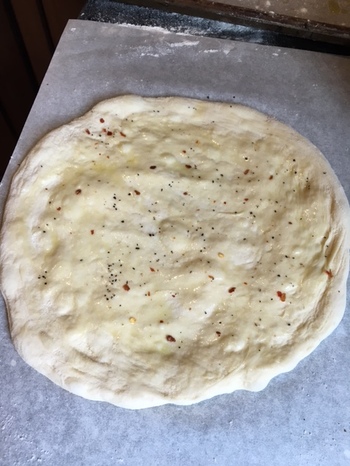
DO NOT roll out the dough. Gently lift dough up by the edge and start turning it with your hands like a steering wheel in clock-wise direction allowing gravity to help you stretch the dough. Do this fairly quickly to keep an even shape. You can go around several times, if needed. To stretch the dough further, drape the dough over the backs of your hands. Start with your hands fairly close together and gently pull them apart to stretch out the dough, while continually turning the dough in a clock-wise fashion as before. Take your time. You can move your hands to the thicker parts of the dough as necessary. If it should tear, lay the dough down and pinch together the hole. If you don't get a perfect circle, don't worry, it will still taste amazing. 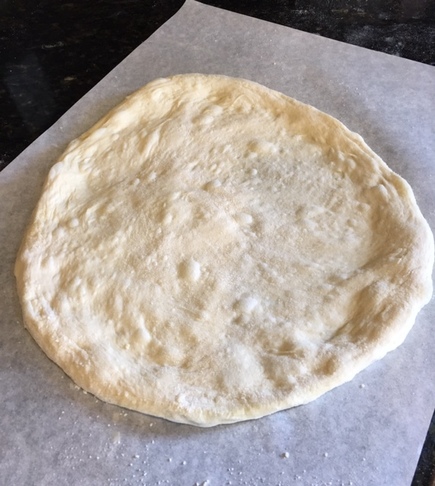 Success! See all those beautiful air bubbles? Your dough is back down on the floured parchment and ready to assemble. Sprinkle the top with a tiny pinch of kosher or sea salt before continuing. 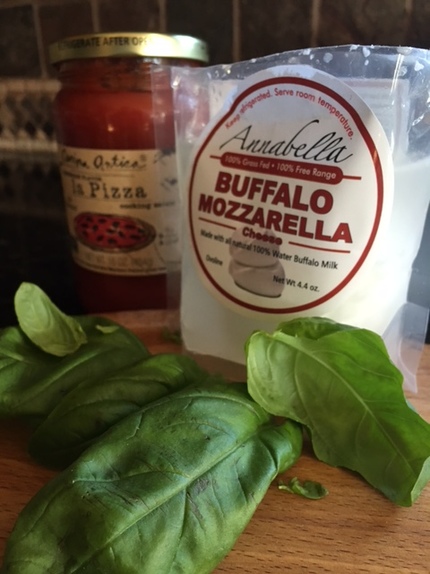 Remember to use fresh, quality ingredients . It doesn't have to be what's pictured here, but your pizza will only taste as good as what goes into it. Remember to use pre-cooked meats and some veggies will benefit from pre-cooking as well. It may take trial and error to discover which you like better pre-cooked.
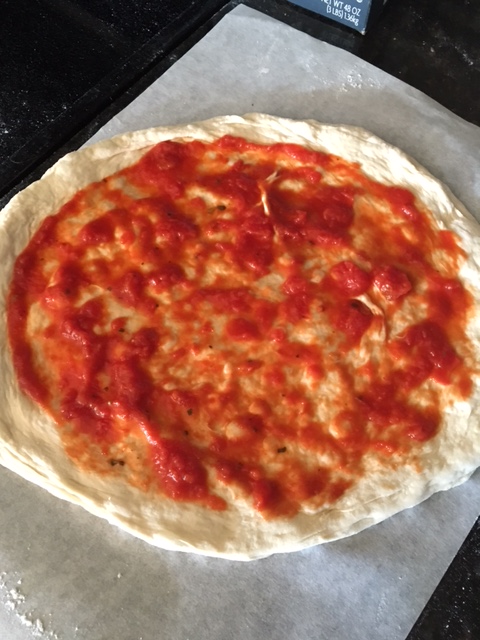
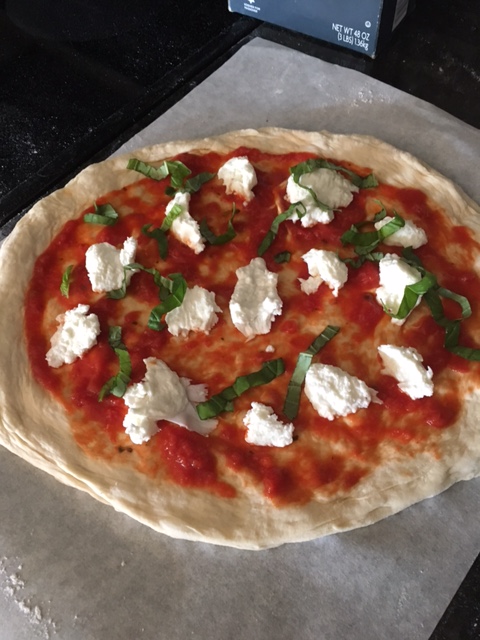
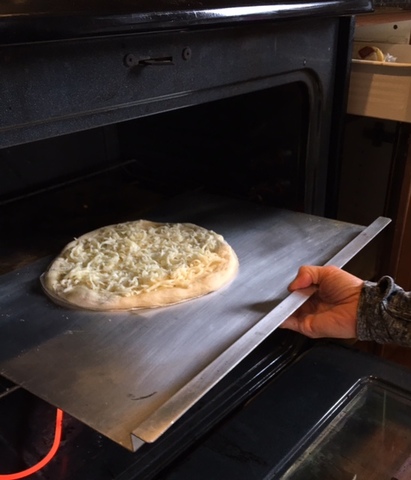
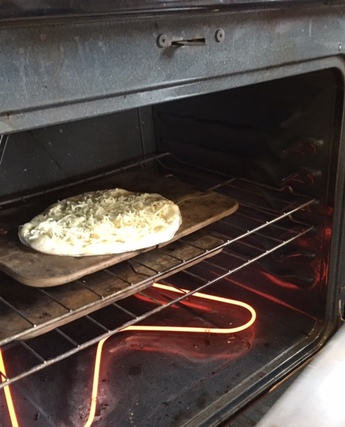
Top your pizza sparingly. That is the right amount of sauce shown (or pesto, or alfredo...whatever you use as the base). You could certainly use more cheese. I was going for a more "authentic" Italian Pizza Margherita presentation here. Just remember the old adage "less is more." Use your imagination and have fun thinking up great combos! 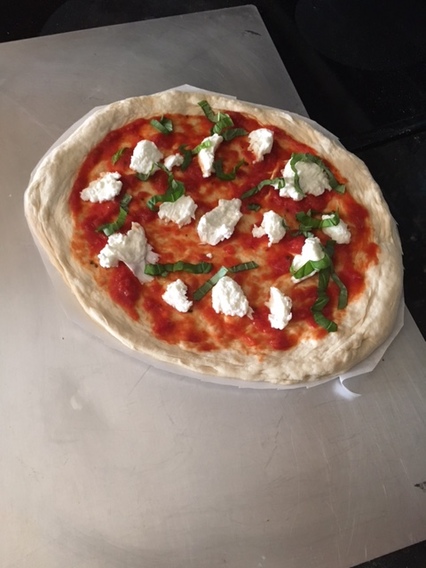 With a pair of scissors trim the parchment all around the pizza and slide a rimless baking sheet or pizza peel under the paper to transfer it to the oven.  Place the edge of the pizza farthest away from you at the back of the pizza stone (which has been in your oven preheating for an hour, right?) and wiggle it off the pan while pulling the rimless baking pan (or pizza peel) back towards you as quickly as you are comfortable with. With practice you will gain more confidence and execute this step quickly and flawlessly. For some reason this picture makes the pizza look like it's hovering above the stone, when in fact it is on the stone. Bake away (Check on it once during baking and rotate it as needed for even baking. Be quick so you keep all that hot air in your oven where it's needed). Caution: you may want to let the first blast of hot air escape the oven before putting your face down into it. So lean slightly away as you open your oven door.  After about 6-10 minutes, depending on how your oven operates, you will remove a pizza that looks something like this! You can see the puffy edge , the toppings are fully melted and cooked, the rim of the pizza is golden and the bottom (if you were to peek) is nicely browned and crisp. Pizza perfection in my book! 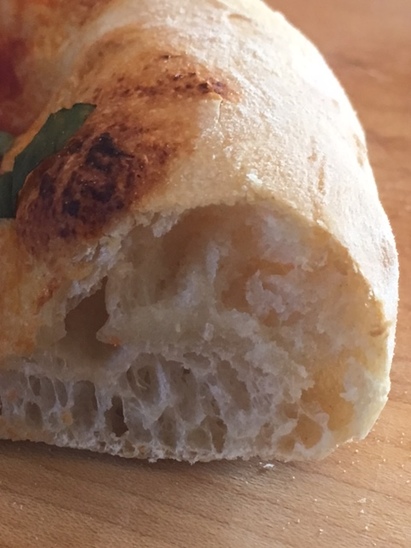 See how allowing the dough a nice slow rise and being gentle with the dough to retain the air pockets paid off here? Yummy good stuff, I tell you! If you'd like to try my salad topped pizza, you can find it here.
Be sure to let me know how you get on with your pizza making. I'd be interested to know! ♥ * Note: If you care to experiment, links to other dough recipes I like are here (time consuming but extremely flavorful-for the more advanced cook), here and here. Happy pizza making!
0 Comments
"Love is a fruit in season at all times and within the reach of every hand." - Mother Teresa Back in November I came across a book called Medical Medium, by Anthony William. At the time I had been dealing with a very rare, so-called auto-immune condition called Granuloma Annulare for about 2 1/2 years. In that time I had tried treatments recommended by my dermatologist that only made things worse and left me with unsightly scarring. Dietary changes suggested to me by other practioners also proved fruitless for me for that condition. This book brought me great hope, although it didn't address my condition specifically. I immediately incorporated some of the dietary changes recommended in the book. In January, after the holidays had passed, I started the cleanse. The cleanse is basically a raw, vegan diet , heavy on the fruits, with no fats, including nuts and seeds, allowed for 28 days. I never thought I'd make it 28 days. Every day I told myself just get through today. Then it just got easy to follow, and I ended up doing the cleanse for almost 35 days. The best news of all is that my Granuloma Annulare that had been speading like wildfire, was an angry red color and very itchy, disappeared as did my hot flashes (a bonus). I found it wasn't really all that hard to adhere to the eating plan after the first few days. The food was delicious, life-giving and satisfying. Smoothies like this one became the cornerstone of my eating plan, and I mostly still eat raw vegan because I feel so much healthier and even lighter emotionally. Chronic illnes or not, this smoothie is simply delicious. My whole family loves them (thank goodness for Costco's organic frozen fruit department)! I have a Vitamix blender, and I still need to let the frozen fruit thaw partially. If you don't have a high speed blender, adapt the recipe to suit the power you have. Anthony WIlliam recommends using all organic produce for best results, but use what your budget allows. The hemp and chia seeds add fiber and bulk to the smoothie as well as protein. THe spirulina will alter the color into a bluish greenish shade, but won't affect the taste. Hawaiian Spirulina is a super food that helps take heavy metals out of the blood stream and also has a small amount of protein. Green Tropical Smoothie- makes 2 2 cups (slightly heaping) frozen mango chunks 1 cup fresh or frozen pineapple chunks 1/2 cup coconut or filtered water* 1 banana, peeled and chunked 1 cup loosley packed baby spinach (organic) 1 cara cara or other navel orange, peeled 2 Tablespoons organic hemp seeds (optional) 2 teaspoons organic chia seeds (optional) 1 teaspoon Hawaiian Spirulina (optional) 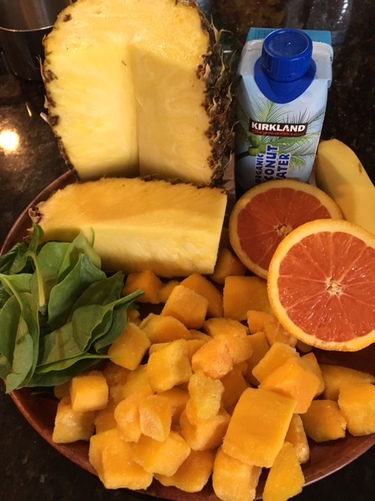 1. In your blender jar, layer coconut water, banana, orange, spinach, hemp, chia and spirulina (if using) and frozen fruits. 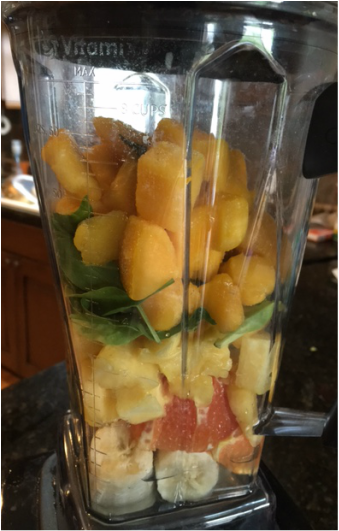 2. Blend according to your blenders instructions, until smooth. 3. Pour into glasses and enjoy! 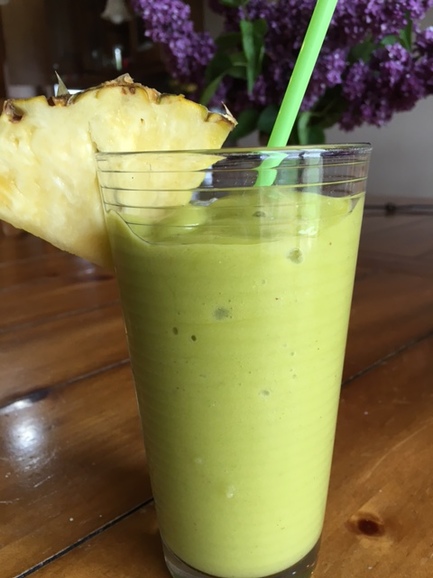 * If using all fresh fruit and you want a slushy consistency to your smoothie, omit coconut water and substitute ice cubes (go into blender last) to get the desired consistency. I'd start with about a cup to start. Here's to your health! ♥
“My love is pizza shaped. Won’t you have a slice? It’s circular, so there’s enough to go around.
” -Dora J. Arod Last week I was back in Upstate New York where I grew up, helping my mom pack up her house of 51 years. It was at times wonderful, trying, sad and good. Maybe some of you have had a similar experience helping a parent move. I also got to see my brother, sister and their families, which was a delight for me. I don't get back there as often as I would like. One of the highlights was showing my nieces and nephew how to make homemade pizza one night as we celebrated my youngest niece's 11th birthday!. We had so much fun! They took to it like naturals, too. That got me thinking that I hadn't made pizza at home for a very long time. Now that we have a couple gluten free people in my household, we don't make it as often as we once did. So this weekend with some free time on my hands I thought I'd make one of my favorite pizzas-salad topped pizza. It is just baby mixed salad greens tossed lightly in a nice lemony vinaigrette sitting atop a sauce-less cheese pizza. It makes a wonderful lunch or light dinner It is super simple especially if you start with purchased quality dough from your favorite store, pizzeria or Italian deli. I usually make my own dough, but if I didn't plan ahead, I really like to use the fresh dough they sell at Whole Foods. Salad Topped Pizza (makes 2 -10 inch pizzas) 1 lb fresh pizza dough (purchased or homemade) sea salt coarse ground black pepper crushed red pepper flakes 2 cups shredded part-skim mozzarella 2 Tablespoons fresh grated Parmesan cheese plus more for shaving 4 cups lightly packed mixed baby salad greens or baby arugula 2 Tablespoons Extra virgin Olive Oil 2 teaspoons fresh lemon juice 1/4 teaspoon Dijon mustard 1/4 teaspoon minced fresh garlic, peeled all-purpose flour for dusting parchment paper 1. About an hour before making pizzas, place pizza stones inside oven and preheat oven to 550 degrees Farenheit (if you don't have a pizza stone, I have also had good success using inverted, heavy duty baking sheets as my "stones".). 2. Remove dough from fridge*. On a lightly floured surface, divide dough evenly into two pieces. 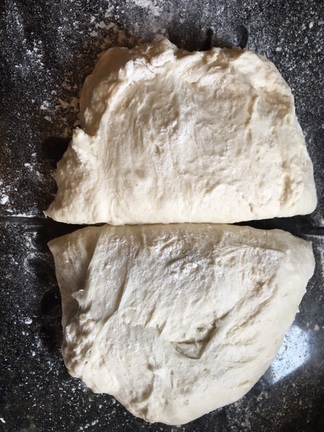 3. Take each half and fold the dough edges into the middle to make a rough ball. With the rough side down, roll the dough, using the counter as an aid, into 2 nice smooth balls. Place the balls on an oiled cookie sheet, several inches apart. Brush the tops of the dough ball with olive oil as well. Let rest on counter for about 1 hour. 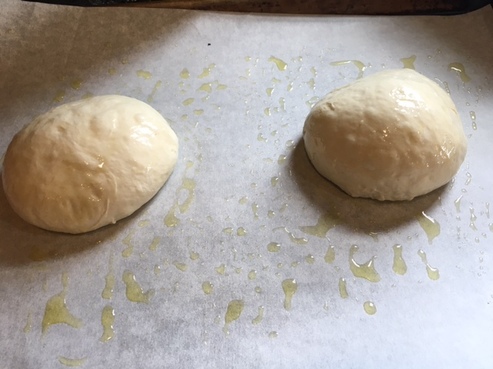 4. After an hour taking one ball of dough at a time, dip both sides of the dough ball in flour. Take a sheet of parchment, sprinkle it lightly with flour. Place the floured ball of dough on it and using your finger tips, dimple the dough.
 5. Now pick up the dough with both hands (lightly floured) on the top edge of the dough. Using two hands, lift the dough in the air and letting gravity help you, spin the dough clockwise moving your hands around, until the dough has stretched out to about a 10" round. You can also keep it flat on your floured paper and stretch it by hand on the paper. I think you get a more even crust this way I demonstrate, but do what you are comfortable with. Just remember to keep your hands on the thick outer part of the dough and just allow the pull of gravity to do all the work, keeping the dough round in constant motion If your dough is really elastic. You may have to place the dough down on the floured paper and let it rest several minutes before trying again. Repeat with the other ball of dough. Also do not worry about getting a perfect round. A rustic shape is just as delicious!
6. Once the dough has reached desired size, lay it gently back down on the floured parchment paper.  7. Lightly brush the tops with olive oil. Sprinkle each dough round lightly with a small pinch each of sea salt, black pepper and crushed red pepper. Top with mozzarella. Sprinkle each with 1 Tablespoon freshly grated Parmesan and drizzle very lightly with additional olive oil (optional).
8. Trim parchment with scissors all around dough.  9. Using a pizza peel or rimless baking sheet, transfer pizzas to preheated pizza stones inside oven, parchment paper and all. This is my fool-proof "trick" for building and transferring a pizza into the oven. Works like a charm every time.
10. Let pizzas bake about 6-10 minutes. (Disclaimer: Every oven is a little different, so please check on your pizzas, rotate them as needed from top to bottom (using peel or rimless baking sheet) or rotate them around on their stone to ensure even baking. Your pizzas are done when the crust is golden and crackly, cheese is bubbly and maybe lightly browned in spots, and bottom of pizza is nicely golden. 11. While pizzas are baking whip up salad dressing: whisk together 2 Tablespoons Extra Virgin Olive Oil, lemon juice, pinch each salt and pepper, garlic and Dijon. Set aside. 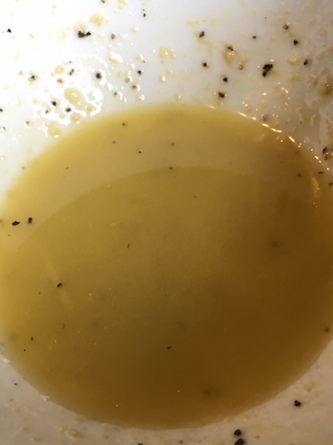 12. When done remove pizzas from oven and transfer to plates. 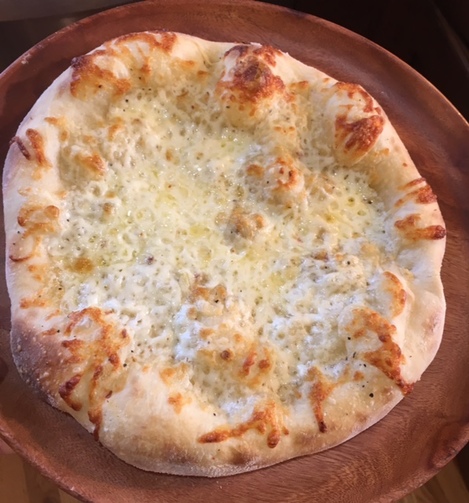 13. Immediately toss salad greens with dressing to taste. 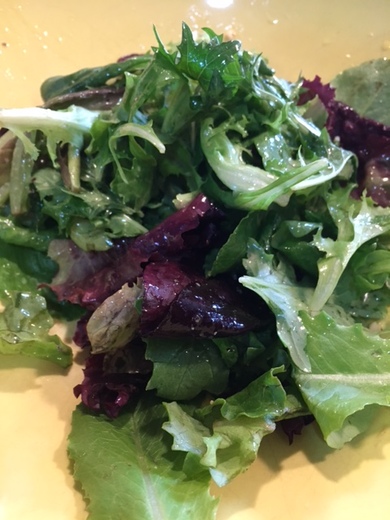 14. Once dressed, top hot pizzas with salad greens. Shave Parmesan cheese on top and serve. Dig in! 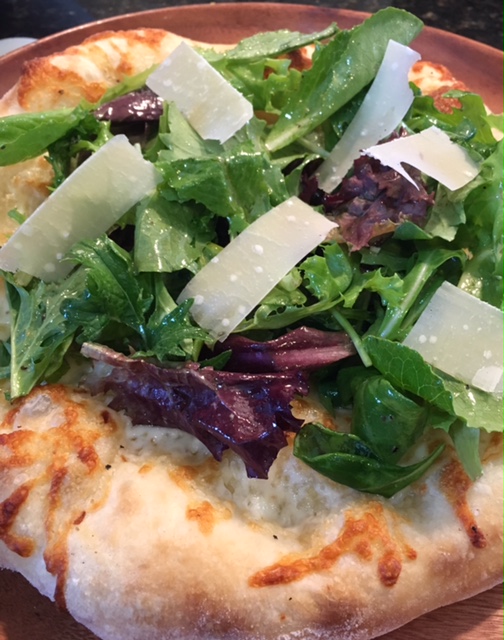 * if you are using home made dough (I have several favorites I will share with you another time) my suggestion is to let it rise slowly in refrigerator for several hours and possibly over-night to develop the best flavor. Don't punch it down, just gently divide the dough and roll into balls as instructed. The time on the counter is less about a second rise than it is about warming up the dough closer to room temp. However, if you have beat down the dough, you may need to let it sit out longer once you form into balls to allow the nice air bubbles to form again. These give the dough great character and lightness.
|

Archives
December 2019
Categories
All
|

 RSS Feed
