|
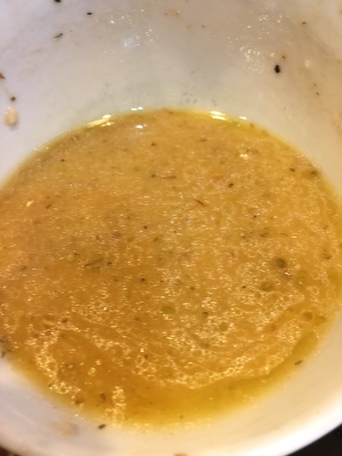
“Tacos are like what the voices of a hundred angels singing Bob Dylan while sitting on rainbows and playing banjos would taste like if that sound were edible.” -Isabel Quintero I found the above quote on Goodreads. I'm not sure I have ever come across a more glorious food quote! Made my whole being smile. Then again, it makes me think this recipe really has a lot to live up to, and I am a little nervous about that! I also just realized it has been a long time since I posted a recipe or a Gratitude Diaries (entry coming soon!). So I thought I'd quickly share where my crazy brain has been the last month. First of all I have a senior in high school who will be graduating in just a little over a month. I am wanting to make the most of the time we have together before she (my youngest of two kids) heads off to college out of state. I work almost full-time outside of the house, so that's an added time taker. Lastly I have been doing some creative exploration that I have not shared here. I have created some mixed media art and some leather wrap bracelets specifically and the act of creating has just taken me to such a happy place, I neglected many other things (blog, laundry, clearing the paper clutter off my counters....) But I re-grouped recently to handle some of those issues and thus a new blog post in the form of a recipe. So I hope it was worth the wait. Thanks for hanging in there. Weebly, my blog host, gives me stats, and somehow, you have been still visiting and reading! So thank you so much for that! xoxo This recipe is inspired by one I saw travel on Facebook from Better Homes and Gardens. I made their version and it was time consuming and messier than I liked. Don't get me wrong, it tasted very good, but not good enough to justify how long it took me to make it. So I stream-lined things a bit and came up with the following. Yummy good and super easy thanks to the use of a pre-cooked rotisserie chicken from Costco (or wherever...mine had a net weight of about 3 lbs). Try it and see what you think. It was a huge hit at my house and is already being requested for an encore appearance. Buen Provecho! Green Chile-Tequila Chicken Tacos (Serves 6 or so) Breast and Thigh meat from 1 pre-cooked Rotisserie chicken, shredded, skin removed, pan juices reserved.* 1 c. diced onion 1 Tbsp. minced garlic olive oil 1/2 jalapeno pepper, seeded 2 Tbsp. Tequila (I used Jose Cuervo Gold) 1 1/2 cups salsa verde (if you are near a Trader Joe's, I really like their brand, too) 1 cup chicken stock pinch salt pinch coarse ground black pepper 1/2 tsp ground cumin 1/8 tsp. ground coriander 1/4 tsp dried oregano, crumbled 6" corn tortillas (GF are available) Assorted toppings to taste: Cilantro, crumbled cotija cheese**, radishes julienned, chopped red or green cabbage, diced fresh tomatoes, diced white or green onion, minced jalapeno or pickled jalapeno slices, fresh lime wedges 1. In a large skillet heat 2 Tablespoons olive oil until hot, but not smoking. Add in onion, garlic and jalapeno half. Cook, stirring until softened and translucent, about 5 minutes. Stir in Tequila and cook until nearly evaporated.
2. Stir in salsa verde , chicken stock, salt, pepper, cumin, coriander, oregano and reserved pan juices. Bring to a boil then reduce heat to a simmer. Cook, stirring occasionally, until slightly thickened and reduced, about 10-15 minutes. Remove and discard jalapeno OR you can chop it up and stir it back in if you want some extra kick. Stir in reserved chicken.
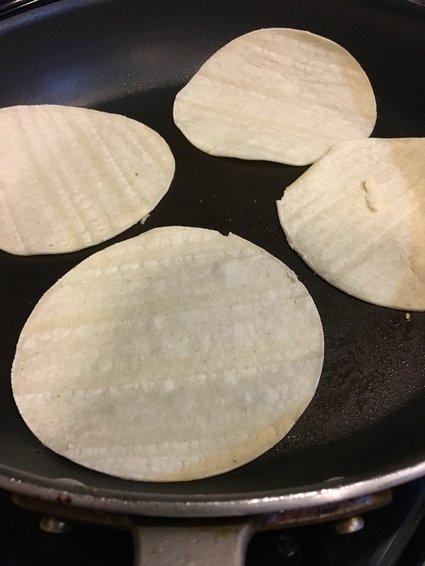
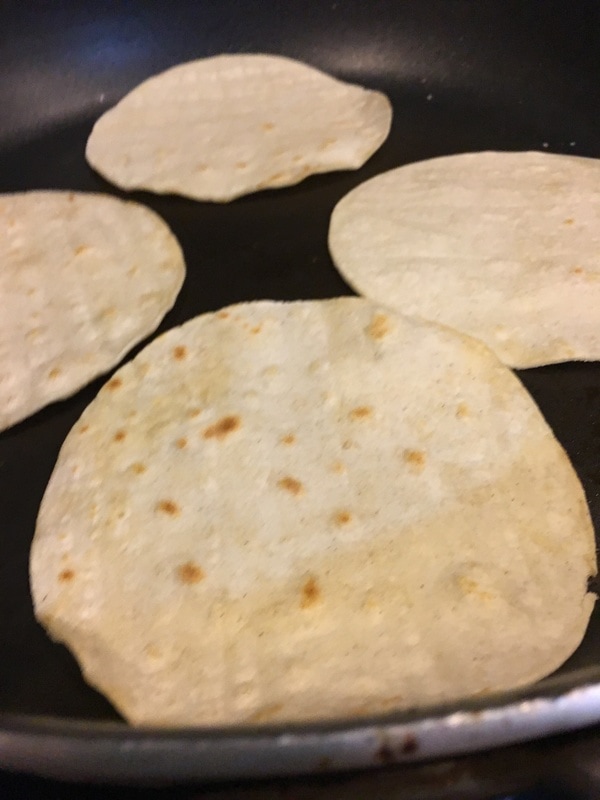
3. Combine chicken and pan sauce until fully coated. Simmer until heated through. Taste for seasoning and adjust as needed. (remember the cotija cheese is on the salty side if using). Remove from heat, cover and set aside . 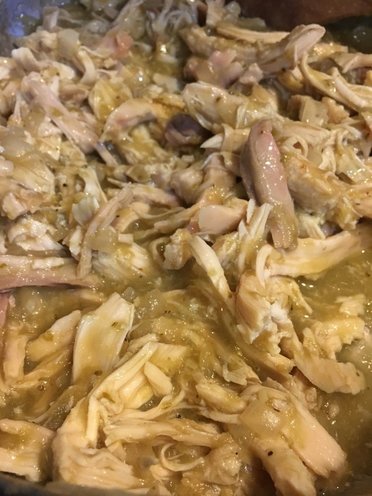 4. Meanwhile heat another skillet or griddle and heat corn tortillas on medium to medium high heat on both sides to make them soft and malleable, about 30-60 seconds per side.
5. Have a variety of toppings nearby. Create tacos by filling warm tortillas with a small amount of chicken the topping as desired. Don't overfill! Squeeze lime juice on top if that's to your taste. 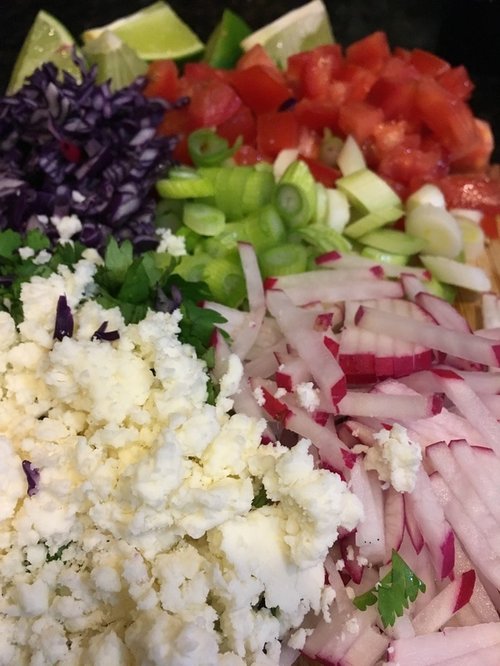 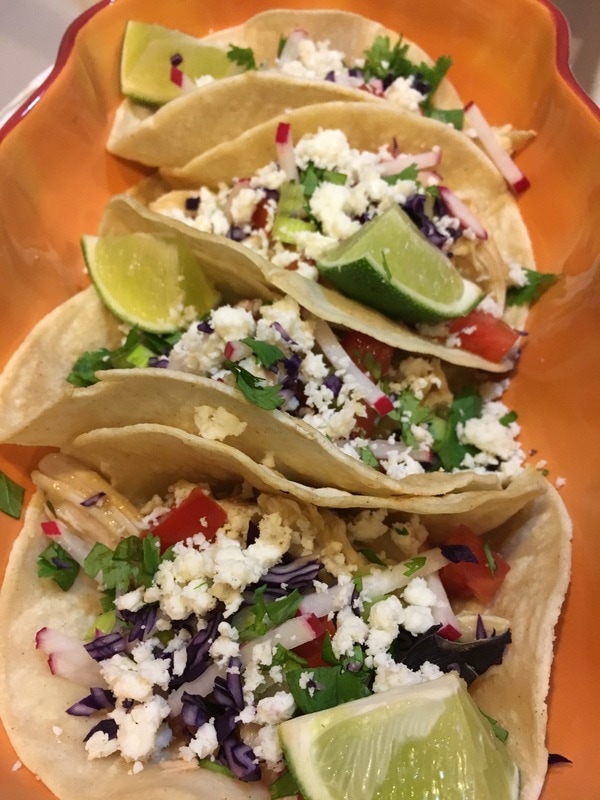 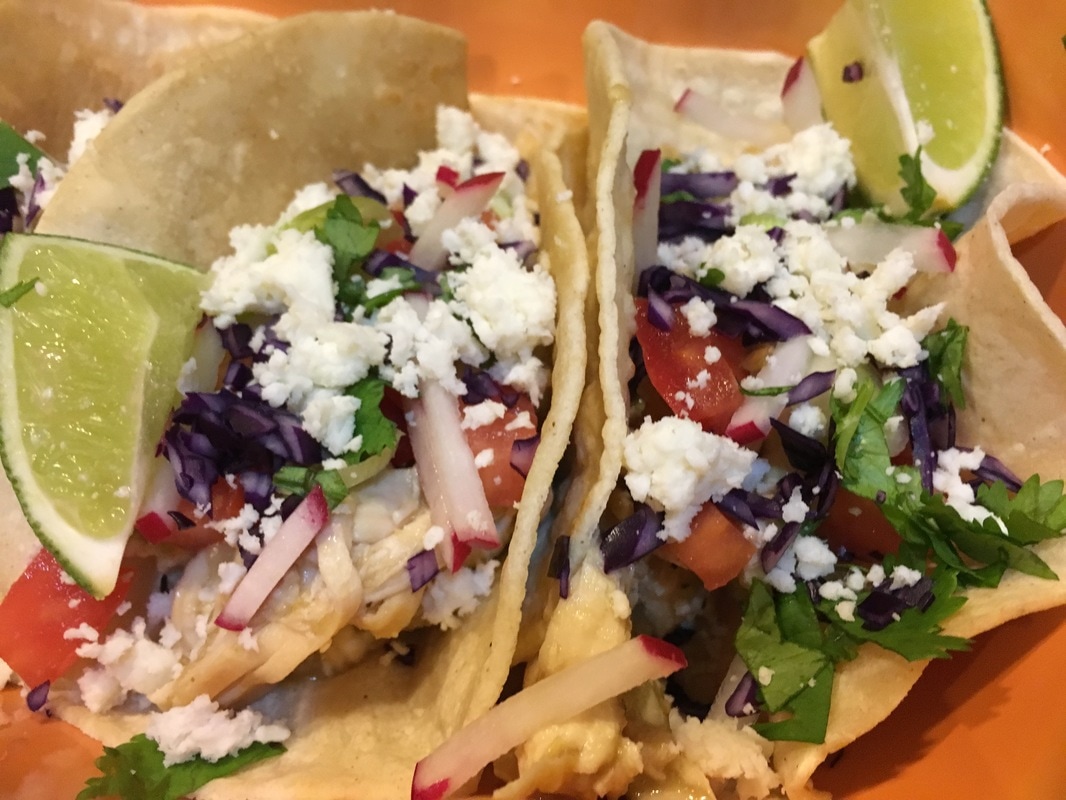 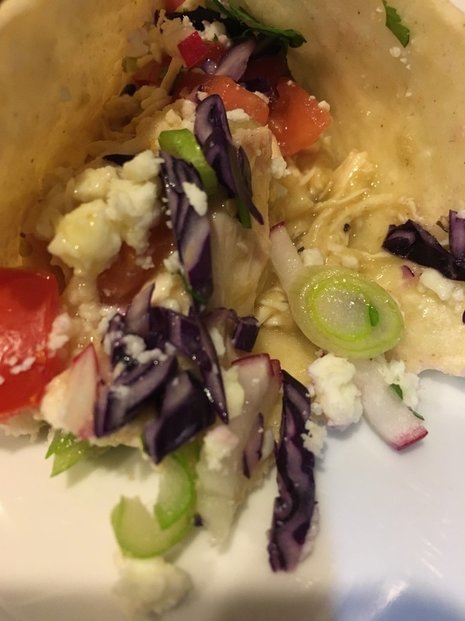 Notes: * Chicken demi-glace would be a good substitute for the rotisserie chicken pan juices. It's available on-line or in some gourmet grocery stores. Use 1 Tbsp or to taste. A little goes a long way. Store leftover in freezer, air-tight.
** a substitute for Cotija cheese, if it's not available, near you, is just a basic domestic crumbled feta from the dairy aisle of your grocery store.
0 Comments
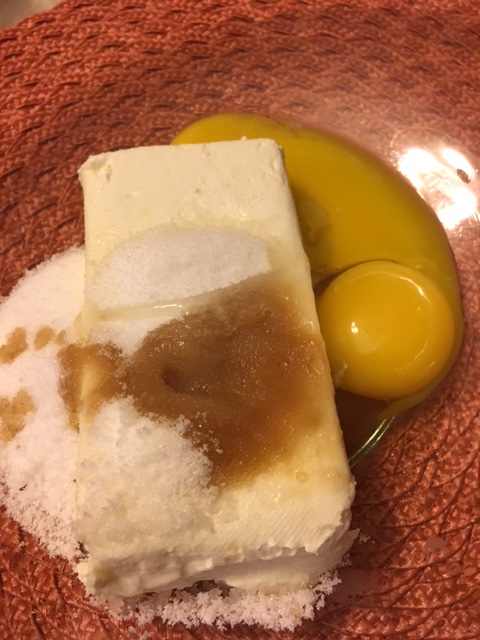
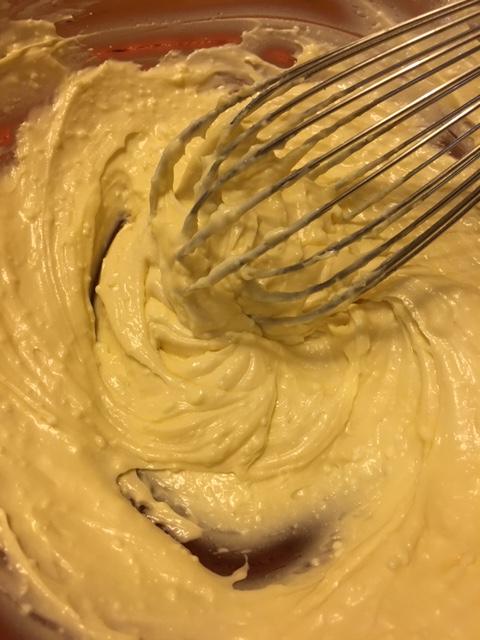
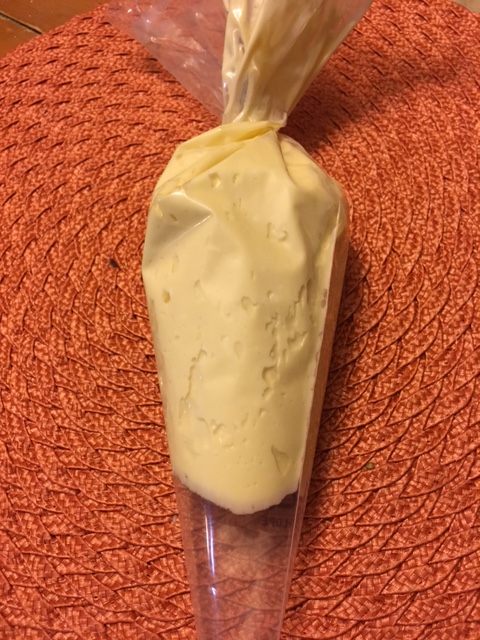
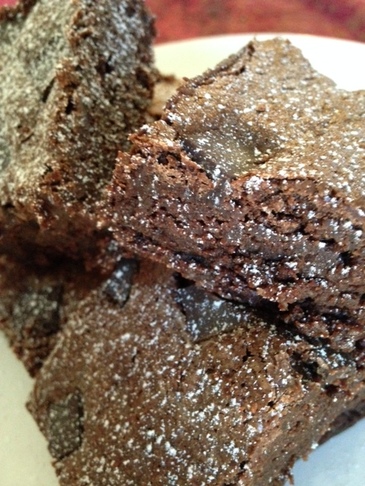
"The only way cheese is dessert is when it is followed by the word cake. " -Michele Gorman, Single in the City It's hard to argue with that kind of logic, Michele! So I hope you are not quite sick of all the sweet posts of late. I promise something savory is on the way, and just in time for Thanksgiving, too! But for now, how about a pan of Cheesecake Swirl Brownies? In fact, any chocoholics on your Thanksgiving guest list will really thank you for thinking of them by having a plate of these for dessert (as opposed to some sweetened vegetable pie- really now). So to start off with you need to make these brownies. I have never tried the cream cheese version with the almond flour version, so can't attest to the results, but the all-purpose or gluten free flour version will definitely work. Once you get the brownie batter in the pan, then get to work on the cheesecake part. Have all the ingredients at room temperature so it will come together quickly. Cheesecake Swirl Batter -enough to swirl through 1-9x13" pan of brownies 8 ounces cream cheese, preferably Kraft Philadelphia brand 1/4 cup granulated sugar 2 egg yolks 3/4 teaspoon pure vanilla extract 1. Combine all ingredients in a bowl with a whisk. Beat until smooth-ish.
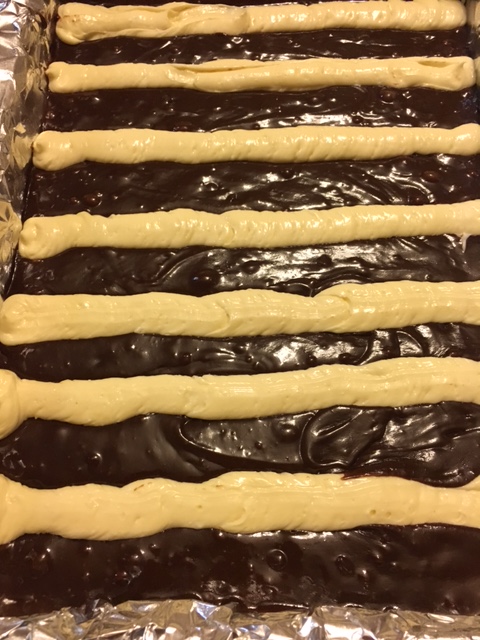
2. Transfer cream cheese mixture to a piping bag or a gallon ziploc bag. Twist to close or seal. Cut off about 1/2 inch at the tip or corner. 3. Inserting tip of bag slightly into brownie batter, pipe evenly spaced rows of cream cheese mixture horizontally across short edge of the pan.
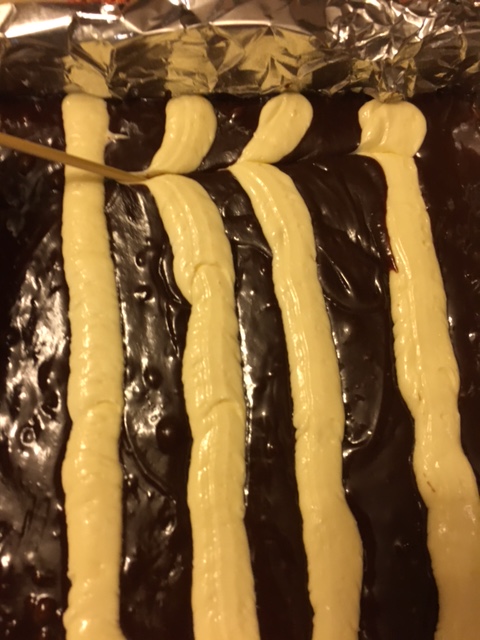
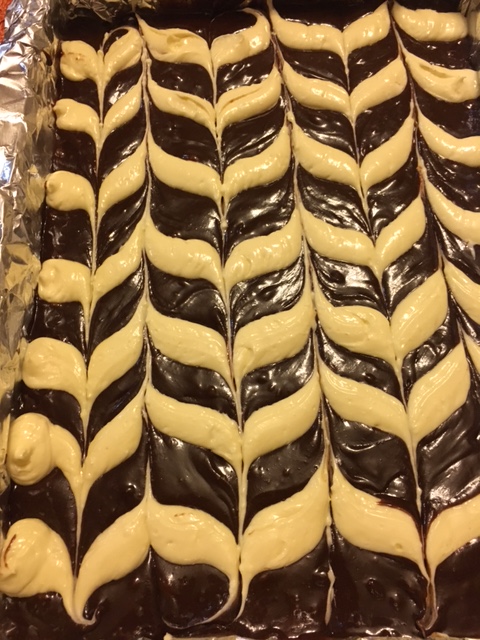
4. Using a toothpick, wooden skewer or tip of a very thin bladed knife, draw the tip through the rows in one direction and then in the alternate direction and so on until a beautiful chevron design is throughout batter.
5. Bake in a preheated 325 degree F oven for approximately 40-50 minutes until brownie is done (moist crumbs are on toothpick inserted in center (do not over-bake).. 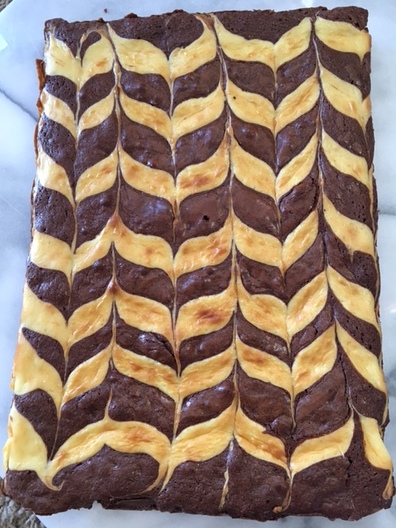 6. Let cool completely before cutting into squares. Store in airtight container in refrigerator for up to a week. 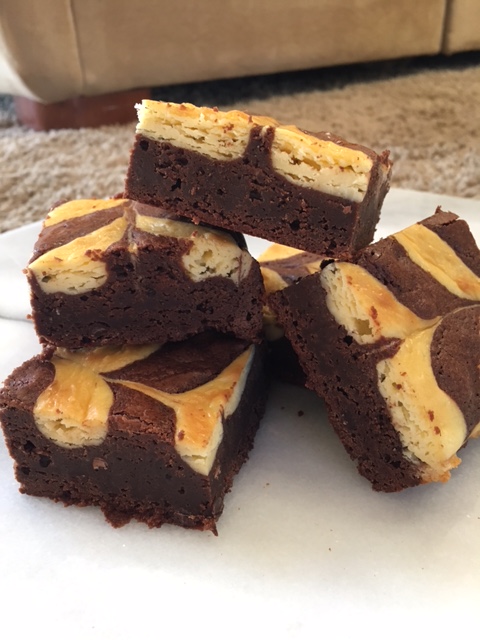  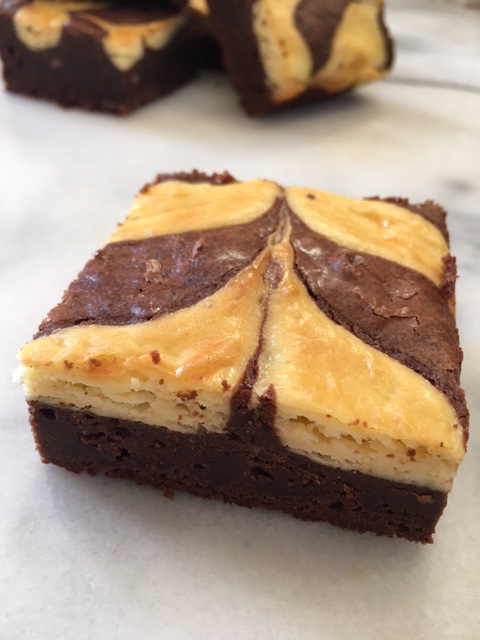 Happy baking! Be sure to share! ; ) ♥
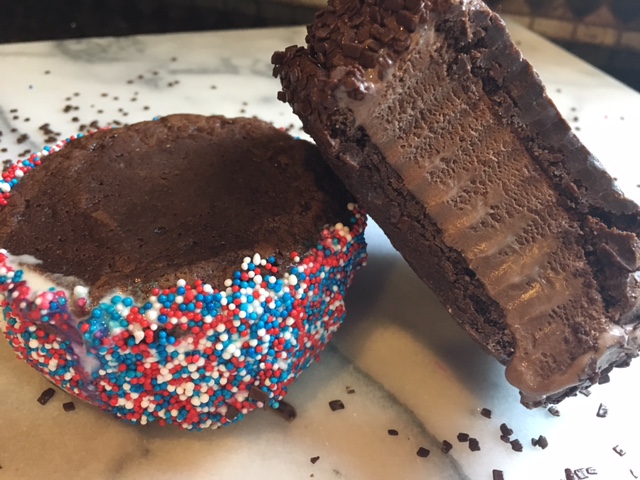
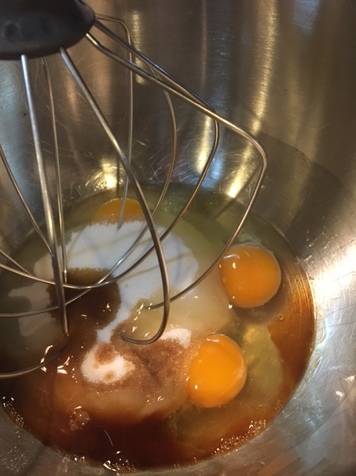
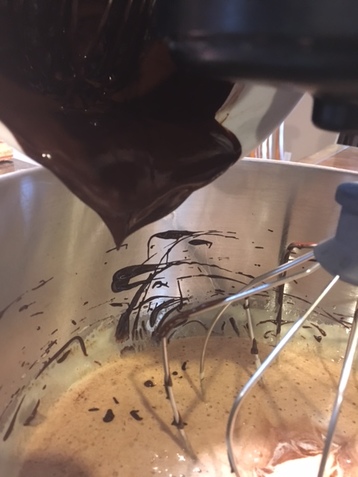
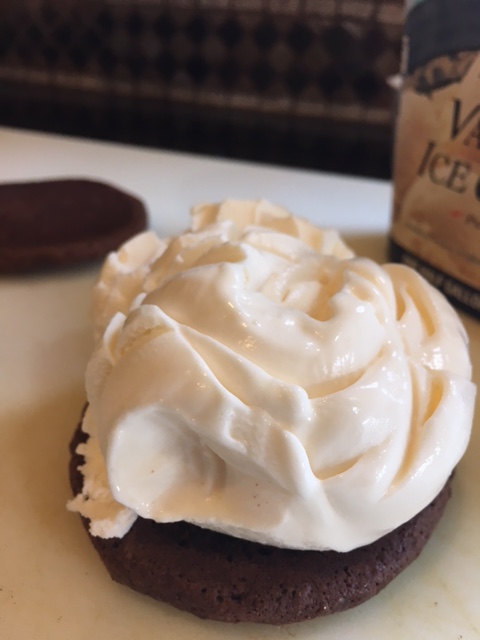
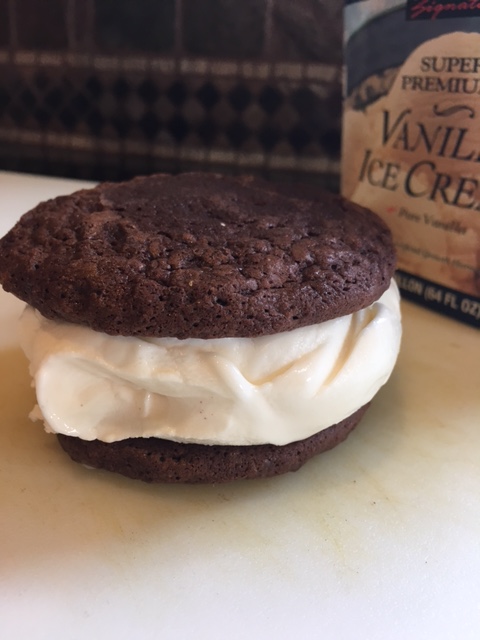
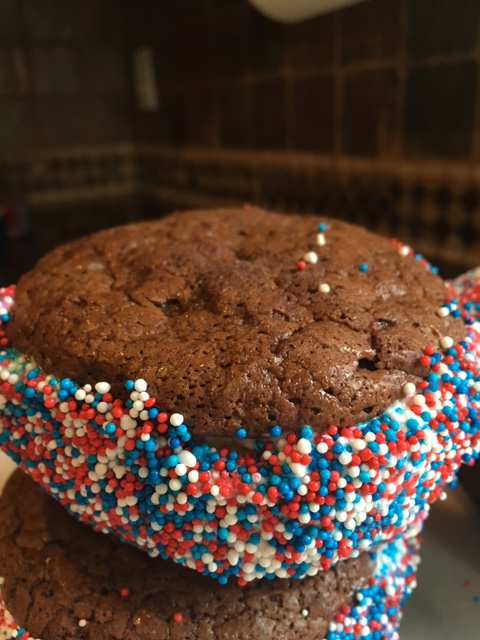
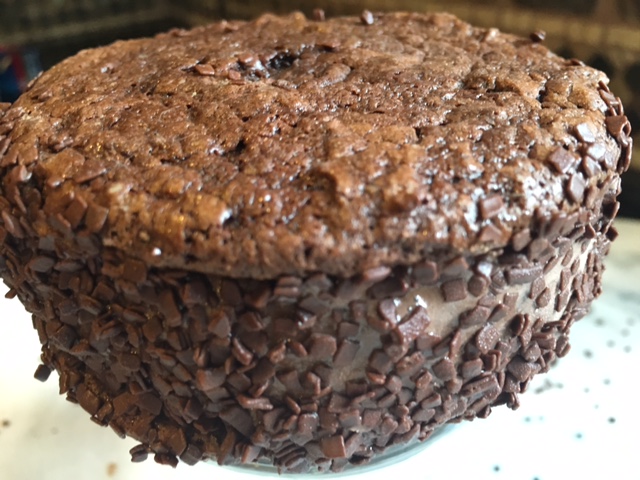
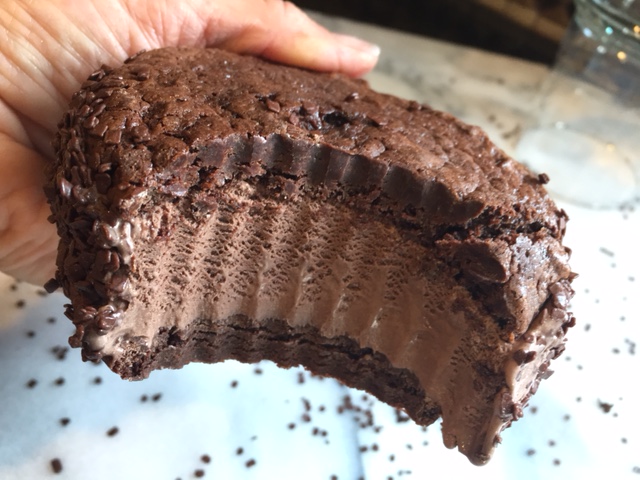
"It is always sad when someone leaves home, unless they are simply going around the corner and will return in a few minutes with ice-cream sandwiches. " Lemony Snicket Ice cream sandwiches...I remember so fondly eating them up as a kid with the soft cakey-cookie outside and the meltingly delicious inside. The only problem is that they weren't actually all that good. Ah, nostalgia! Lol! The idea of them, however, is very good. And they are not so hard to improve upon. I start with a flourless (and therefore gluten free...bonus!) brownie cookie and sandwich premium ice cream in-between two cookies. Roll them in sprinkles and you are good to go. The brownie cookie is a good base for almost all of the flavors you could imagine- from plain vanilla to everything but the kitchen sink (maybe not so great with an apple pie flavored ice cream, but you get the idea- peanut butter, coffee, cookie dough, strawberry, butter pecan, mint chocolate chip....) The brownie cookie stays somewhat soft even when frozen so it makes eating pretty easy. These are pretty big so you might want to split yours with someone special. You can make them any size just watch the baking time in the cookies if you go smaller. As for the decorations, finely chopped nuts, sprinkles or non-pareils, finely crushed candies.... use your imagination for endless combinations. Great project to make with the kids, too, so why not get the whole family involved! Brownie Ice Cream Sandwiches-makes approx 14-16 3" cookies, enough for 7-8 sandwiches 12 ounces 70% bittersweet chocolate, choppped 4 ounces (1 stick) unsalted butter, cubed 3 extra large eggs 1/8 tsp. instant espresso powder 1 1/2 tsp vanilla 1 cup granulated sugar (7 ounces) 3 ounces almond flour 1/2 tsp baking powder 1/4 tsp kosher salt approx 1/2 gallon your favorite ice cream(s), slightly softened sprinkles, nuts or other garnishes for the sides, optional 1. Combine the almond flour, baking powder and salt. Set aside. 2.In the top of a double boiler or in the microwave gently melt the chocolate and butter together. Once melted, stir to combine and set aside for a few minutes to cool slightly. 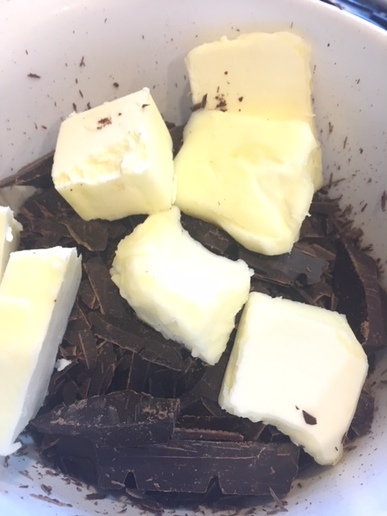 3. Using an electric mixer with the whisk attachment on medium speed, beat the eggs, sugar, vanilla and espresso powder until increased in volume and lighter in color, about 2-3 minutes. 4. Reduce speed to low and drizzle in chocolate. Combine well.
5. On low speed stir in almond flour mixture, until just combined. Remove bowl from mixer and cover with plastic wrap. let set on counter for 45 minutes or refrigerate for up to 30 minutes to firm up a bit. 6. Preheat oven to 350 degrees F. Line two baking sheets with parchment paper; set aside. 7. When ready, using an ice cream scoop that holds approximately 1/4 cup, scoop dough onto parchment lined baking sheets about 3 inches apart. Pat dough down slightly using moistened fingertips.  8. Bake for 10-12 minutes until just set and tops no longer appear wet. Remove from oven and cool on baking sheet. Once cool transfer to freezer for 30 minutes (can be made up to a week in advance, store airtight in freezer for longer storage). Repeat with any remaining dough. 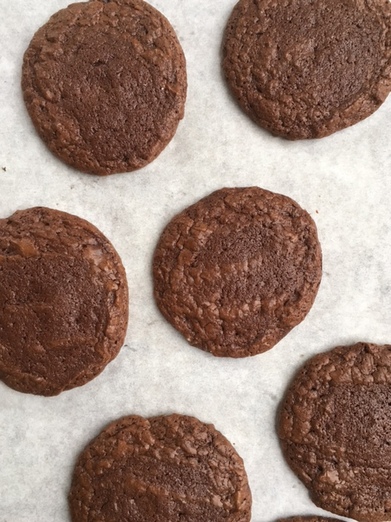 9. When ready to assemble sandwiches, place any sprinkles or other garnish in shallow bowls or pie plates. Remove ice cream from freezer to allow it to soften slightly. Place a parchment -lined baking tray in your freezer. 10. Working with a pair of cookies at a time, scoop a generous amount of ice cream onto the base (Flat side) of the cookie. Top with the second cookie, pressing down slightly to push ice cream to the edge of the cookie.
11. With a small off-set spatula, smooth edges of ice cream, sandwich (Working quickly). Roll edges in desired garnishes (sprinkles here) and immediately place on tray in freezer. 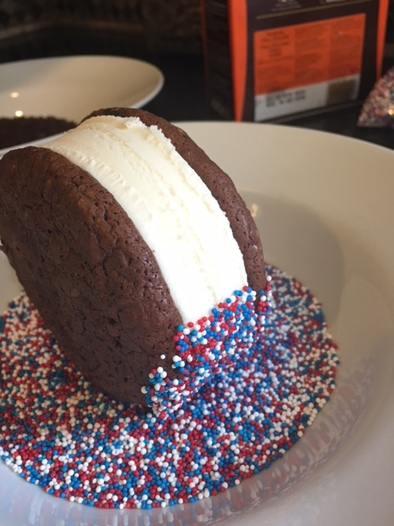 12. Repeat with remaining cookies, until all have been filled and garnished, if desired.  13. Serve immediately or wrap individually in wax paper or plastic wrap and store air-tight in a freezer bag in the freezer for up to a week or two. 14. Share! : )
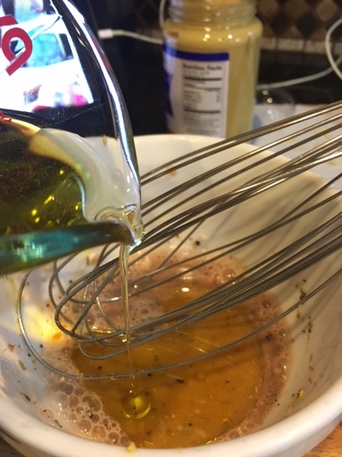
 "But, for my own part, it was Greek to me." - William Shakespeare Greek salad , isn't something that has been too tinkered with that I can tell. It is pretty much universally the same tomato, cucumber, red onion, feta and olive mixture the world over, drowned in some kind of vinaigrette, some better than others. And I love it (minus the drowned part). It is like a summer garden in a bowl- colorful, fresh and delicious. However, when I make it at home,. I think, well, why not add.... and thus Greek Salad MY way! It's super easy to make, just dump, dress and mix, and you'll have a great summery salad to enjoy any day! Greek Salad My Way 12 ounces Grape or cherry tomatoes, halved 1 English cucumber (about 10" long) washed, halved lengthwise and cut into 1/2" half moons 1 1/2 Yellow Bell Peppers, seeded and cut into 1 " chunks 1 c. red onions, peeled and sliced 1/4 " thick into half moons* 1/2 cup canned chick peas, rinsed and drained very well (pat dry if necessary) 4 ounces fresh green beans, stemmed, briefly blanched and cut in half or thirds cross-wise 1/2 cup Castelvetrano olives, pitted and drained (so yummy!) 1/2 cup Kalamata olives, pitted and drained 2 Tablespoons fresh basil leaves cut in a chiffonade** 3/4 cups cup Cubed feta cheese (or to taste) -omit of you want a vegan version Romaine lettuce leaves, washed and dried Vinaigrette: 1 clove garlic, minced 1 Teaspoon Dijon Mustard 3 Tablespoons Red Wine Vinegar 1/4 teaspoon kosher salt 1/4 teaspoon coarse ground black pepper 1/2 teaspoon dried oregano, crushed with your fingertips juice from 1/2 lemon 3/8 cup extra Virgin Olive Oil 2 Tablespoons avocado oil 1. For Vinaigrette: In a small bowl whisk together garlic, Dijon, vinegar, salt, pepper, oregano and lemon juice. This will help dissolve the salt. 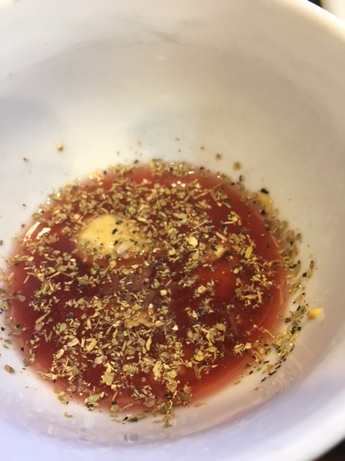 2. Combine the olive and avocado oils in a measuring cup with a pour spout. Slowly whisk the oil into the vinegar mixture. Whisk well.
3. If not using right away (or for leftovers) store in a glass jar with a lid. Use within a week. 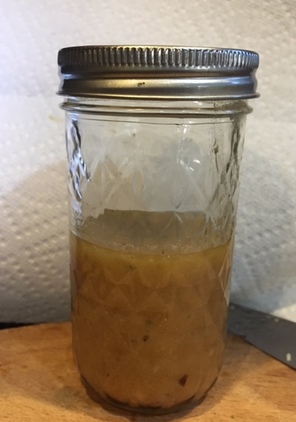 4. For Salad: Place all ingredients in a bowl, except the feta and vinaigrette. Toss gently to combine. 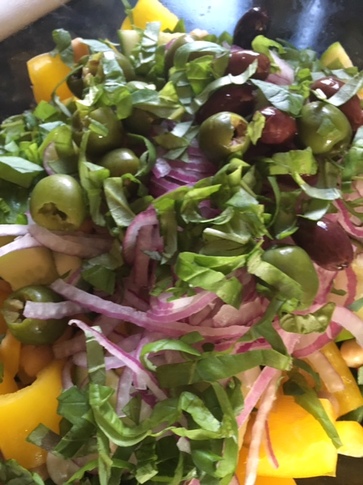 5. Top with feta, add vinaigrette (if it's been sitting mix well once again) judiciously, toss to combine. Taste and adjust seasonings and vinaigrette to your taste. 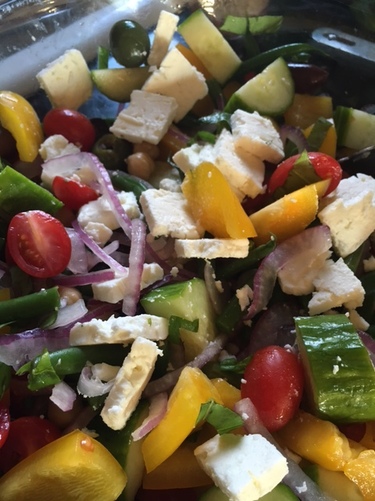 6. To serve, place a few romaine leaves on each plate and top with a generous portion of salad mixture. 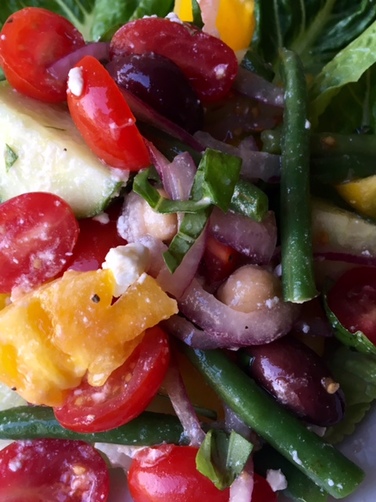 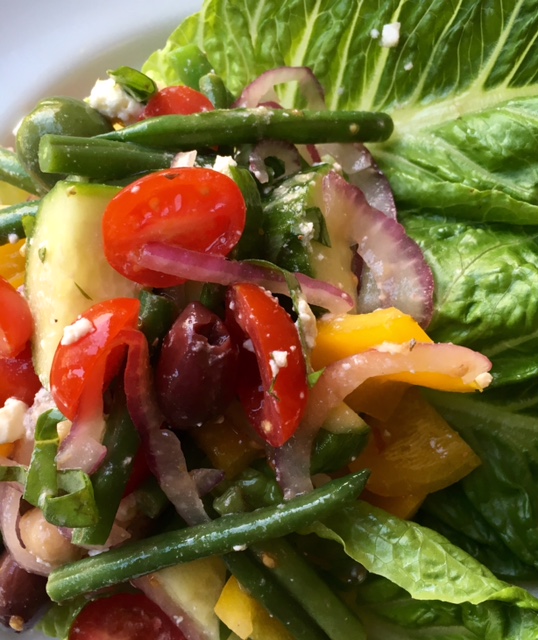 * to take the bite out of red onions, soak the sliced onions in a bowl of ice water for 30 minutes, drain, pat dry and proceed with recipe.
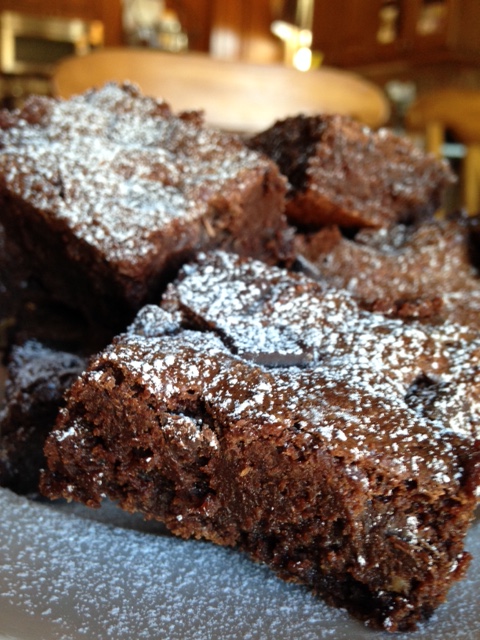
** to chiffonade basil, roll whole basil leaves into a cigar shape and then cut across the roll cross-wise with a very sharp knife into thin strips. “There is nothing better than a friend, unless it is a friend with chocolate.” -Linda Grayson I am so all about the chocolate, always have been. I grew up in a home where not everything was chocolate (dad always wanted cherry pie for his birthday for example), but it actually seemed like it was. I was out of college before I even knew what a snickerdoodle was (chocolate chip cookies and brownies in rotation were our most common desserts). Now I enjoy lots of different flavors but chocolate remains my true love. I've been working on my chocolate chip cookie and brownie recipes for quite some time. Up until recently I was pretty happy with my current recipes. Then my daughter was diagnosed with gluten sensitivity, and I was also advised to stay clear of gluten as I try to resolve some auto-immune issues. Personally I am not a huge fan of gluten-free baked goods. I find the taste starchy and off-putting. For some reason I find the gluten free flours bother my tummy a bit, too. I have used Bob 's Red Mill 1 to 1 Gluten Free baking flour with really great results, but again, the taste is just not what I am looking for. It's just my personal experience. You may feel differently, and it's all good. So when I started thinking about gluten free brownies, the thought crossed my mind to make them in the style of flourless chocolate cakes, some of which use ground almonds in place of flour to add structure. So I did just that, and not only are they wonderful, I believe they are now my favorite brownie ever! The chocolate flavor is more vibrant than the version with all -purpose flour (which is an awesome brownie anyhow). So unless you are allergic to nuts, these grain free, gluten free (and decadently fudgey) brownies make one hell of a dessert! If you are allergic to nuts, don't worry, I tell you how much all purpose flour to use if you want to make them the traditional way, and you will NOT be disappointed!. Coming on Monday I'll be sharing an amazing dessert to use the brownies in-so stay tuned! It's a 2 for 1! Best Ever Fudge Brownies- makes 1- 9x13" pan 1 1/2 cups plus 1 Tablespoon almond flour (or you can use 1 1/3 cups all-purpose or 1:1 Gluten Free flour or Einkorn flour, if you prefer) 1/2 teaspoon baking powder 1 teaspoon kosher salt 1/8 teaspoon instant espresso powder 4 ounces unsweetened chocolate, chopped 8 ounces bittersweet chocolate, chopped 2 1/2 sticks (10 ounces) unsalted butter, cubed 2 1/2 cups granulated sugar 4 teaspoons pure vanilla extract 6 large eggs, room temperature 2-3 Tbsp whole milk or heavy cream (optional) 1 cup of chocolate chips or chunks (optional) Powdered sugar for dusting (optional) 1. Preheat oven to 325 degrees F. Line a 9x13" baking pan with aluminum foil. Spray with non-stick cooking spray; set aside. 2. With a whisk combine almond flour (OR all-purpose OR gluten-free flour, as you wish), baking powder, salt and espresso powder in a medium bowl; set aside.  3. In a microwave safe bowl, combine the butter, unsweetened and bittersweet chocolates. Gently melt the chocolate-butter mixture in the microwave, at 1 minute intervals until completely melted and smooth.  4. Whisk in the sugar until very well combined. Whisk in eggs, 2 at a time, and vanilla. Whisk until smooth. 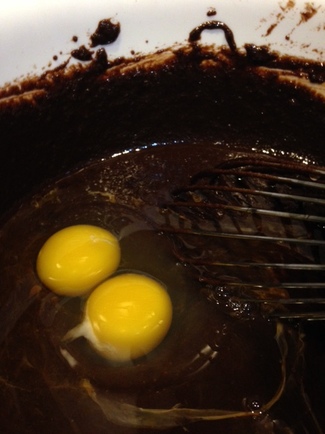 5. With a spatula or wooden spoon, stir in the almond flour mixture (or whatever flour you chose). 6. Dump brownie batter into prepared pan, smooth top to level it out . I like to lightly brush the top with milk or cream to keep it soft (totally optional). Sprinkle chocolate chips or chunks evenly on top if using. 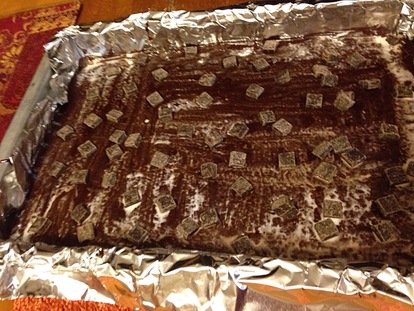 7. Bake the brownies on the center rack of the preheated oven for 30-35 minutes or until a toothpick inserted in the center comes out with a few moist crumbs clinging to it. 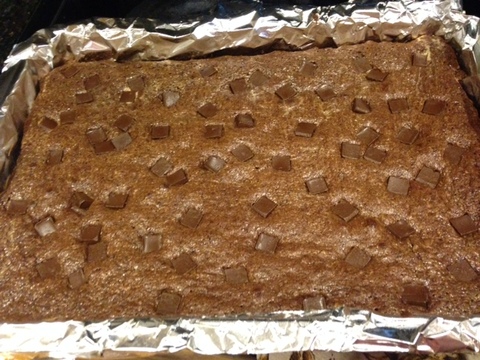 8. Let cool completely, then refrigerate for 3 hours or over-night before cutting. 9. Remove brownies from pan using the foil to help. Remove the foil from the brownies and cut into desired sized brownies. I like to trim the edges for nice neat squares (the pastry chef in me plus you need a snack about now, don't you?). Dust with powdered sugar, if desired. 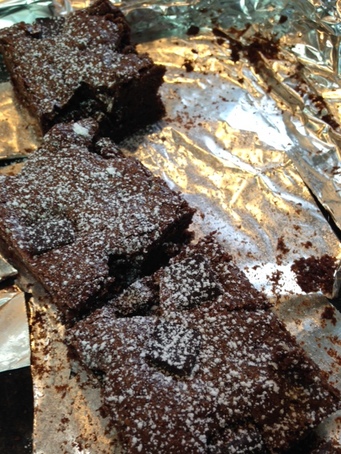 10. Grab a glass of cold milk and enjoy!
Note: I prefer to store these well-wrapped in the refrigerator to preserve freshness longer.
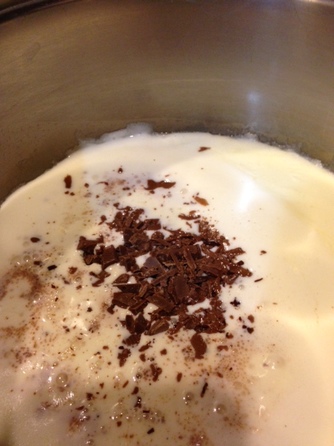
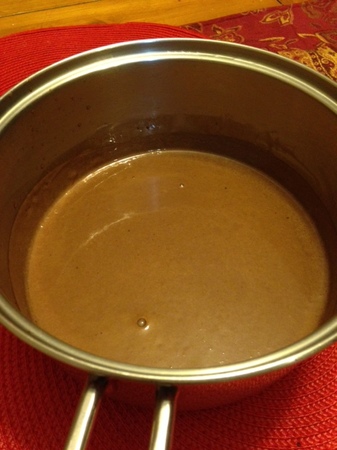
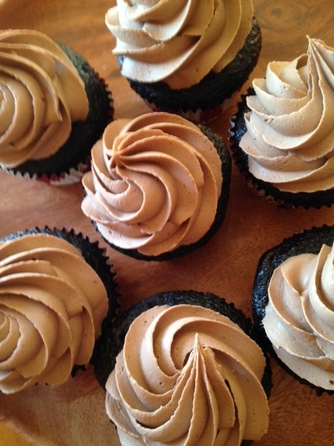
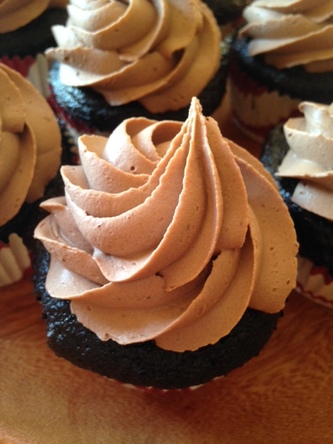
Remember to stop back on Monday for a super yummy dessert you can use scraps or chunks of these brownies in. I can't wait to share it with you!♥ “Love is like a hollowed out piece of chocolate, filled with melted music.” -Jarod Kintz Tomorrow is my daughter's 17th birthday and Valentine's Day is not far behind. For me any celebration calls for chocolate. So I thought I'd share my technique for making an easy showstopper of a cupcake that you can whip up in time for Valentine's day or any time you need a little chocolate indulgence. You'll need to begin the recipe 24 hours ahead of time, but that's just to allow for refrigeration and time for the delightful cream (sooo delicious) to set up. Start with a baker's dozen of chocolate cupcakes, homemade (best) or store-bought. If you have more, simply increase the ingredients accordingly.Use the best quality chocolate you can afford as the flavor will be front and center. You will need a scale for this recipe as well that measures in both grams and ounces. Showstopper Cupcakes 13 prepared chocolate cupcakes, cooled 500 grams Heavy Cream pinch instant espresso powder (optional) 180 grams good quality Milk Chocolate(Lindt, Valrhona, El Rey or Callebaut are some brands to consider), finely chopped 4 ounces good quality Semi-sweet or Bittersweet Chocolate, finely chopped 1. In a medium saucepan, bring the cream to a boil.. Remove from heat and immediately add chopped milk chocolate and espresso powder to cream. Let sit 5 minutes, covered. Gently whisk until combined and smooth.
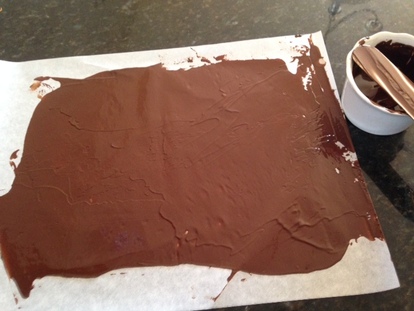
2. Immediately transfer mixture to a mixing bowl, place a piece of plastic wrap directly on the surface. Poke a slit in plastic wrap to allow steam to escape. Place in refrigerator for 24 hours. 3. Meanwhile, gently melt the 4 ounces of semi-sweet or bittersweet chocolate. Have 4 sheets of parchment paper nearby. 4. Lay out two sheets of parchment paper on a smooth, level surface. Pour half of chocolate onto one sheet. With an off-set spatula, spread the chocolate into a thin, even layer. Place another layer of parchment on top of chocolate, smoothing it out.
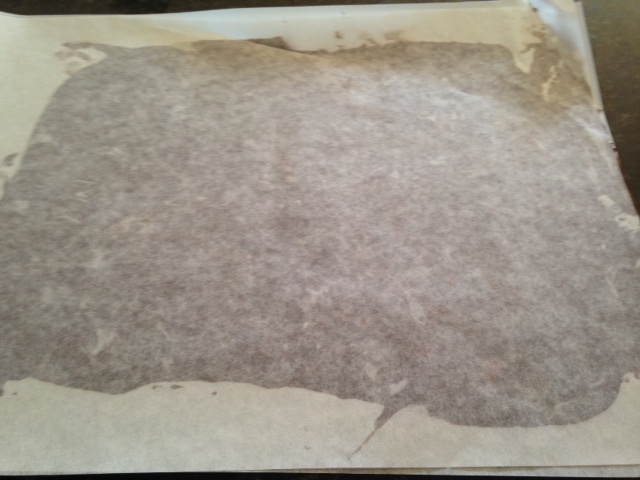
5. Roll chocolate sheet up and insert into an empty paper towel or toilet tissue tube. 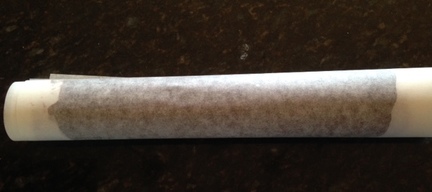 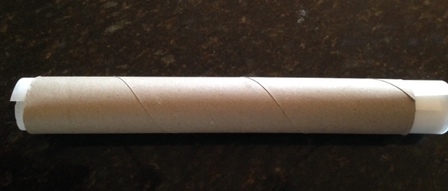 6. Repeat with the other half of the chocolate. Place both rolls in the freezer to set, for at least 30 minutes or over-night. 7. After 24 hours, remove the cream mixture from the fridge. With a hand-held or stand mixer, whip the chocolate cream on medium speed until thickened and the consistency is somewhere between whipped cream and soft mousse. It will be fairly thick. 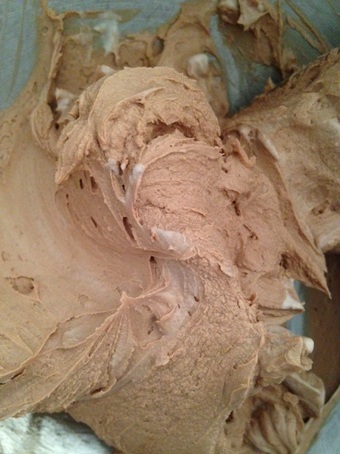 8. Remove chocolate rolls from freezer. On a clean sheet pan, unwrap the rolls, leaving shards of chocolate to use. Place sheet pan in freezer until ready to use. 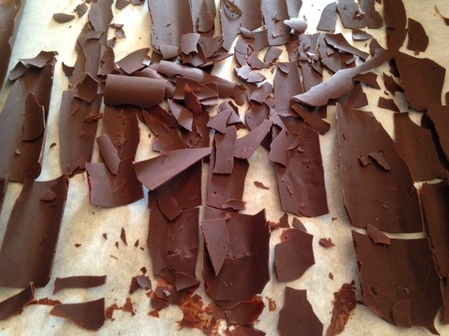 9. Meanwhile, place whipped milk chocolate cream in a pastry bag fitted with a large star tip. Pipe the cream mixture on top of each cupcakes in a generous rosette.
10. Remove chocolate shards from freezer. Top each cupcake with the chocolate shards as desired. Sprinkle tops of cupcakes lightly with powdered sugar. Eh voila! "Oohs" and "aahs" will abound! Share the love! ♥ 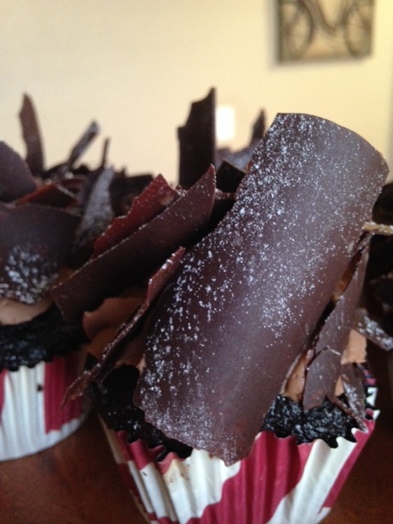 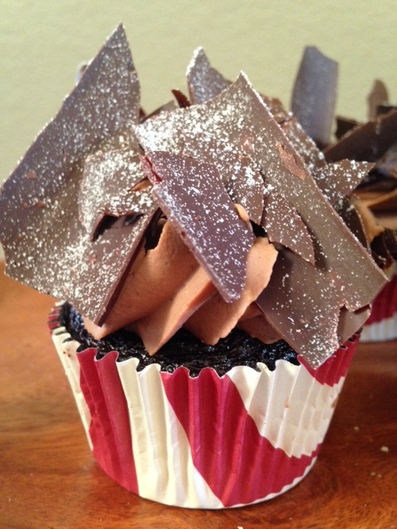 Note:
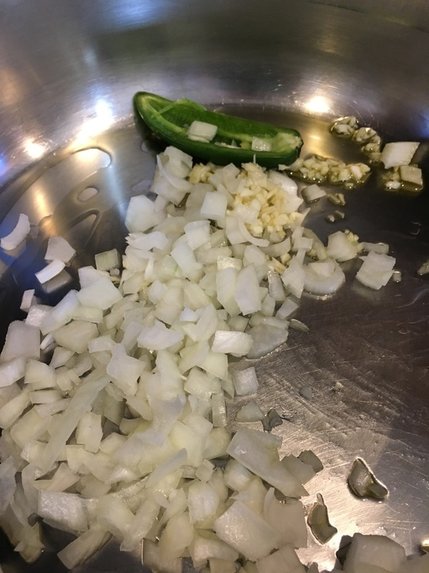
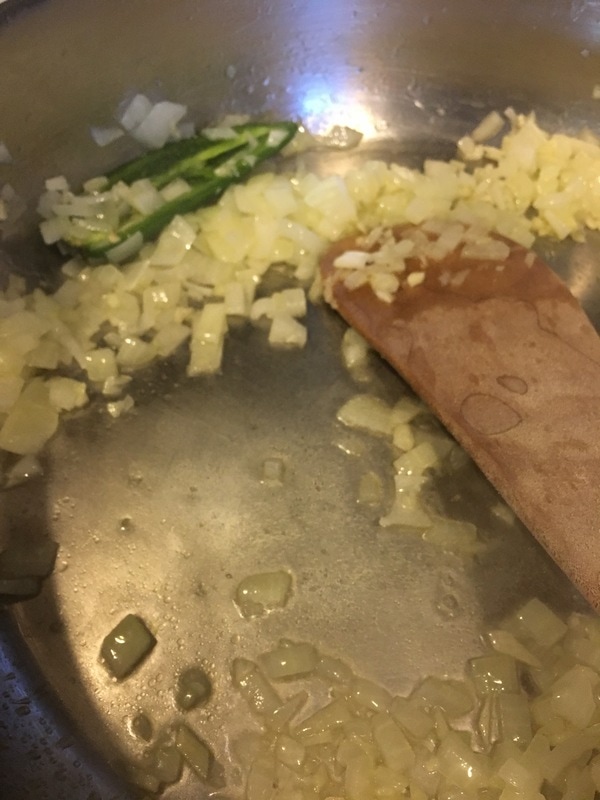
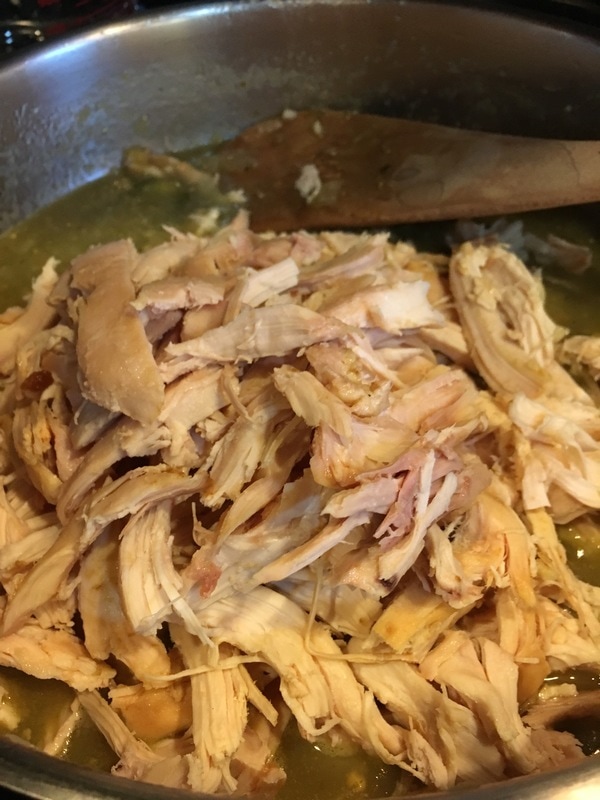
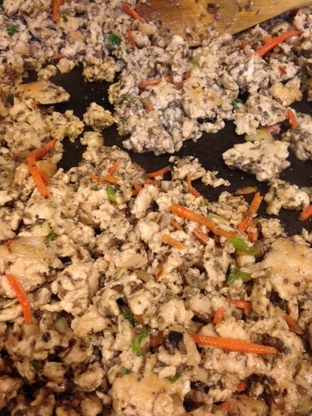
Cupcakes are best eaten within 24 hours. The cream will start to wilt in a day or two. Keep cupcakes stored in the refrigerator. Remove from refrigerator and let sit at room temp 20-30 minutes before serving. "Tell me and I'll forget, show me and I may remember, involve me and I'll understand." -Chinese proverb Not that Chicken stir-fry lettuce cups are authentically Chinese, but they are in the spirit of Chinese cuisine.You may have had them at the popular restaurant, P.F. Chang's. My local Chinese eatery, South China Restaurant in Fort Collins (the best!!), has a version that is to die for. Ming Lee, the chef-owner, serves them with a very unique orange sauce that I wish I knew how to make. So delicious! You can finds lots of recipes for Chicken Lettuce cups on-line; this is mine. It is a featured recipe in my e-cookbook on poultry which you can find here. My kids love this dish and I have made it for groups of their friends always to rave reviews (they don't even know it is full of mushrooms). It is fun to serve it family style and let everyone personalize their cups with the toppings they prefer. I know ground chicken isn't always easy to find. If you have a nice butcher he or she may be happy to grind it for you to order. I will caution you that if you decide to substitute ground turkey for the chicken, the taste will not be the same. When made with chicken the dish tastes is lighter and cleaner. Don't be put off by the long-ish ingredient list. The trick is to have everything ready to go. It comes together very quickly once the prep is complete. Asian Chicken Stir-Fry Lettuce Cups- serves 4 (or more for appetizers) 1 pound ground chicken breast 2 port0bello mushrooms, stemmed and gills removed, minced (I use a food processor) 2 Tablespoons Tamari (gluten-free soy sauce) or low sodium soy sauce 4 scallions, sliced very thinly, white and some of the green parts, plus more for garnish 1 teaspoon cornstarch 1/3 cup shredded carrot pinch crushed red pepper flakes 1 teaspoon minced fresh garlic 1 teaspoon peeled and minced fresh ginger (I use a microplane to mince) 2 teaspoons oyster sauce (this brand is gluten free according to the manufacturer) juice from half an orange 2 tablespoons chopped fresh cilantro, plus more for garnish 2 Tablespoons coconut or light olive oil Sliced toasted almonds Asian Sweet Chili Sauce ( this brand is gluten free) Fresh radishes, cut into thin matchsticks (I use a mandoline) whole lettuce leaves for serving chicken (butter and iceberg work well) 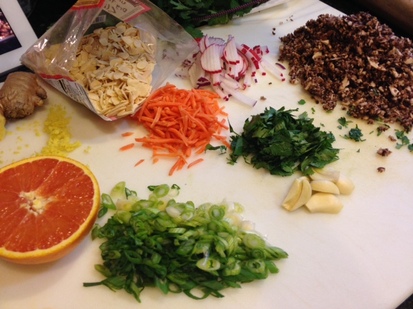 See all these yummy fresh ingredients that are about to become your dinner?!! 1. In a medium bowl, combine the ground chicken, 4 sliced scallions, cornstarch and Tamari sauce. Marinate the ingredients for 10 minutes. 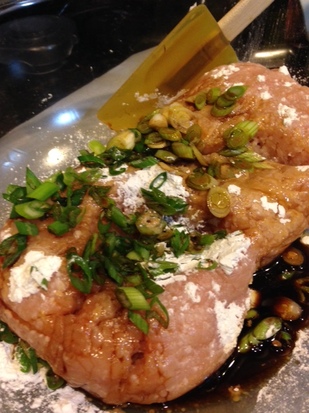 2. In the meantime, arrange the lettuce leaves on a large platter. Pour the chili sauce into a ramekin and place on platter. Place all the other garnishes (almonds, radishes, green onion and cilantro) into individual ramekins and arrange on platter, leaving room for the chicken mixture once it's done. 3. Over medium-high heat 2 tablespoons of coconut or other oil in a skillet or wok, if you have one. When it is hot but not smoking, stir in minced mushrooms. Stir-fry mushrooms 15-20 seconds. Stir in carrots, red pepper flakes, garlic, ginger and stir-fry another 15 seconds.  4. Add in chicken mixture and cook, stirring often, until browned and cooked through, being sure to crumble it up as you cook it. You want a very small texture, not big chunks. Stir in orange juice, 2 tablespoons cilantro and oyster sauce. Cook 30 seconds more.
5. Remove chicken from heat and spoon onto your serving platter. 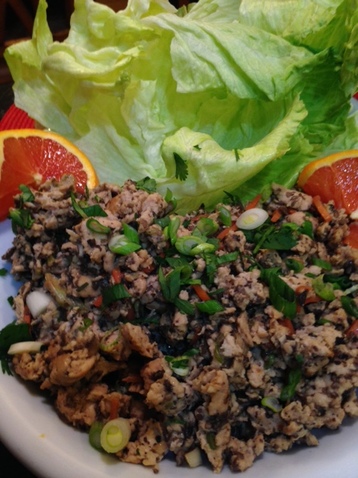 6. To serve, spoon some chicken mixture into your lettuce cup and top with desired garnishes. Eat immediately!  If you are looking for more delicious poultry recipes, please take a look at my e-cookbook on Amazon!
|

Archives
December 2019
Categories
All
|


 RSS Feed
