|
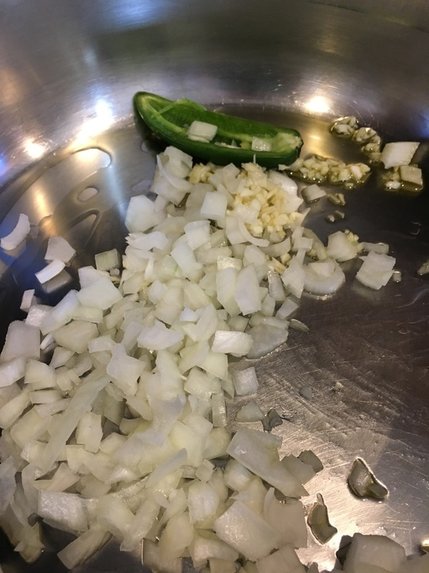
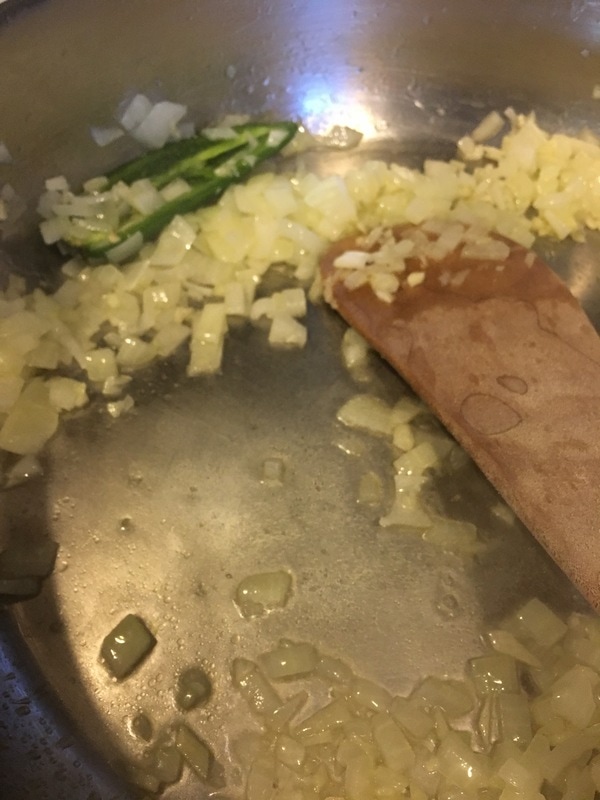
“Tacos are like what the voices of a hundred angels singing Bob Dylan while sitting on rainbows and playing banjos would taste like if that sound were edible.” -Isabel Quintero I found the above quote on Goodreads. I'm not sure I have ever come across a more glorious food quote! Made my whole being smile. Then again, it makes me think this recipe really has a lot to live up to, and I am a little nervous about that! I also just realized it has been a long time since I posted a recipe or a Gratitude Diaries (entry coming soon!). So I thought I'd quickly share where my crazy brain has been the last month. First of all I have a senior in high school who will be graduating in just a little over a month. I am wanting to make the most of the time we have together before she (my youngest of two kids) heads off to college out of state. I work almost full-time outside of the house, so that's an added time taker. Lastly I have been doing some creative exploration that I have not shared here. I have created some mixed media art and some leather wrap bracelets specifically and the act of creating has just taken me to such a happy place, I neglected many other things (blog, laundry, clearing the paper clutter off my counters....) But I re-grouped recently to handle some of those issues and thus a new blog post in the form of a recipe. So I hope it was worth the wait. Thanks for hanging in there. Weebly, my blog host, gives me stats, and somehow, you have been still visiting and reading! So thank you so much for that! xoxo This recipe is inspired by one I saw travel on Facebook from Better Homes and Gardens. I made their version and it was time consuming and messier than I liked. Don't get me wrong, it tasted very good, but not good enough to justify how long it took me to make it. So I stream-lined things a bit and came up with the following. Yummy good and super easy thanks to the use of a pre-cooked rotisserie chicken from Costco (or wherever...mine had a net weight of about 3 lbs). Try it and see what you think. It was a huge hit at my house and is already being requested for an encore appearance. Buen Provecho! Green Chile-Tequila Chicken Tacos (Serves 6 or so) Breast and Thigh meat from 1 pre-cooked Rotisserie chicken, shredded, skin removed, pan juices reserved.* 1 c. diced onion 1 Tbsp. minced garlic olive oil 1/2 jalapeno pepper, seeded 2 Tbsp. Tequila (I used Jose Cuervo Gold) 1 1/2 cups salsa verde (if you are near a Trader Joe's, I really like their brand, too) 1 cup chicken stock pinch salt pinch coarse ground black pepper 1/2 tsp ground cumin 1/8 tsp. ground coriander 1/4 tsp dried oregano, crumbled 6" corn tortillas (GF are available) Assorted toppings to taste: Cilantro, crumbled cotija cheese**, radishes julienned, chopped red or green cabbage, diced fresh tomatoes, diced white or green onion, minced jalapeno or pickled jalapeno slices, fresh lime wedges 1. In a large skillet heat 2 Tablespoons olive oil until hot, but not smoking. Add in onion, garlic and jalapeno half. Cook, stirring until softened and translucent, about 5 minutes. Stir in Tequila and cook until nearly evaporated.
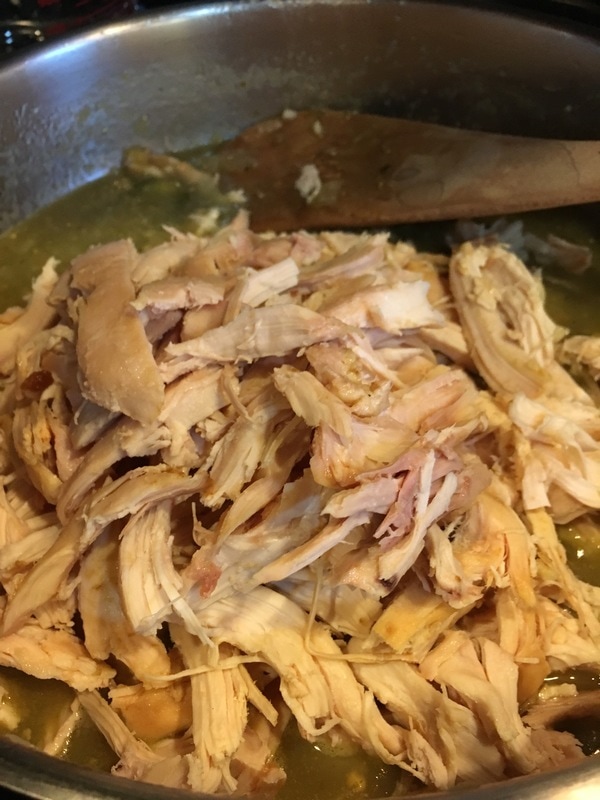
2. Stir in salsa verde , chicken stock, salt, pepper, cumin, coriander, oregano and reserved pan juices. Bring to a boil then reduce heat to a simmer. Cook, stirring occasionally, until slightly thickened and reduced, about 10-15 minutes. Remove and discard jalapeno OR you can chop it up and stir it back in if you want some extra kick. Stir in reserved chicken.
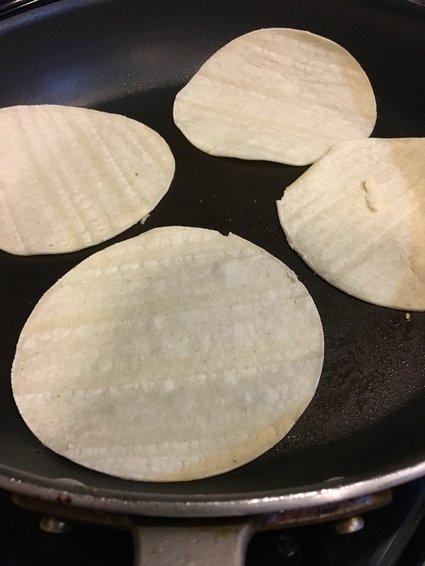
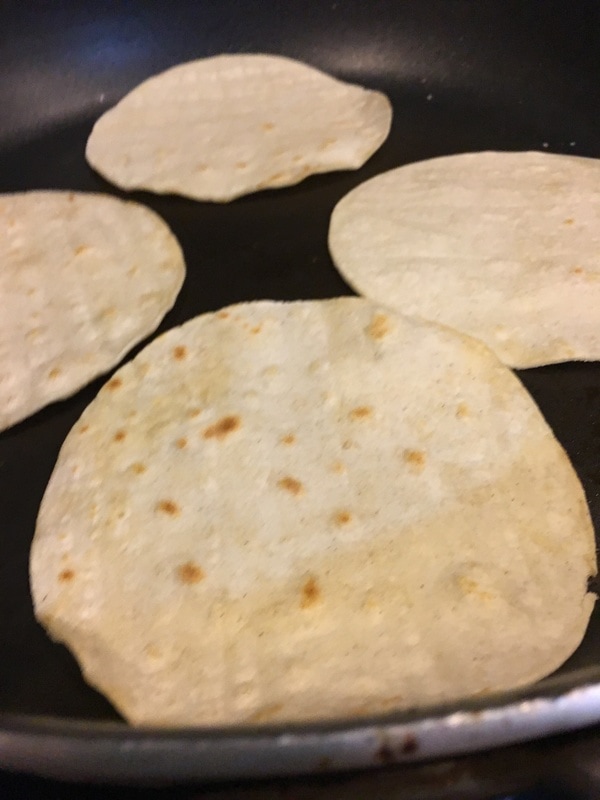
3. Combine chicken and pan sauce until fully coated. Simmer until heated through. Taste for seasoning and adjust as needed. (remember the cotija cheese is on the salty side if using). Remove from heat, cover and set aside . 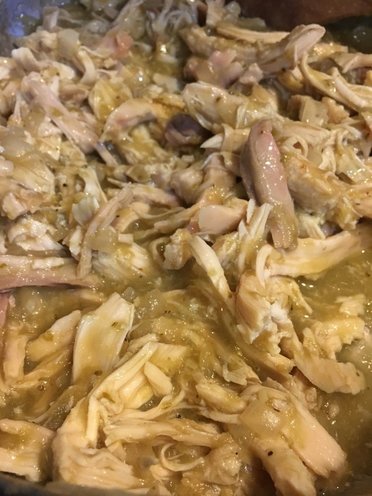 4. Meanwhile heat another skillet or griddle and heat corn tortillas on medium to medium high heat on both sides to make them soft and malleable, about 30-60 seconds per side.
5. Have a variety of toppings nearby. Create tacos by filling warm tortillas with a small amount of chicken the topping as desired. Don't overfill! Squeeze lime juice on top if that's to your taste. 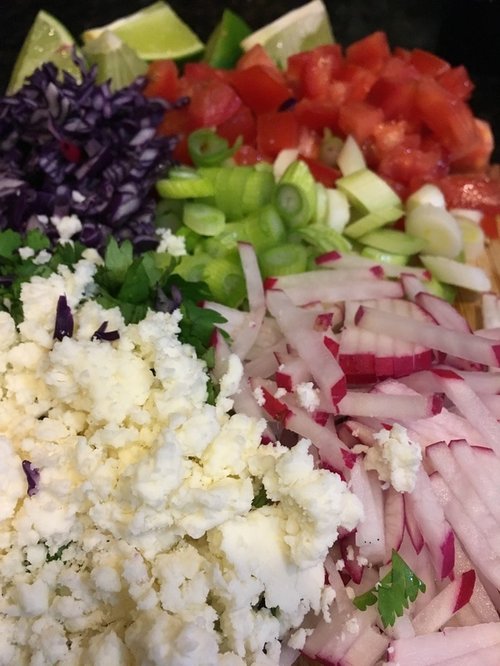 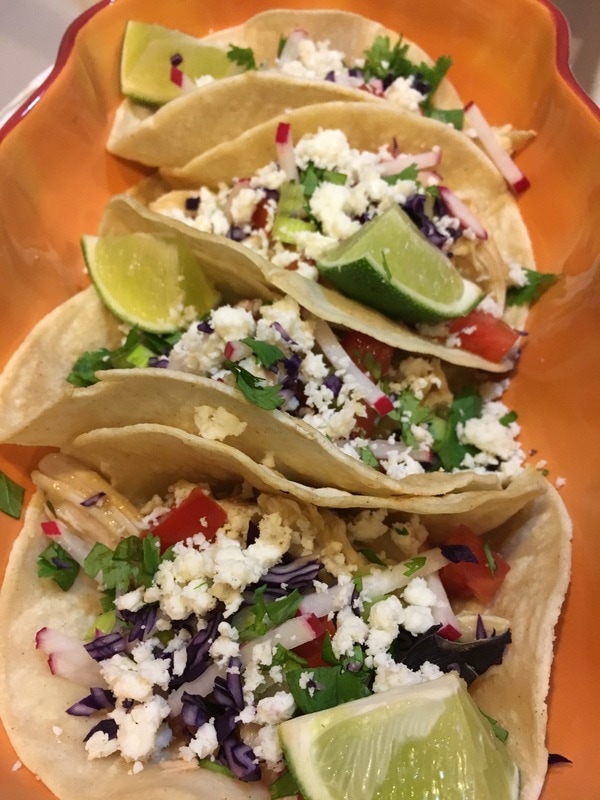 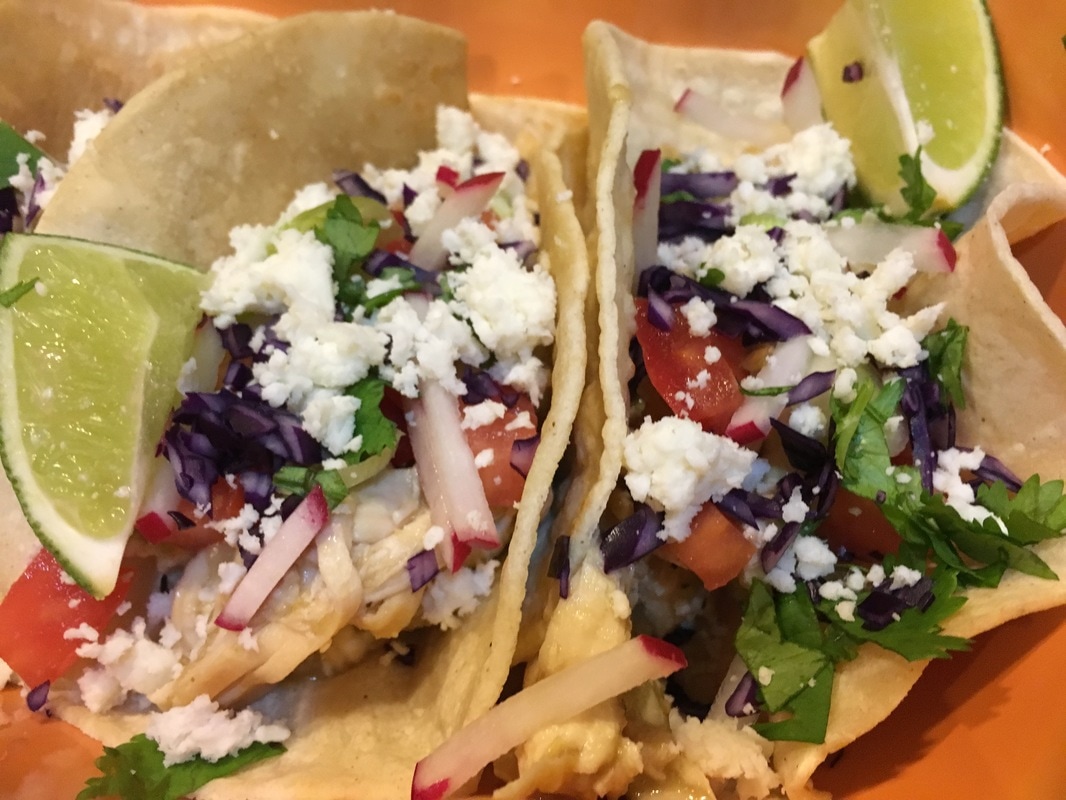 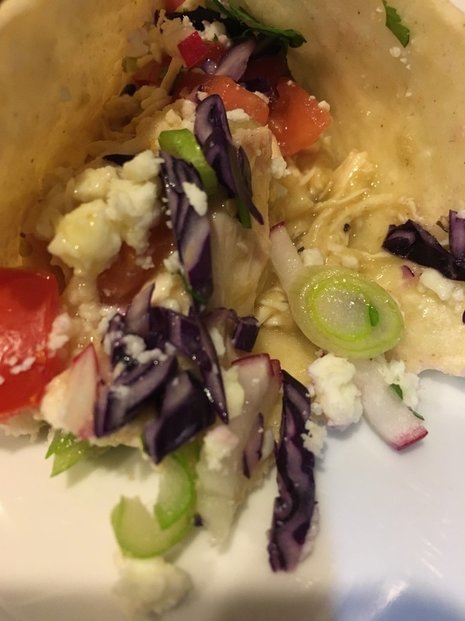 Notes: * Chicken demi-glace would be a good substitute for the rotisserie chicken pan juices. It's available on-line or in some gourmet grocery stores. Use 1 Tbsp or to taste. A little goes a long way. Store leftover in freezer, air-tight.
** a substitute for Cotija cheese, if it's not available, near you, is just a basic domestic crumbled feta from the dairy aisle of your grocery store.
0 Comments
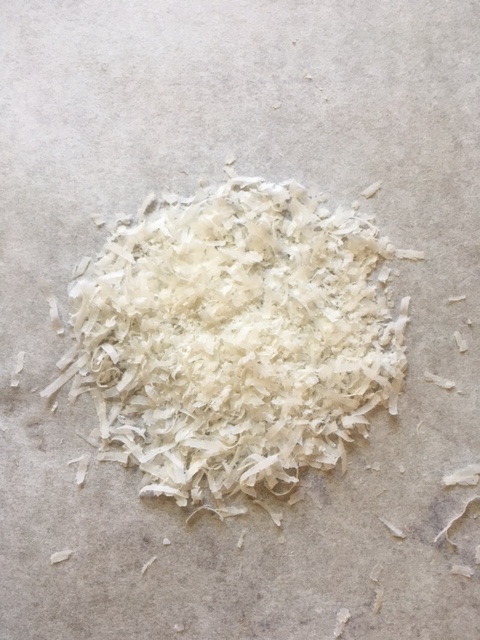
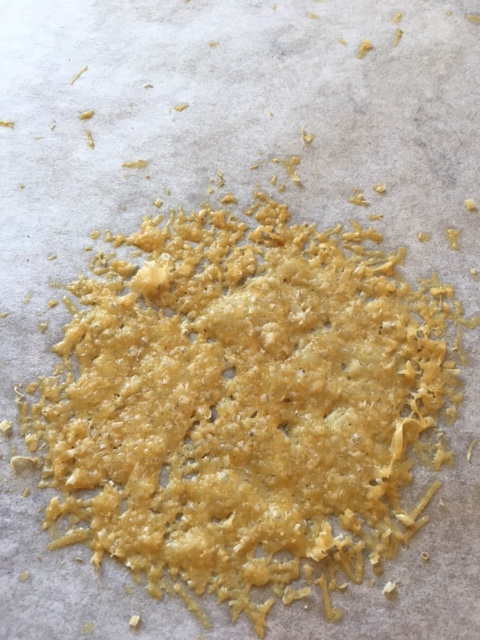
"I live on good soup, not on fine words. " -Moliere One of my first blog posts when I started this thing about a year ago, was an ode to farm fresh tomatoes. You can see those recipes here and here. Truly, a fresh tomato off the vine, picked and sold locally, if not harvested from your own garden, is a treat for the senses that no supermarket tomato can come close to approximating. There are variations in juiciness, sweetness and acidity , size and color. The anticipation of getting these fresh tomatoes mounts and mounts as the growing season progresses. Everyone thinks tomatoes are a summer vegetable (well fruit actually), but the truth is it is quite close to summer's end before the best tomatoes appear, and then poof- they are gone. Recently I was able to get some tomatoes from the local farm I volunteer at and I decided to turn them into Roasted Tomato Soup. This recipe is one I adapted from Tyler Florence. It is so delicious. His original recipe calls for much more fat than I use and also calls for basil. Personally I can't stand basil in tomato soup because it makes me feel like I am eating a bowl of marinara. I grew up on Campbell's Condensed Tomato Soup, did you? And I loved it....at the time, with the requisite grilled cheese sandwich on the side. Now the sweetness of the soup really does not appeal to me, but the memory lingers. This soup is a nice grown up version to appease the memory. It's creamy, fresh, beautiful and delicious, with or without the grilled cheese sandwich. So quick, grab some fresh grown tomatoes and make a batch. Better yet, double it (or triple even if you have a soup pot large enough) and place a container in the freezer for another time. Roasted Tomato Soup- serves 4 2 1/2 pounds of assorted ripe tomatoes (large, small, plum, heirloom...), cored, seeded and halved* 1/2 cup extra virgin olive oil 5 small cloves of garlic, peeled 4 cups thinly sliced onions, packed 1 1/2 teaspoons kosher salt 1 teaspoon coarsely ground black pepper 5-6 sprigs fresh thyme 3-4 cups chicken or vegetable stock (low sodium, if canned) 2 bay leaves 1 tablespoon unsalted butter (optional if vegan) 2 Tablespoons heavy cream (optional) Parmesan crisps (optional) 1. Preheat the oven to 450 Degrees F. Line a baking sheet with foil then lay a piece of parchment paper on top. 2. Arrange the tomatoes on top of the paper (don't you just love all that variation?). 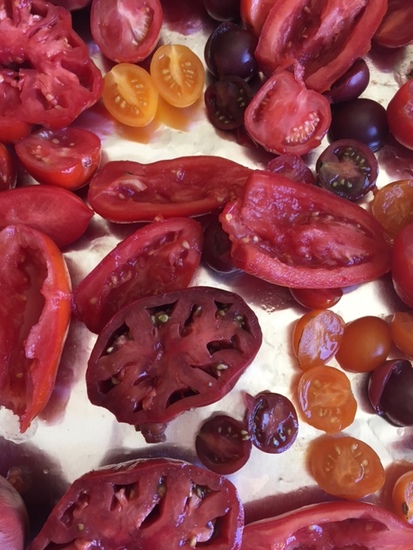 3. Place the sliced onions and garlic on top of the tomatoes. Sprinkle with salt and pepper. Drizzle with olive oil and toss to combine. Top with fresh thyme. 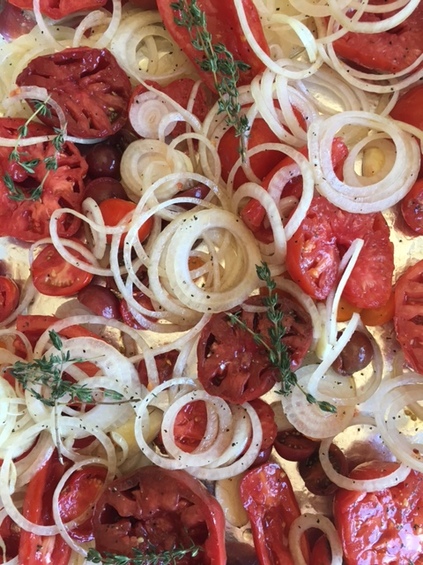 4. Place tray in hot oven and roast for 30-40 minutes until cooked down and slightly caramelized.. If making Parmesan crisps, reduce oven to 375 degrees F. 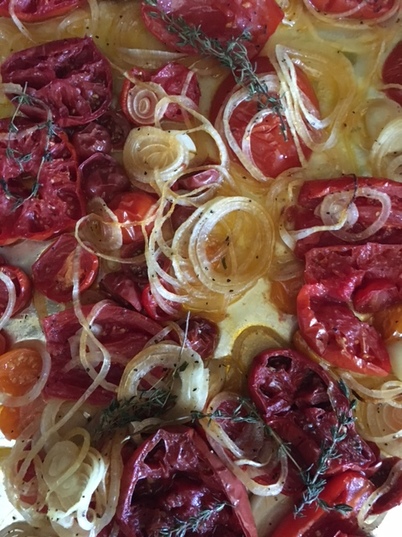 5. Remove the thyme sprigs, leaving some of the leaves only behind with the tomatoes. Transfer the roasted tomato mixture into a soup pot large enough to hold the ingredients. Add in bay leaves, stock and butter, if using. Bring mixture to a boil, then reduce heat and simmer, until liquid is reduced, about 20-30 minutes, stirring occasionally. 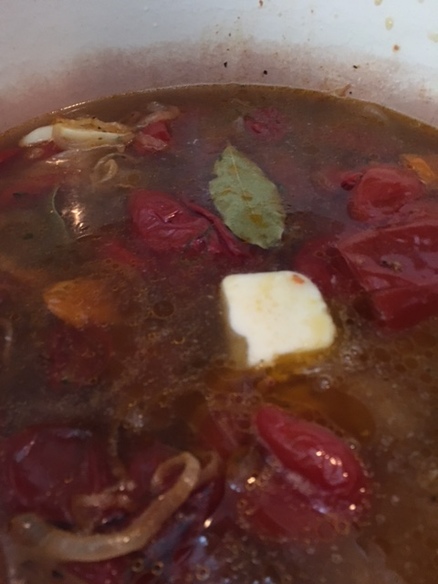 6. Remove the bay leaves and discard. 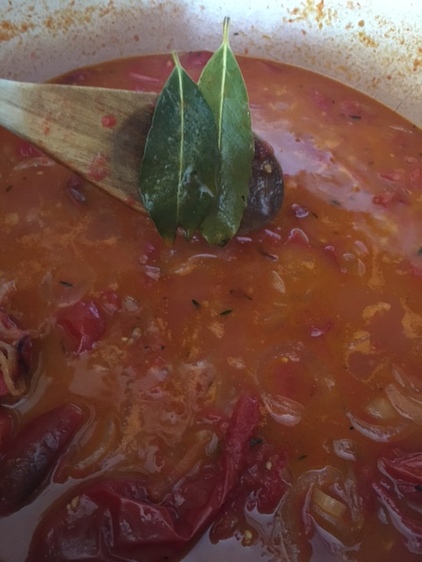 7. Using an immersion blender (one of my favorite tools), puree soup, right in the pot, until smooth. If an immersion blender is not available, carefully use a stand blender, filling jar no more than half-way full. You may have to puree in batches. Be careful, contents are HOT! 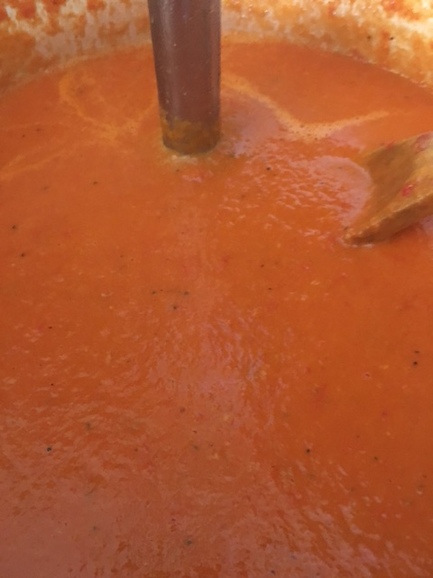 8. Taste for seasoning and adjust to taste. Add in additional stock, if desired, for thinner soup. Stir in cream if using. (I personally think it's not needed at all- sometimes more fat muddies the flavor instead of heightening it IMHO). 9. To make Parmesan crisps, line a baking sheet with parchment. For every Parmesan crisp you'd like to make , place 1 Tablespoon of grated Parmesan cheese onto the baking sheet and pat down into a circle, leaving 2-3 inches between mounds. Bake for 3-5 minutes until golden. Remove from oven and cool completely before removing from tray (they can be a bit fragile).
10. Ladle soup into bowl and float a Parmesan crisp on top. Serve hot!  And it was good to the last drop! ; ) ♥ 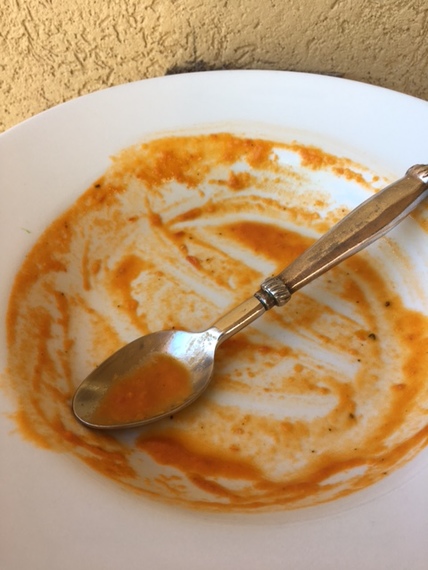 * Note: To seed the tomatoes, core them first (only needed with the larger tomatoes). Cut the tomatoes in half cross-wise. hold the tomatoes cut side down over a bowl or the sink. Give a gentle squeeze and a little shake and the seeds will fall out, not all of them, but most. Good enough.
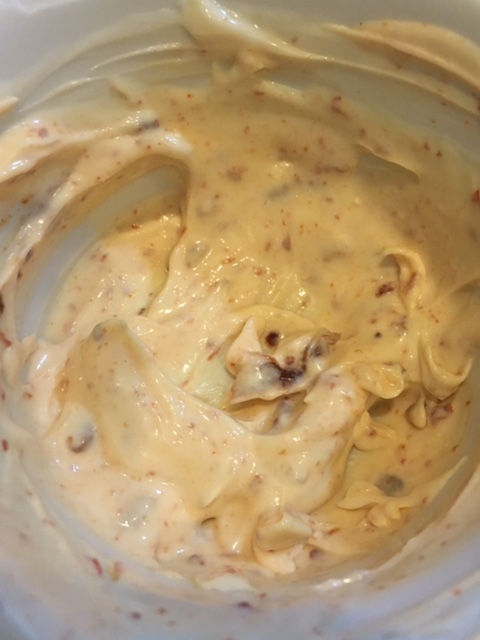
PS: If you'd like another great fall soup recipe, please visit this link here. “Oh, I adore to cook. It makes me feel so mindless in a worthwhile way.” -Truman Capote By now you probably know that I am really into simple, fresh food.It's unlikely that I will ever give you a recipe for a really complicated, time-consuming culinary masterpiece. I am all about getting a good, fresh, delicious meal on the table without having to spend my entire life in the kitchen (which is pretty much what I do anyway, but that's beside the point...). So something easy, flavorful , and maybe just a bit out of the ordinary, makes me quite a happy cook. This Taos Turkey Burger is no exception. It is made from super simple ingredients. I use fresh roasted chiles from my farmer's market*, you could roast your own or even use canned roasted chiles if that's what you prefer. In any case, in the time it takes to get your grill hot, you can pretty much have these prepared and ready to cook. Grilled or pan-seared, these are a year-round favorite. If burgers are your thing I have a couple others you might like to try here and here. Taos Turkey Burgers- serves 5 1 1/2 lbs ground turkey 1/2 cup diced roasted chiles, peeled, stemmed and seeds removed (or canned, drained) 1/2 cup shredded cheese (pepper jack, cheddar or colby jack) 2 Tablespoons finely snipped chives 1/4 cup finely crushed salted tortilla chips 2 Tablespoons mayonnaise scant 1/2 teaspoon kosher or sea salt 1/4 teaspoon coarsely ground black pepper Chipotle Mayo-optional 3 Tablespoons mayonnaise 1-2 teaspoon pureed chipotle chiles in adobo sauce (smoky medium heat flavor) 5 burger buns, grilled-optional lettuce-optional sliced avocado or guacamole-optional 1. If using an outdoor grill, start the fire or preheat it now. 2. Combine the first nine ingredients in a medium sized mixing bowl. Gently, yet thoroughly, combine all ingredients. I like to use my fingertips and avoid compacting the mixture. Keep it loose! 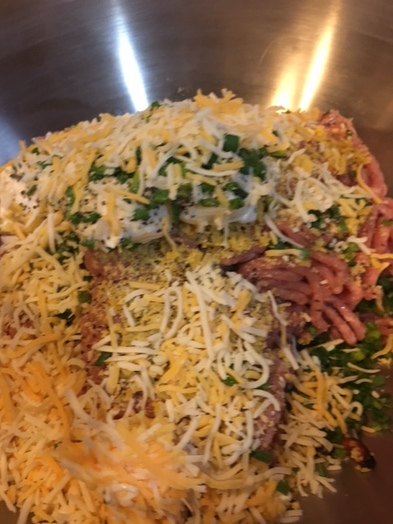 3. Gently form mixture into 5 generous patties. Press a hole in the middle of each burger with your index finger (this helps prevent the middle from puffing up while cooking). 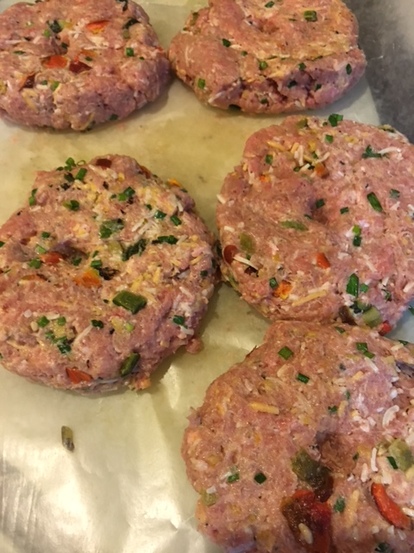 4. Place burgers on hot grill , or if using a heavy-bottomed skillet (cast iron is great), heat skillet with 1 tablespoon of oil in it over medium heat. When hot, add burgers. 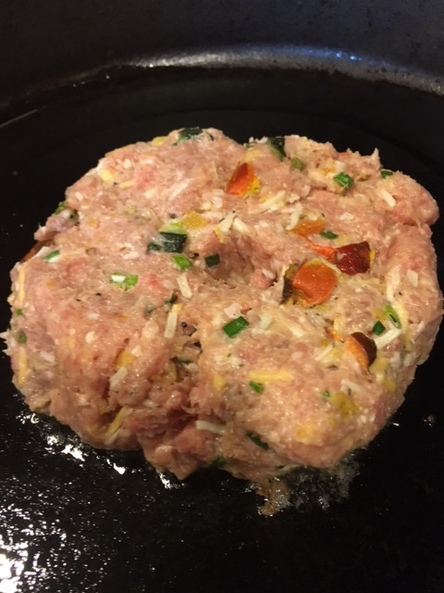 5. Cook burgers, 5-7 minutes per side, or until done, flipping once. 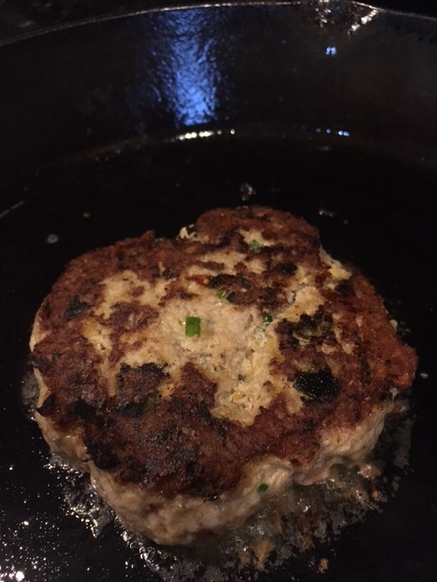 6. Meanwhile, mix together remaining 3 Tablespoons mayonnaise and 1 teaspoon (or to taste) pureed chipotle chiles. Spread evenly on both sides of buns, if using.
7. Assemble burgers using the optional ingredients of your choice and serve! 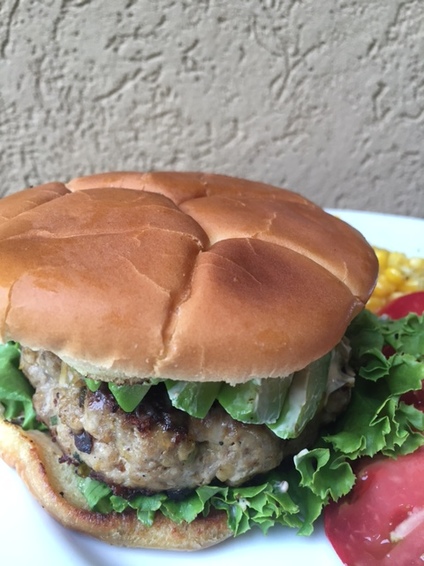 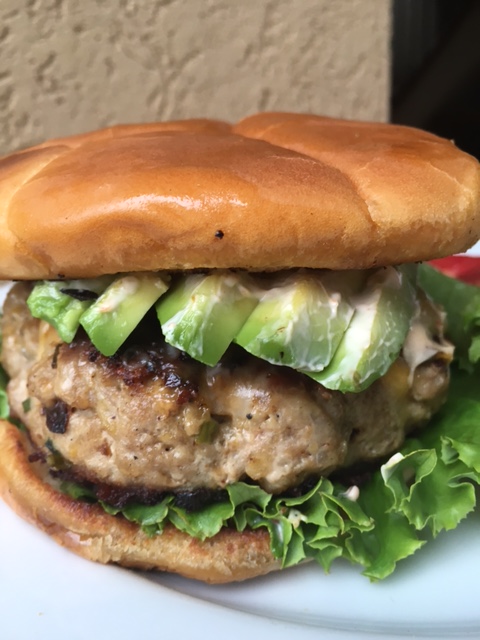 *Tip: I buy the roasted chiles at my farmer's market in varying degrees of heat. When I get them home, I peel , stem and seed them. I then lay them flat in a single layer on a parchment covered baking tray(s). I then place chiles in the freezer until frozen firm. Once frozen I remove them and pack like chiles together in freezer bags which I store back in the freezer. They are ready to use in all kinds of dishes, thaw, chop and go! The taste is superior to canned. If you roast your own, you can also store them in this manner.
"It's another tequila sunrise, staring slowly across the sky. " -The Eagles Just the word Tequila piqued your interest, didn't it? You can admit it, I won't tell. Well unlike tequila shots, there won't be any regrets the next morning when making this spectacular summer dish I am about to share with you. It's simply lean and quick-cooking pork tenderloin, bathed in a beautifully herbaceous, slightly acidic and gorgeously green marinade. I swoon over it ever summer. Just the color of the marinade gets me going! I did not create this recipe though I tweaked it ever so slightly , increasing the amount of cilantro called for. However I no longer recall the original source, so I apologize for not being able to give proper credit here*. You will be happy to know that once the meat is cooked , the flavors still shine bright. You can slice it and eat it plain or create tacos or quesadillas with the meat as well. It's equally delicious with boneless, skinless chicken breasts, too, so why not try both? Its a great dish to entertain with as well- nothing ordinary about it yet it is so super simple to make! Tequila-Jalapeno Pork Tenderloin serves 6-ish or more depending on how large your tenderloins are 1 cup packed cilantro (leaves with stems ok)- about 1 small bunch 2-3 jalapeno peppers, halved and seeded, depending on your tolerance for spice (I use 2) 1/2 cup roughly diced onion 3 small cloves garlic, peeled 1/4 cup freshly squeezed lime juice (2-3) 2 Tablespoons Tequila (I use Jose Cuervo Gold ) 1/4 cup freshly squeezed orange juice 1/4 cup olive oil 1 teaspoon kosher or sea salt 1/2 teaspoon coarse ground black pepper 1/2 teaspoon ground cumin 1/2 teaspoon honey or granulated sugar 2 pork tenderloins (or try with boneless, skinless chicken breasts) 1. Make Marinade: Combine all ingredients in blender jar. 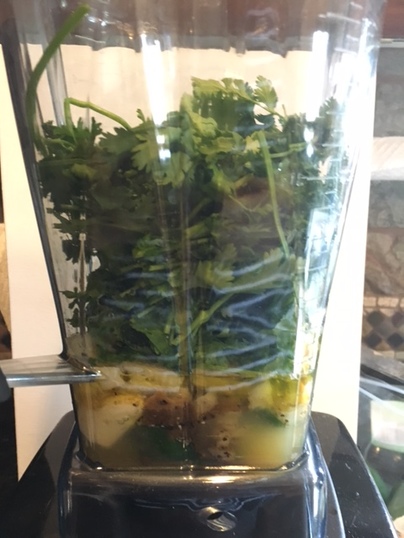 2. Blend on high until mixture is smooth and homogeneous, about 1 minute. 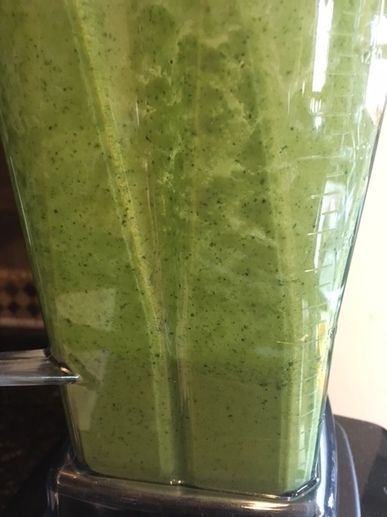 3. On a clean cutting board, butterfly the two pork tenderloins. To butterfly, cut not quite through each tenderloin, lengthwise, with a very sharp knife, so it opens like a book. Do not cut through! 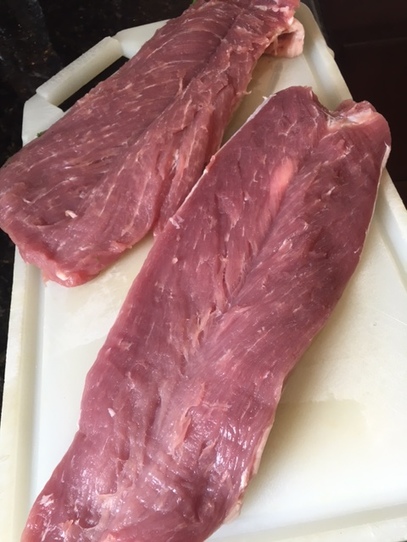 4. Place tenderloins in a ziploc bag or non-reactive dish . If using a dish, pour half the marinade on top. Turn the tenderloins over and pour the remaining marinade on top. Cover with plastic wrap and refrigerate for at least 4 hours or over-night. If using a bag just pour the marinade into the bag over the tenderloins and seal. 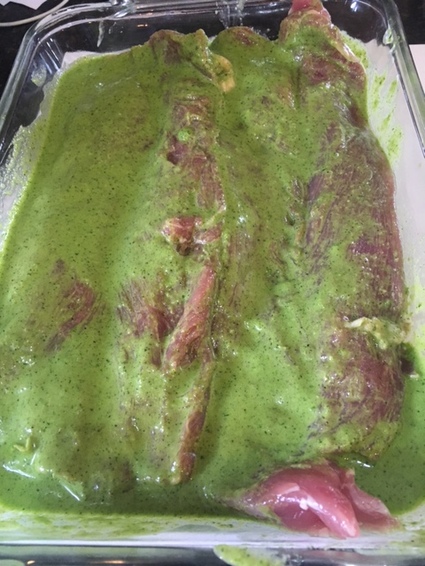 5. When ready to cook prepare charcoal grill or preheat gas grill to medium-high heat. Clean and oil cooking grates. When ready, remove pork from marinade mixture and discard remaining marinade. Place pork onto cooking surface and grill, covered for about 7 minutes per side, turning once. 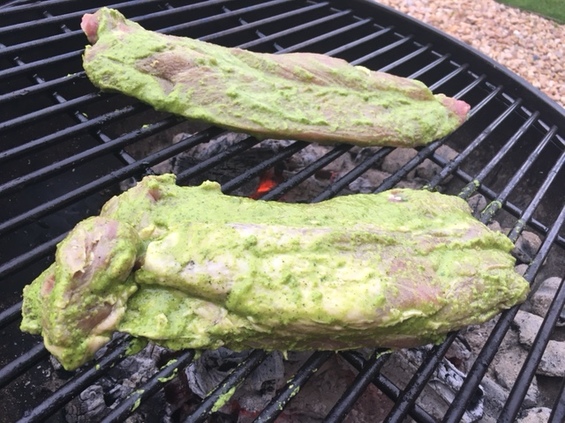 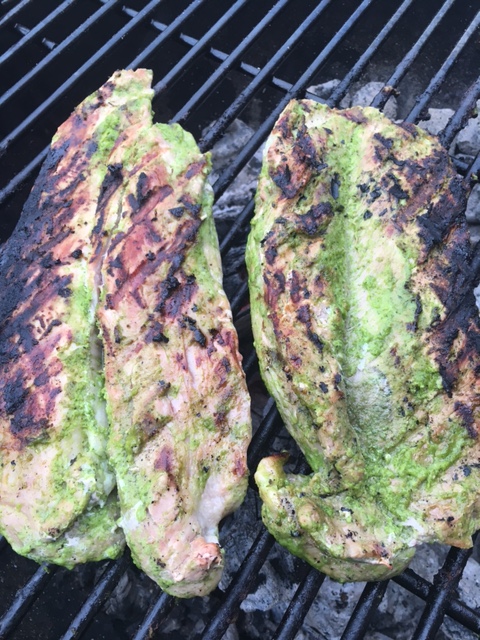 6. When done I cook mine to 145 degrees internal temperature but USDA says cook to 165 degrees F, you decide what seems good to you). Remove from grill and let rest 10 minutes before slicing (cooking will continue with carry-over heat). 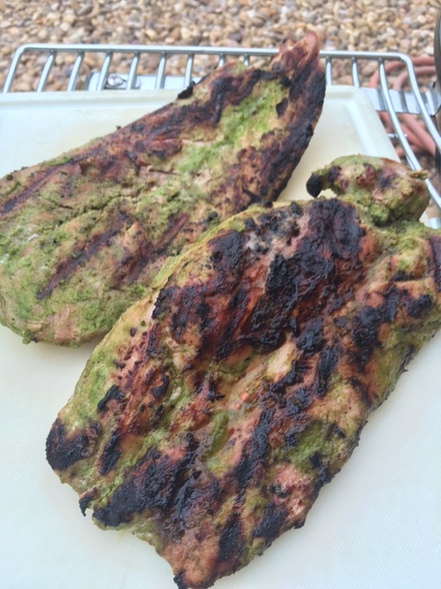 7. Slice thinly cross-wise against the grain and serve immediately with sides of your choice. 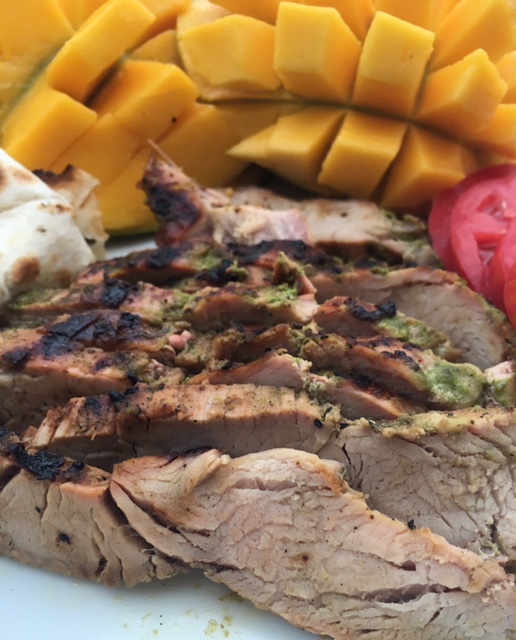 I hope you love it! What's your favorite way to prepare pork tenderloin? Please share in the comments below!
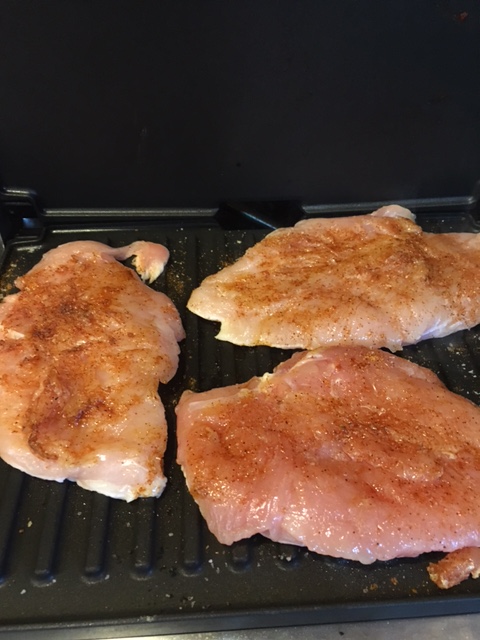
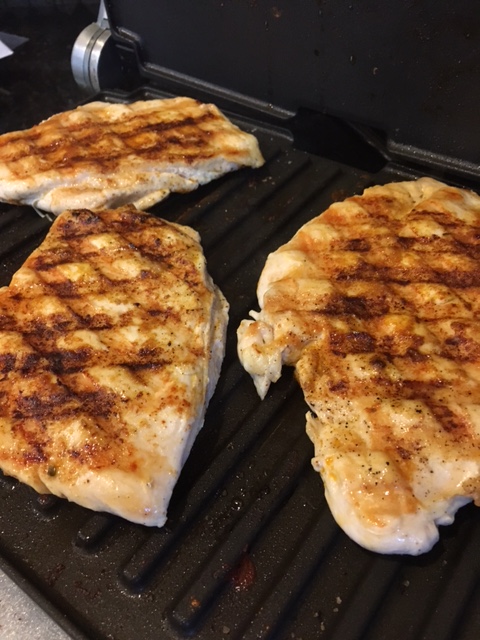
* I was thinking the recipe originally was featured in Fine Cooking magazine, but I searched and searched the web for anything similar and came up empty handed. “Pull up a chair. Take a taste. Come join us. Life is so endlessly delicious.” -Ruth Reichl Just came across that quote-love it!! Don't you? So anyhow, just wanted to give you another idea how to use that Cool and Crunchy Jicama Slaw I recently featured. It makes summer meals taste better...really! We had it last night with Oven-Baked BBQ Ribs (finished off the ribs on the grill with some smoking chips). It was perfect because ribs are heavy and rich and the slaw is the complete opposite-light and fresh. Well, here is another idea, a grilled chicken tostada. If you have the slaw made already you are half-way there! If you have left-over grilled chicken from another meal, well, then you have a quick and easy meal with barely any effort! If you are starting from scratch, let me show you how! Grilled Chicken Tostada- serves 4 to 6 Jicama Slaw made with half of dressing, reserve other half 4 split chicken breasts, about 6 ounces each seasoning mix from this recipe 6" flour or crunchy corn tostada tortillas (your choice) 2 avocados, pitted and sliced cilantro leaves for garnish, optional lime wedges for serving, optional 1. Preheat grill. Prepare seasoning mix and set aside. 2.Take two sheets of plastic wrap and place chicken breasts in-between the two sheets. Pound them into an even thickness, no more than 1/2 ". 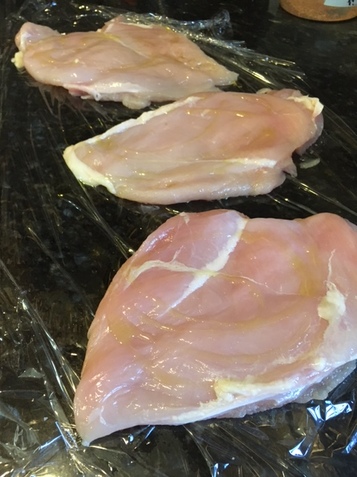 3. Season both sides of chicken with spice mixture (a generous pinch per side). 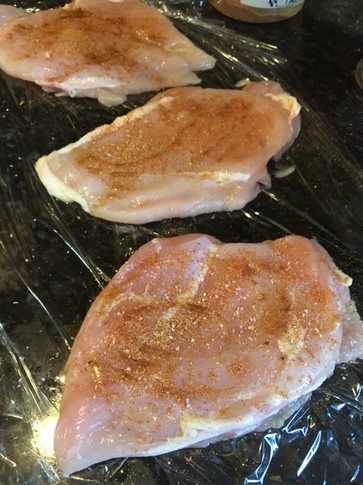 4. Place chicken on hot grill and cook, turning once, til just done, about 3-4 minutes per side. Do not over-cook. Remove from grill and let rest for 5 minutes.
5. Slice chicken in half lengthwise and then into thin strips cross-wise. 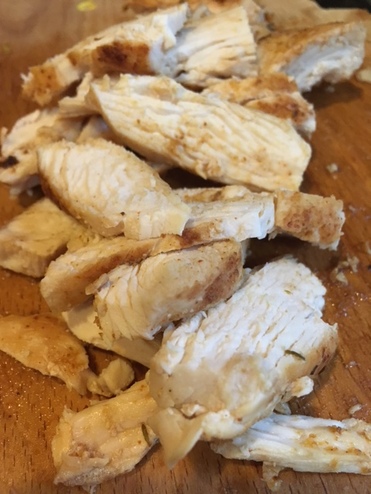 6. If using flour tortillas, grill them until browned and crisp (sorry for the way too blurry shot, but you get the idea). If using crunchy corn tostada tortillas, skip this step. 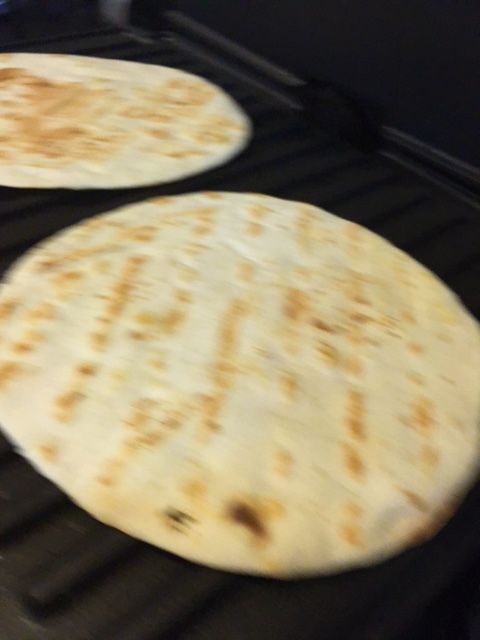 7. To assemble: on each plate, lay down a tortilla. Top with a layer of grilled chicken. Top the chicken with Cool and Crunchy Jicama Slaw, drizzle with a little extra slaw dressing, then garnish with sliced avocado , cilantro leaves and lime wedges, if desired. As they say south of the border- Buen Provecho! ♥ 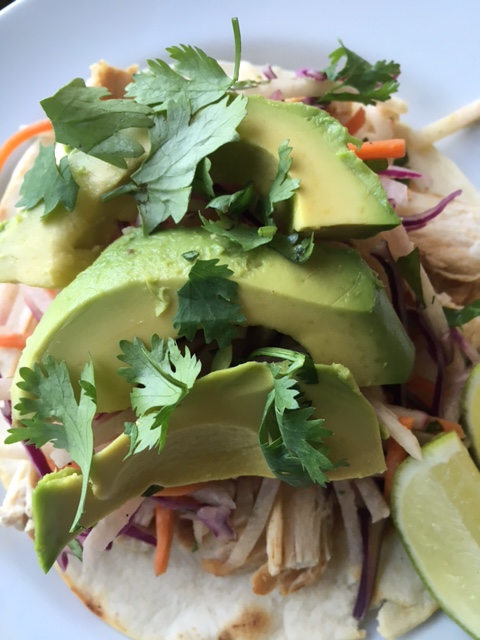 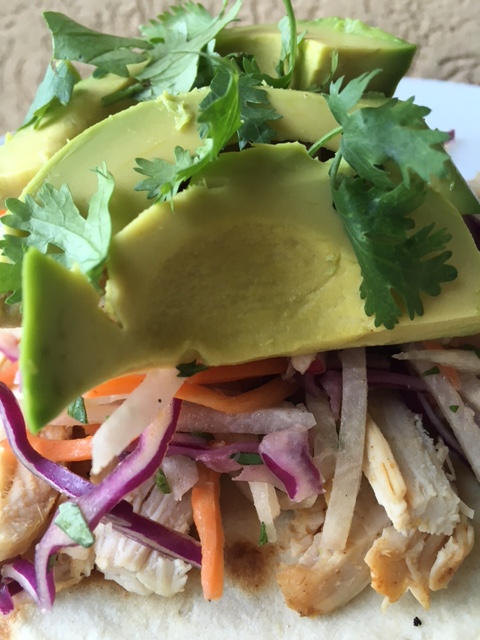 “My love is pizza shaped. Won’t you have a slice? It’s circular, so there’s enough to go around.
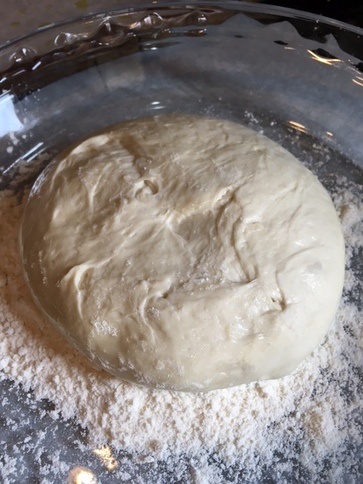
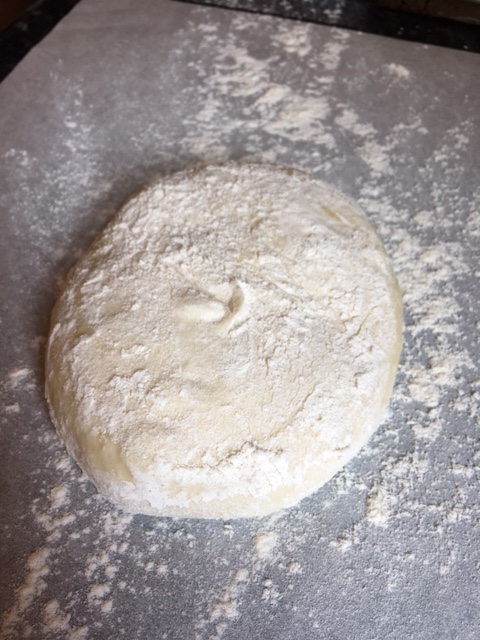
” -Dora J. Arod Last week I was back in Upstate New York where I grew up, helping my mom pack up her house of 51 years. It was at times wonderful, trying, sad and good. Maybe some of you have had a similar experience helping a parent move. I also got to see my brother, sister and their families, which was a delight for me. I don't get back there as often as I would like. One of the highlights was showing my nieces and nephew how to make homemade pizza one night as we celebrated my youngest niece's 11th birthday!. We had so much fun! They took to it like naturals, too. That got me thinking that I hadn't made pizza at home for a very long time. Now that we have a couple gluten free people in my household, we don't make it as often as we once did. So this weekend with some free time on my hands I thought I'd make one of my favorite pizzas-salad topped pizza. It is just baby mixed salad greens tossed lightly in a nice lemony vinaigrette sitting atop a sauce-less cheese pizza. It makes a wonderful lunch or light dinner It is super simple especially if you start with purchased quality dough from your favorite store, pizzeria or Italian deli. I usually make my own dough, but if I didn't plan ahead, I really like to use the fresh dough they sell at Whole Foods. Salad Topped Pizza (makes 2 -10 inch pizzas) 1 lb fresh pizza dough (purchased or homemade) sea salt coarse ground black pepper crushed red pepper flakes 2 cups shredded part-skim mozzarella 2 Tablespoons fresh grated Parmesan cheese plus more for shaving 4 cups lightly packed mixed baby salad greens or baby arugula 2 Tablespoons Extra virgin Olive Oil 2 teaspoons fresh lemon juice 1/4 teaspoon Dijon mustard 1/4 teaspoon minced fresh garlic, peeled all-purpose flour for dusting parchment paper 1. About an hour before making pizzas, place pizza stones inside oven and preheat oven to 550 degrees Farenheit (if you don't have a pizza stone, I have also had good success using inverted, heavy duty baking sheets as my "stones".). 2. Remove dough from fridge*. On a lightly floured surface, divide dough evenly into two pieces. 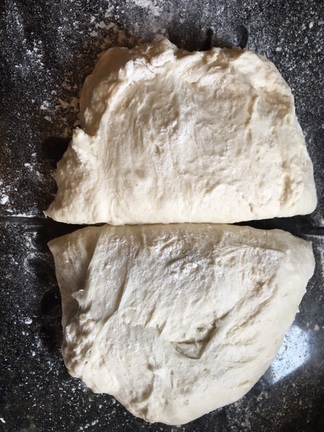 3. Take each half and fold the dough edges into the middle to make a rough ball. With the rough side down, roll the dough, using the counter as an aid, into 2 nice smooth balls. Place the balls on an oiled cookie sheet, several inches apart. Brush the tops of the dough ball with olive oil as well. Let rest on counter for about 1 hour. 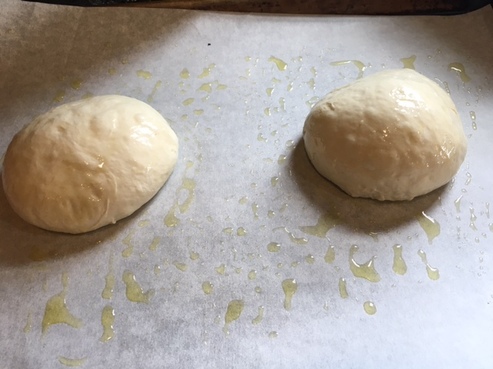 4. After an hour taking one ball of dough at a time, dip both sides of the dough ball in flour. Take a sheet of parchment, sprinkle it lightly with flour. Place the floured ball of dough on it and using your finger tips, dimple the dough.
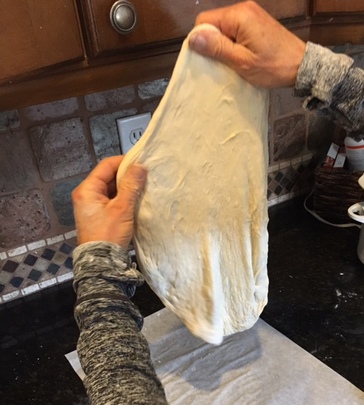
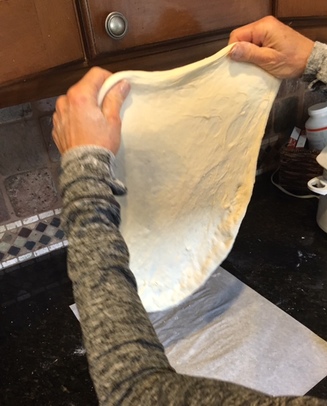
 5. Now pick up the dough with both hands (lightly floured) on the top edge of the dough. Using two hands, lift the dough in the air and letting gravity help you, spin the dough clockwise moving your hands around, until the dough has stretched out to about a 10" round. You can also keep it flat on your floured paper and stretch it by hand on the paper. I think you get a more even crust this way I demonstrate, but do what you are comfortable with. Just remember to keep your hands on the thick outer part of the dough and just allow the pull of gravity to do all the work, keeping the dough round in constant motion If your dough is really elastic. You may have to place the dough down on the floured paper and let it rest several minutes before trying again. Repeat with the other ball of dough. Also do not worry about getting a perfect round. A rustic shape is just as delicious!
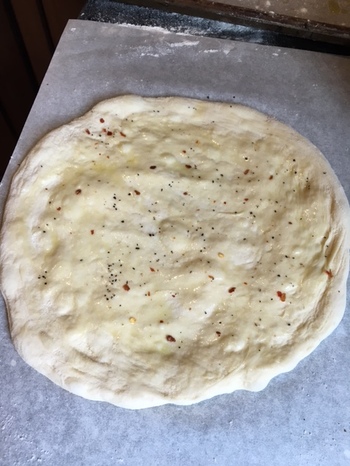
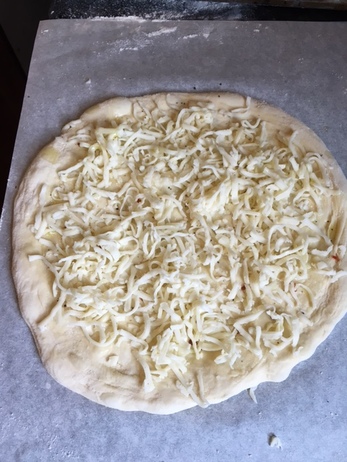
6. Once the dough has reached desired size, lay it gently back down on the floured parchment paper. 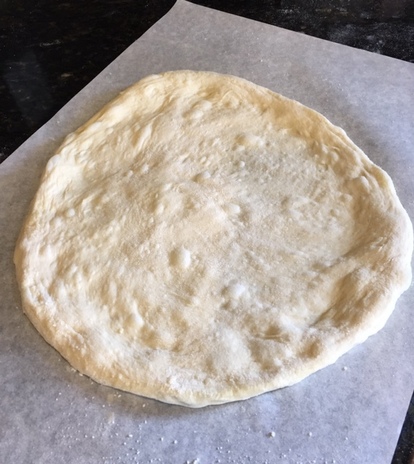 7. Lightly brush the tops with olive oil. Sprinkle each dough round lightly with a small pinch each of sea salt, black pepper and crushed red pepper. Top with mozzarella. Sprinkle each with 1 Tablespoon freshly grated Parmesan and drizzle very lightly with additional olive oil (optional).
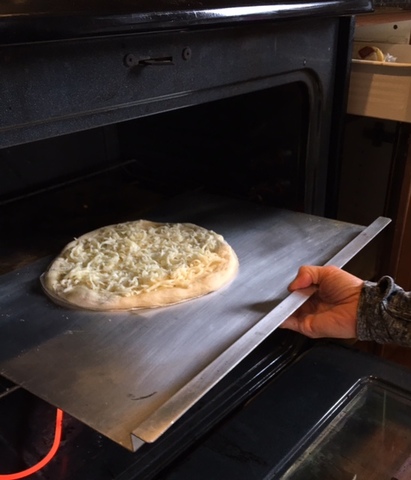
8. Trim parchment with scissors all around dough.  9. Using a pizza peel or rimless baking sheet, transfer pizzas to preheated pizza stones inside oven, parchment paper and all. This is my fool-proof "trick" for building and transferring a pizza into the oven. Works like a charm every time.
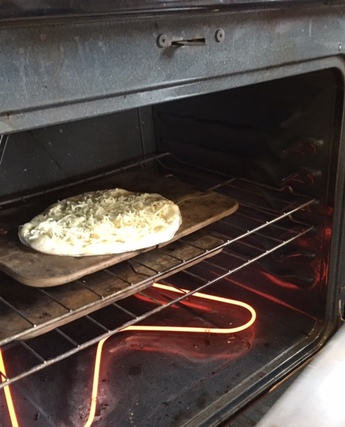
10. Let pizzas bake about 6-10 minutes. (Disclaimer: Every oven is a little different, so please check on your pizzas, rotate them as needed from top to bottom (using peel or rimless baking sheet) or rotate them around on their stone to ensure even baking. Your pizzas are done when the crust is golden and crackly, cheese is bubbly and maybe lightly browned in spots, and bottom of pizza is nicely golden. 11. While pizzas are baking whip up salad dressing: whisk together 2 Tablespoons Extra Virgin Olive Oil, lemon juice, pinch each salt and pepper, garlic and Dijon. Set aside. 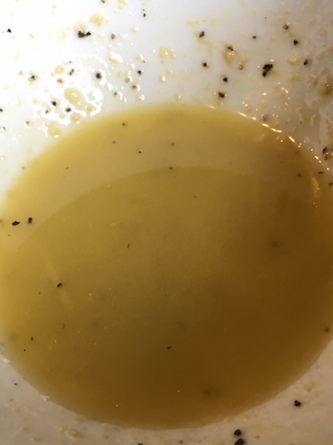 12. When done remove pizzas from oven and transfer to plates.  13. Immediately toss salad greens with dressing to taste. 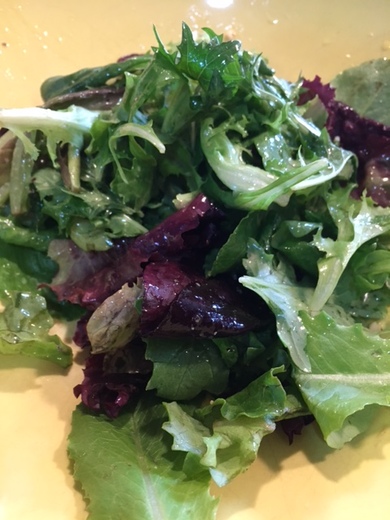 14. Once dressed, top hot pizzas with salad greens. Shave Parmesan cheese on top and serve. Dig in! 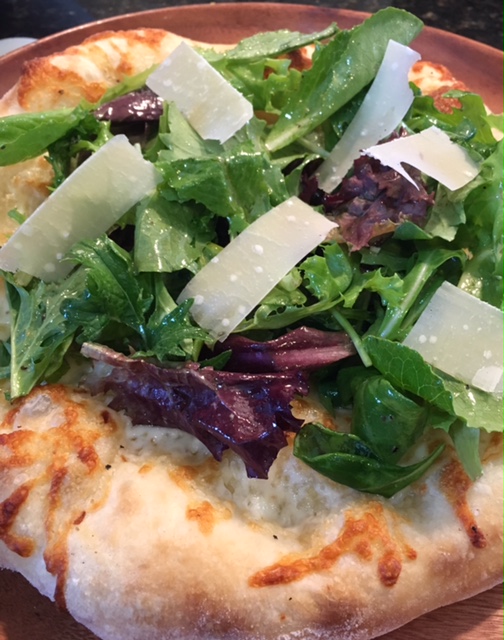 * if you are using home made dough (I have several favorites I will share with you another time) my suggestion is to let it rise slowly in refrigerator for several hours and possibly over-night to develop the best flavor. Don't punch it down, just gently divide the dough and roll into balls as instructed. The time on the counter is less about a second rise than it is about warming up the dough closer to room temp. However, if you have beat down the dough, you may need to let it sit out longer once you form into balls to allow the nice air bubbles to form again. These give the dough great character and lightness.
"You don't need a silver fork to eat good food."- the late great Paul Prudhomme I just found this quote, and it perfectly sums up how I feel about food- fresh, simple and delicious. I don't want the caviar and fancy techno cooking (not that I wouldn't enjoy eating that- well, not the caviar-have had it-not impressed, but it's not central to how I feel about food and cooking). I think Mother Nature got pretty much everything right. Think of a ripe peach. Really, can you improve on that? I don't think so. It's also fitting for this recipe I have to share with you today. The humble pork rib. It's tough and not much to look at, but transforms beautifully with a little time and inexpensive seasoning. I know it is probably blasphemous to suggest oven BBQ to anyone from certain regions of this country, but I am a working mother of two with other interests and no smoker in my backyard. Granted these ribs will lack the sweet touch of smoky goodness only real hardwood will give you, but they are satisfying and delicious if you are a rib lover. And they couldn't be easier. You do need to plan to start them at least 24-48 hours ahead of when you want to cook them as they need time to let the seasoning work its magic. You can scale this recipe up or down as long as you have the oven capacity, in case you want to make them for a crowd. The spice seasoning should be adequate for several racks of baby backs and will store fine for up to 4 months in an airtight container in your spice cabinet (would be great on BBQ or Beer can Chicken, too). The smoked paprika and smoked salt help bring a touch of that wood-smoked flavor to the ribs, but you can substitute sweet paprika and more kosher salt if you prefer. Ready to get started? Oven-Baked BBQ Ribs -serves 4-6 2 Racks of baby back ribs Yellow Mustard (such as French's) Seasoning Rub (recipe below) Barbecue Sauce (your favorite or my recipe below) 1. Lay out a sheet of heavy duty aluminum foil (long enough to enclose the ribs completely) for each rack of ribs preparing. 2. Spread a thin layer of yellow mustard on top and bottom of ribs. 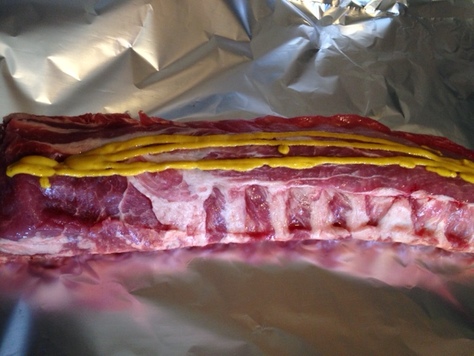 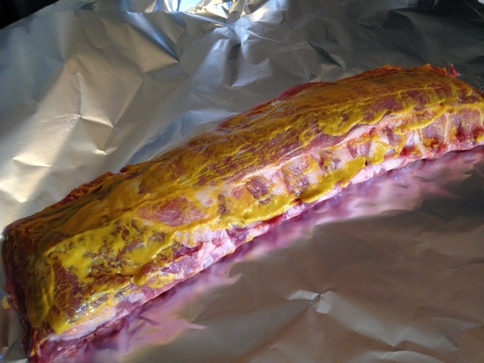 3. Sprinkle seasoning rub all over both sides of the ribs. Gently pat it down into mustard to adhere. 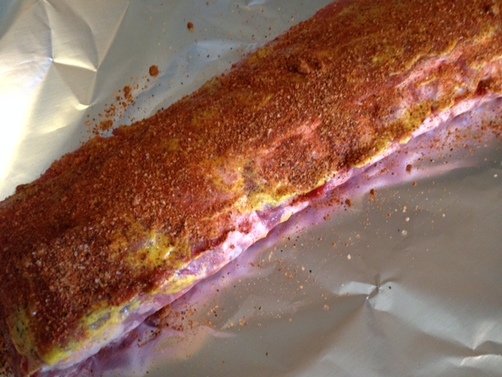 4. Wrap securely in foil, place on a baking tray and refrigerate for at least 24 hours and up to 48 hours. 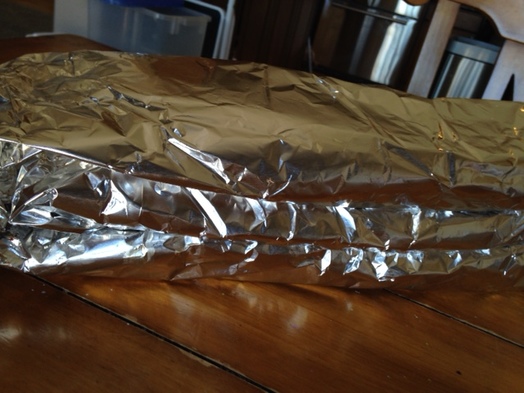 5. Remove ribs from fridge 30 minutes before cooking. When ready to cook, preheat oven to 300 degrees. Place ribs, on tray, into oven and bake for 2 1/2 to 3 hours until ribs are very tender. Remove ribs from oven. Preheat broiler. 6. Unwrap ribs and slather tops generously with barbecue sauce. Return ribs to oven and broil until caramelized. Watch carefully so the sauce doesn't burn! 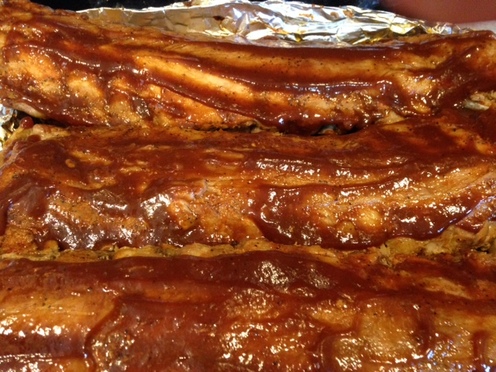 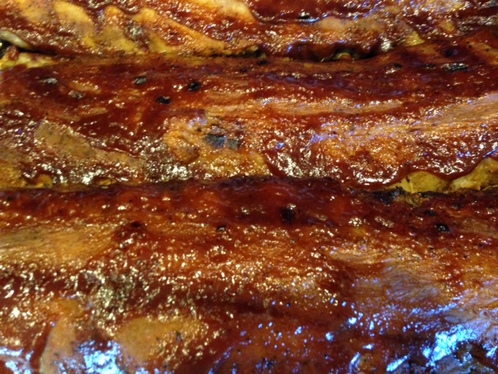 7. Remove from oven, cut into portions (I do every 2-3 ribs), serve with your favorite BBQ sides such as coleslaw, corn and watermelon! Be sure to have extra napkins on hand-this is messy good stuff! ♥ 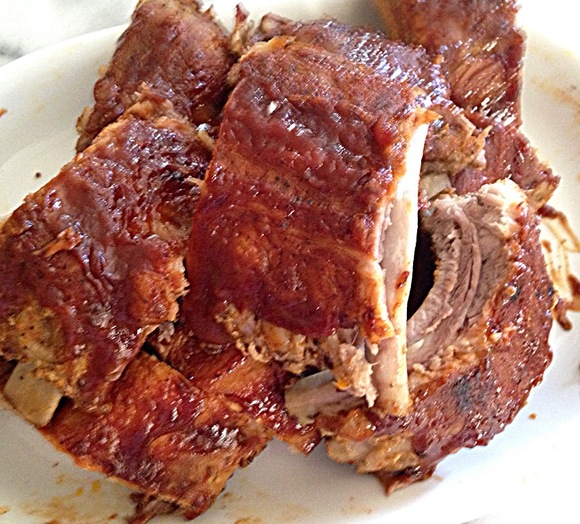 Barbecue Seasoning Spice Rub (Adapted from How to Grill by Steven Raichlen) 1/2 cup light brown sugar 1/2 cup smoked paprika 1/4 cup plus 2 Tablespoons coarse ground black pepper 1/4 cup plus 2 Tablespoons Kosher salt 2 Tablespoon hickory or apple-wood smoked salt 4 teaspoons garlic powder 4 teaspoons onion powder 1 teaspoon cayenne pepper 1. Combine all ingredients together in a bowl. Mix well. Store in an air-tight container until ready to use. Sweet and Zesty Barbecue Sauce -makes approx 1 1/2 cups (Don't be put off by the long ingredient list. It's mostly just measure and dump) 1 teaspoon minced fresh garlic 1/4 cup minced onion 1 cup Ketchup (I like Heinz the best) 1/4 cup Worcestershire sauce 1 1/2 teaspoons molasses 1 1/2 teaspoons apple cider vinegar 1 teaspoon kosher salt (or smoked salt) 1/4 cup fresh squeezed lemon juice (about 2 lemons) 1 teaspoon yellow mustard pinch crushed red pepper 1/4 teaspoon Tabasco sauce 1/4 teaspoon dried thyme dash or two of liquid smoke (optional) 1. Over medium heat saute onions and garlic in a little vegetable oil until softened and translucent. 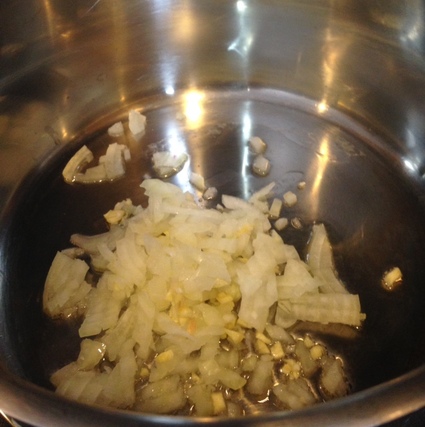 2. Stir in all remaining ingredients. Bring to a boil over medium heat, stirring often. 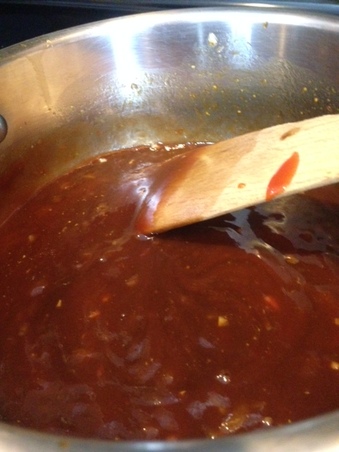 3. Cook, stirring often, until sauce is reduced and thickened. Cool slightly before transferring to glass container. Store in refrigerator for up to a month. 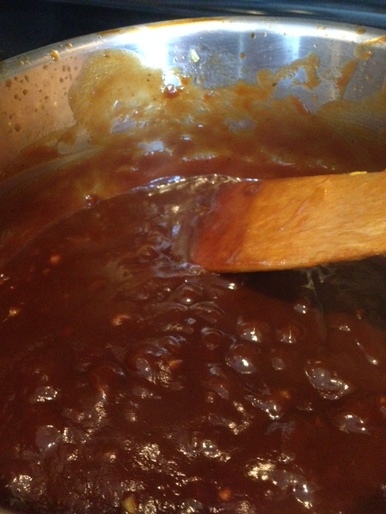 thick and rich and zesty- just the way I like it! : )
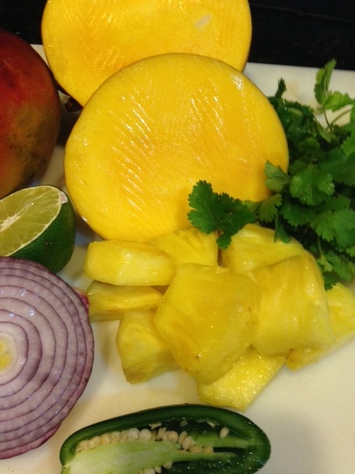
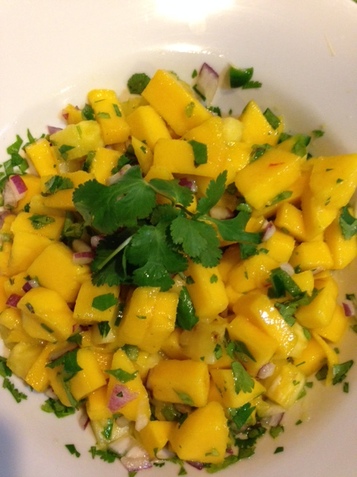
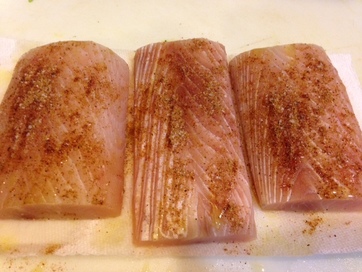
"Sometimes, a Sunday afternoon needs a whole mango to be kept entirely to oneself, and eaten in one sitting." -Alison Pil Mango is really that good. Sometimes you just don't want to share it. And totally off topic, but I'm not the only one who loved The Newsroom and Alison Pil as Maggie in it, right? (I confess to binge-watching all three seasons on Amazon in about 4 days. I know...) Back to mango...in the off chance you are feeling a little more generous and maybe sharing the mango is an option, can I talk you into making Grilled Mahi-Mahi with Mango-Pineapple salsa? It is super easy to make, a great option for a quick, light week-night meal or a casual weekend meal with friends. Minimal prep, maximum flavor. If I were you, I'd double or triple the seasoning rub as it's great on chicken and works on pork, too. It's not quite grilling season here in Northern Colorado, but my indoor grill fit the bill just fine today. This recipe comes from my days as a business owner with my meal prep business, the long gone Meals Made Easy. It was my first time tasting mango salsa and I was smitten immediately. I've added a little fresh pineapple to the salsa, and it's a winner. Easy, colorful and fresh, what could be better?! Grilled Mahi Mahi with Mango-Pineapple Salsa- serves 6 2 teaspoons ground cumin 1 teaspoon ground coriander 1 teaspoon chili powder 1 teaspoon garlic powder 1/8 teaspoon cayenne pepper 2 teaspoons kosher salt plus more for the salsa olive oil 1 large mango, peeled and diced 2/3 cup diced fresh pineapple 2 Tablespoons minced red onion 2 Tablespoon minced fresh cilantro 1/2 fresh jalapeno, seeded and minced juice from 1/2 fresh lime 6 mahi mahi pieces approx 5 ounces each 1. Preheat your grill to medium high. 2. Combine cumin, chili powder, coriander, garlic powder, cayenne pepper and salt in a small bowl; set aside. 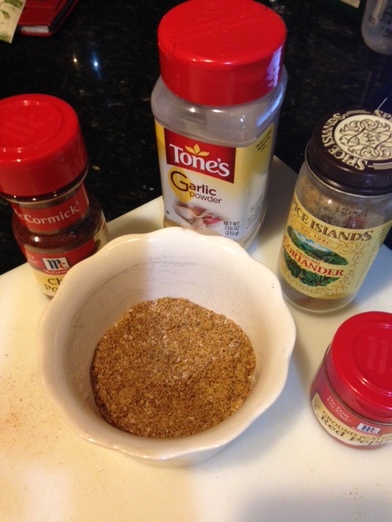 3. Place mango., pineapple, red onion, cilantro, jalapeno, lime juice and a pinch of salt together in a medium bowl. Stir to mix well. Taste for seasoning and adjust accordingly.
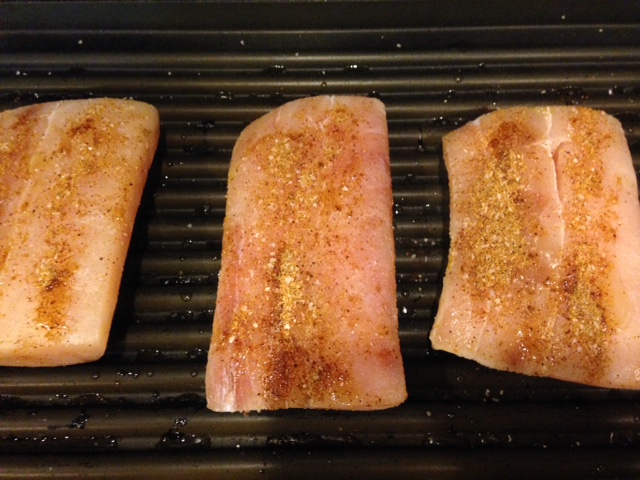
4. Pat fish dry. Drizzle each piece with a little olive oil and sprinkle evenly with spice mixture. Place spice side down on grilling surface and cook about 4-7 minutes a side, depending on thickness of fish and heat of your grill. Before flipping, drizzle top side with olive oil and sprinkle evenly with spice mixture (any leftover spice mix can be kept in an air-tight container in your cupboard for 2 months).
5. Continue cooking, until fish is just done, approximately another 4-7 minutes. DO NOT over-cook. Mahi gets an unpleasant texture when over-cooked. You won't like it. Remove from grill immediately. 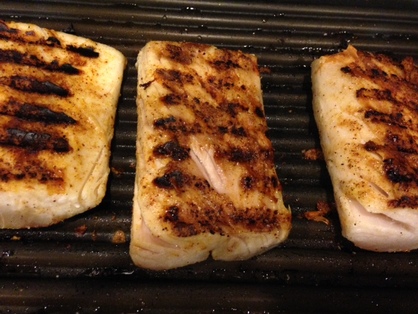 6. Top with salsa and serve. Doesn't that look so delicious? That salsa alone....swoon!  Oh, and did I mention it's even good for you? Healthy, quick, easy AND tasty?!! Winner!
"I can't think of a more perfect meal than a comforting, big bowl of soup." -Cristina Ferrare Here in Northern Colorado we have been spoiled by over 2 weeks of unseasonably warm weather. It has been Spring Fever all the way (insert happy dance here)! And it's not like winter has been so unbearably difficult this year (it for sure hasn't), but for the first time in recent memory, we have had snow and consistently cold temperatures pretty much since Thanksgiving (that is pretty unusual for this area. Colorado , for a winter state, generally has it pretty good). So we are all kind over the winter thing...or so we thought. Then today happened. Though signs of spring are sprouting up everywhere, a cold front came in, gray skies and wind in tow, wagging a finger and letting us know "not so fast" on this Spring thing. So on a day like today, when a brisk chill is in the air, I automatically go into soup mode. Today I thought I'd make a hearty soup chock full of veggies with some smoked Polish sausage thrown in for good measure, not to mention great flavor. I used kale in this recipe, but you can easily substitute fresh baby spinach if that is more to your liking. Bring it, winter- I can handle it! Sausage and Bean Soup with Kale- serves 6-8 as a main course 1 lb. Smoked Polish Sausage, sliced lengthwise in half and cut cross-wise into 1/4 " half moons 1 1/2 cup diced onion 1 cup diced fresh celery 1 1/2 cups sliced carrots 2 cloves garlic, peeled and minced 1 -14.5 ounce can diced tomatoes in juice 2- 14.5 ounce cans of Great Northern or Cannellini Beans, rinsed and drained 8 cups chicken stock, purchased (low-sodium) or homemade 4 sprigs fresh thyme small pinch crushed red pepper flakes (optional) 1 bay leaf 2 cups, packed, thinly sliced Lacinto kale (center ribs removed) Kosher salt and coarse ground black pepper 1 Tablespoon good quality red wine vinegar Freshly grated Parmesan Cheese 1. In a 6-7 qt Dutch Oven or soup pot over medium heat, saute the sausage until browned, stirring occasionally. Remove the sausage to paper towels to drain. 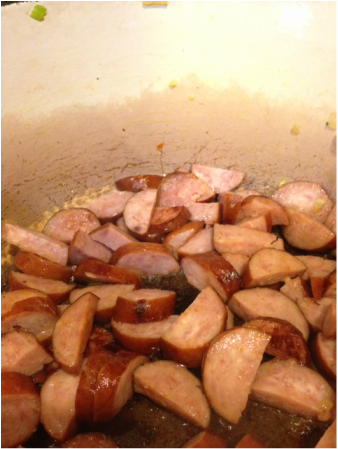 2. Immediately add 1 tablespoon of vegetable or olive oil to pot and stir in celery, carrots, garlic and onion. Season with a generous pinch of salt and pepper.Cook, stirring often, until wilted and onion is translucent. Stir in thyme sprigs, crushed red pepper, if using, and cook, stirring, for another 2 minutes. 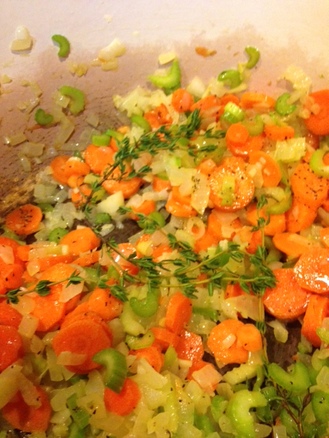 3. To the pot add in chicken stock, 2 cups of water, tomatoes, bay leaf and beans. Bring to a boil over medium high heat, stirring occasionally. Reduce heat to low, add in browned sausage and simmer 45 minutes longer, with the cover just slightly open. 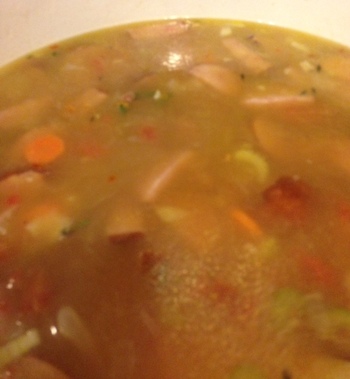 4. After 45 minutes, taste for seasoning and add salt and pepper as needed to suit your taste. Stir in kale. Cover pot and let simmer another 15 minutes, until kale is wilted and tender. 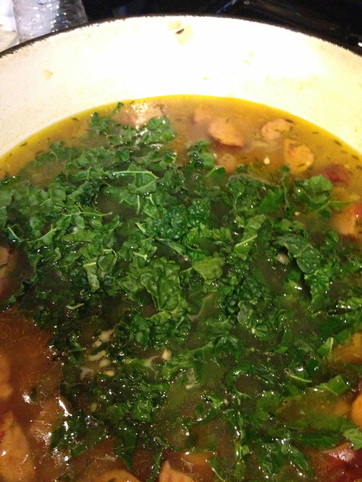 5. Stir in red wine vinegar. Cook 1 more minute. Taste for seasoning one last time and adjust as needed. Remove and discard bay leaf and thyme stems. Ladle soup into bowls, top with freshly grated Parmesan cheese, and serve immediately. Mmm, Mmm good!  “The best meals are those prepared by loving hands.” - Ken Poirot It's mid-week, and things are busy in your house. Am I right? Or maybe you had a busy day at work or school and you don't really feel much like cooking, but still want to put a nourishing meal on the table with minimal effort. With a few pantry items and some leftover chicken, you can do just that! A week ago or so, we had leftover rotisserie chicken and in the back of my mind I thought that Chicken Burrito Bowls would be an easy and delicious way to use that up. It ended up being a big hit with my husband and daughter, and it was super easy.The beauty of it is you can totally customize it to your taste (be sure to check out some variations at the bottom of the post). Here is how I went about it. Chicken Burrito Bowls- serves 4 4 cups cooked and seasoned seasoned brown rice* 4 cups diced left-over roast chicken, reheated gently in the microwave 1/2 cup frozen corn kernels, thawed 3/4 cups black beans, rinsed and drained Your favorite prepared tomato-based salsa Low-Sodium Chicken broth 1 teaspoon taco seasoning** 1 cup shredded cheese (Cheddar, Colby-Jack, Jalapeno-Jack, ) diced avocado -optional chopped fresh cilantro-optional diced fresh tomato-optional sliced olives-optional sour cream-optional guacamole-optional sliced geen onions-optional hot sauce-optional 1. Cook rice according to package directions, substituting salsa for one fourth of the liquid called for and using chicken broth in place of remaining amount of water called for. 2. When rice is done, stir in corn, black beans and 1 tablespoon chopped cilantro (optional). Remove pot from burner and keep covered until ready to use.. 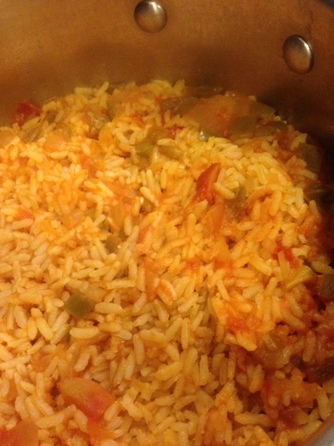 3. Sprinkle diced chicken with taco seasoning; stir to evenly distribute. 4. Into each of the 4 bowls, place 1 cup of the rice. Make a well in the middle of the rice. Into the well place the chicken. 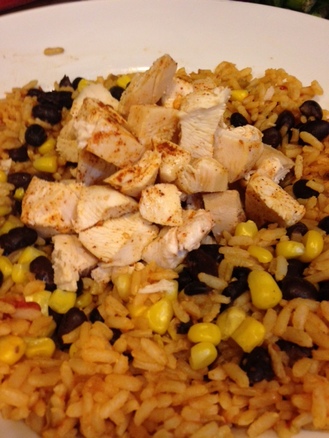 5. Drizzle about 1/4 cup of your prepared salsa on top of chicken then sprinkle each bowl with cheese
6. If desired microwave bowls to melt cheese (or if bowls are oven-proof, feel free to place them under broiler to melt). Top with your favorite garnishes as listed above. Serve with a nice green salad and some fresh fruit.  Variations: Shrimp burrito bowl- Saute 1 pound thawed, peeled and de-veined shrimp tossed with 2-3 teaspoons of taco seasoning in a skillet with 2 tablespoons of olive or coconut oil just until opaque. Squeeze the juice of 1/2 lime over the top. Toss to coat. Substitute for chicken.
Beef Burrito Bowl: cook 1 pound of ground beef in skillet until browned. Stir in 3 tablespoons taco seasoning (or to taste) and 1 cup of water (if using store bought seasoning, follow package directions). Simmer, stirring until water is evaporated and meat is thoroughly seasoned, about 10-15 minutes, adding more water as needed. Taste and adjust seasoning accordingly. Substitute for chicken. Re-fried Beans: Add 1/2 cup of re-fried beans that have been heated to the bottom of the bowl before adding in chicken.Season if desired with taco seasoning. Or for vegetarian option, use re-fried beans in place of meat; substitute vegetable broth for chicken broth in rice. * Different brands may call for different liquid to rice ratios, so be sure to follow the instructions for cooking rice on the package you are using. You want it to yield 4 cups cooked, approximately. ** Taco seasoning: I make my own, but you can use store bought, if you prefer. 1 Tablespoon chili powder 2 teaspoons onion powder 1 1/4 teaspoons ground cumin 1 teaspoon garlic powder 1 teaspoon paprika 1 teaspoon dried oregano 1/2 teaspoon sea salt Place all ingredients in a bowl. Whisk or stir together well to evenly combine. Recipe can be easily doubled or tripled. Store any leftovers in an airtight container for future use. Stir before using. |

Archives
December 2019
Categories
All
|


 RSS Feed
