|
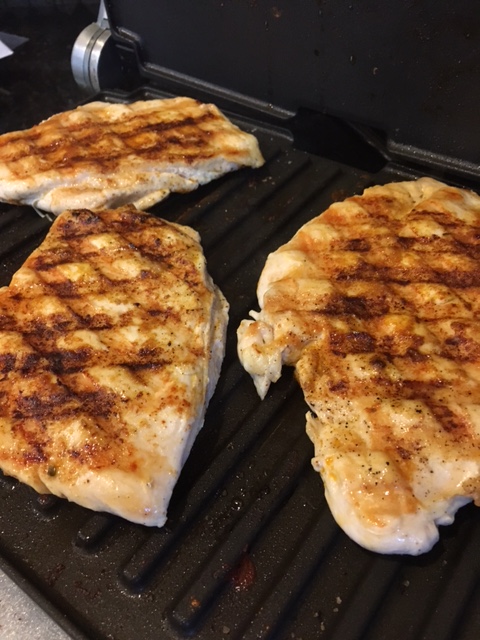
“Pull up a chair. Take a taste. Come join us. Life is so endlessly delicious.” -Ruth Reichl Just came across that quote-love it!! Don't you? So anyhow, just wanted to give you another idea how to use that Cool and Crunchy Jicama Slaw I recently featured. It makes summer meals taste better...really! We had it last night with Oven-Baked BBQ Ribs (finished off the ribs on the grill with some smoking chips). It was perfect because ribs are heavy and rich and the slaw is the complete opposite-light and fresh. Well, here is another idea, a grilled chicken tostada. If you have the slaw made already you are half-way there! If you have left-over grilled chicken from another meal, well, then you have a quick and easy meal with barely any effort! If you are starting from scratch, let me show you how! Grilled Chicken Tostada- serves 4 to 6 Jicama Slaw made with half of dressing, reserve other half 4 split chicken breasts, about 6 ounces each seasoning mix from this recipe 6" flour or crunchy corn tostada tortillas (your choice) 2 avocados, pitted and sliced cilantro leaves for garnish, optional lime wedges for serving, optional 1. Preheat grill. Prepare seasoning mix and set aside. 2.Take two sheets of plastic wrap and place chicken breasts in-between the two sheets. Pound them into an even thickness, no more than 1/2 ". 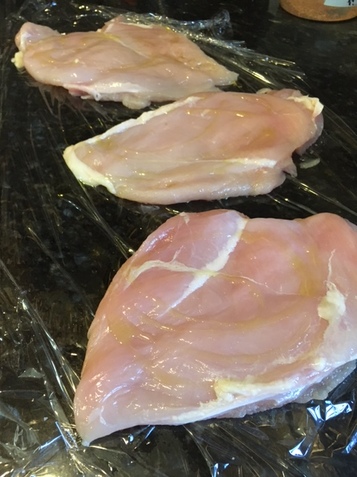 3. Season both sides of chicken with spice mixture (a generous pinch per side). 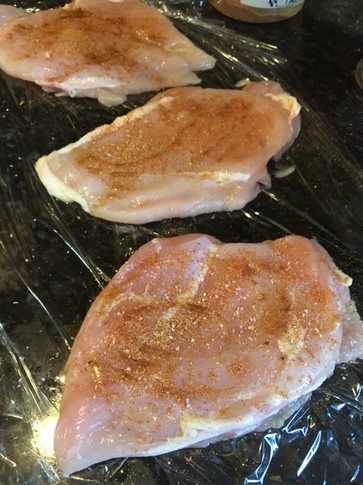 4. Place chicken on hot grill and cook, turning once, til just done, about 3-4 minutes per side. Do not over-cook. Remove from grill and let rest for 5 minutes.
5. Slice chicken in half lengthwise and then into thin strips cross-wise. 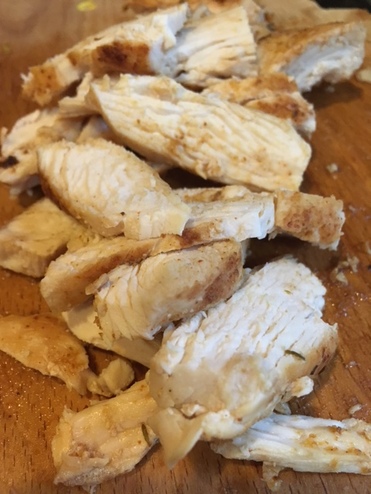 6. If using flour tortillas, grill them until browned and crisp (sorry for the way too blurry shot, but you get the idea). If using crunchy corn tostada tortillas, skip this step. 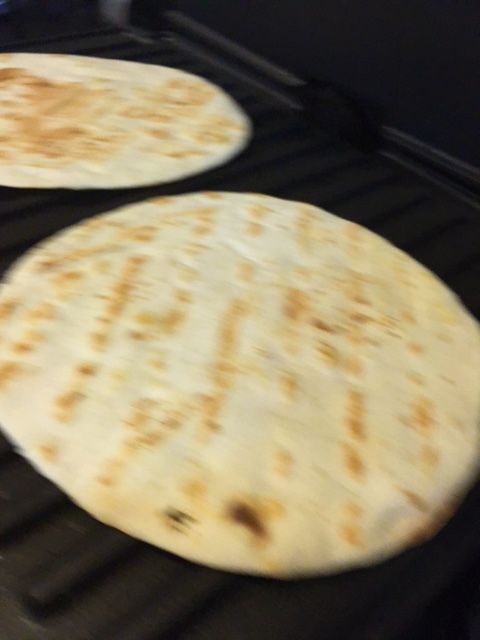 7. To assemble: on each plate, lay down a tortilla. Top with a layer of grilled chicken. Top the chicken with Cool and Crunchy Jicama Slaw, drizzle with a little extra slaw dressing, then garnish with sliced avocado , cilantro leaves and lime wedges, if desired. As they say south of the border- Buen Provecho! ♥ 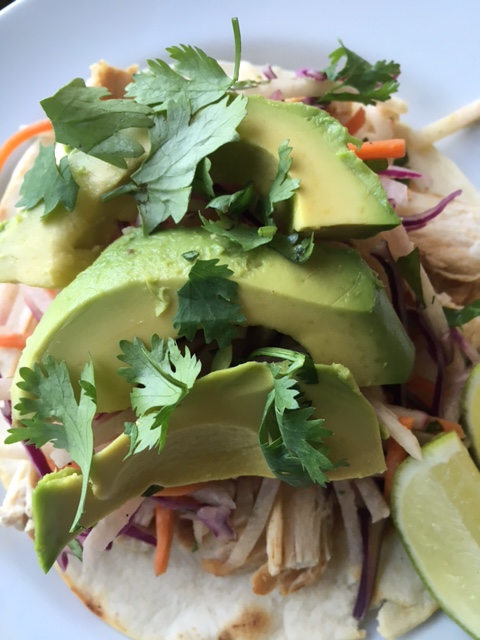 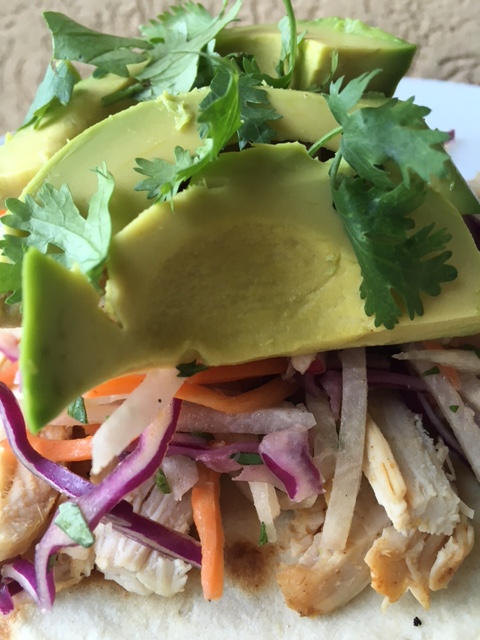
0 Comments
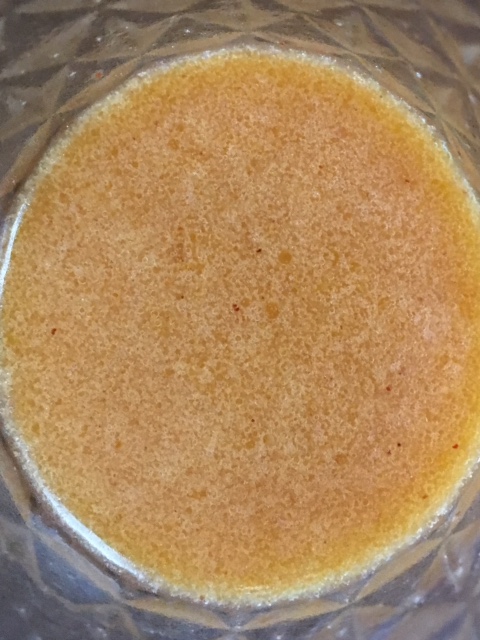
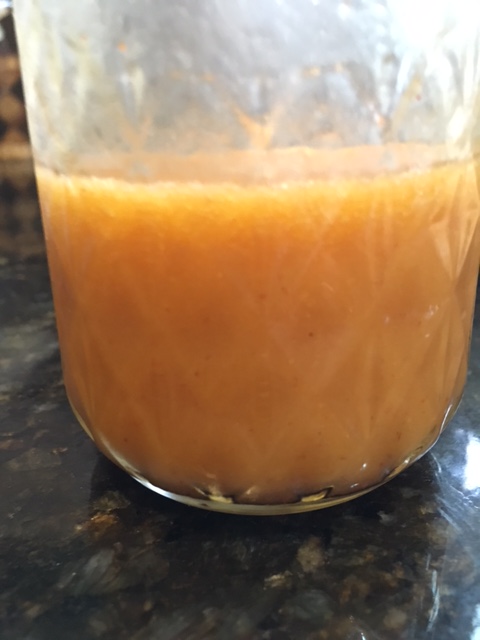
“But, you must remember, whatever you eat, make sure you have at least one bowl of salad with it.” -S.A. Tawks, The Spirit of the Imagination I don't know if I have mentioned it before, but I am an accidental vegan. It has been less than a year that I undertook a (mostly) vegan lifestyle. I had been living with a chronic, rare and so called auto-immune and incurable skin condition called granuloma annulare for nearly three years. Western medicine was unable to help me. Functional medicine approaches yielded no help, including the Paleo diet which is supposed to be really helpful for so called auto-immune disease). The condition only worsened and became more disfiguring by the month, appearing on most areas of my body including my face. Then this past November a book was released by Hay House called Medical Medium by Anthony William. It changed my life. Embarking immediately on a diet change incorporating as many organic raw fruits and vegetables as possible, the condition stopped spreading. Then in January I did the very strict 28-day cleanse out-lined in the book and I my skin cleared up 100% and has never come back. I have felt so good eating that way (both physically and emotionally, not to mention my hot flashes disappeared) I primarily stick with the diet of only raw fruits and vegetables (I am not 100% perfect 100% of the time, and that is good enough for me). Now my family is not following a vegan eating plan, and that's ok with me, too, so I cook for everyone in my family (exhausting sometimes, I'll admit!) Luckily, there are some recipes the whole family can enjoy, and this is one of them! I have been making this for years and it seems to turn up on our dinner table mostly in the summer. It makes a lot, but it lasts several days stored air-tight in the refrigerator, so great to have on hand. It's a perfect accompaniment to typical summer BBQ fare of grilled chicken and ribs, so it would be perfect for summer entertaining as well. It's crunchy, cool and refreshing, And it's so pretty on the plate! Give it a try, won't you? Cool and Crunchy Jicama Slaw- serves 8-10 special equipment needed - Mandoline with slicer and julienne blades Slaw: 1 large Jicama (about 1 1/2 pounds), peeled and julienned 1 cup of julienned radishes 4 cups shredded red cabbage 2 cups julienned carrots (about 3 medium, peeled) 1 cup red onion, halved, and sliced lengthwise 1 yellow or red bell pepper (or half and half), cored, halved cross-wise, seeded and sliced thinly 3/4 cup chopped fresh cilantro (or Italian parsley, if you are a cilantro hater) Dressing: 1 tsp kosher or sea salt 1/4 cup freshly squeezed 1/4 cup unseasoned rice wine vinegar 2 teaspoons honey (you can sub for another sweetener if you are strictly vegan) 1/2 teaspoon chili powder 1/8 teaspoon ground cumin 1 teaspoon minced jalapeno, seeded, optional 1/2 cup avocado oil 1. Place all of prepped veggie ingredients in a large bowl. 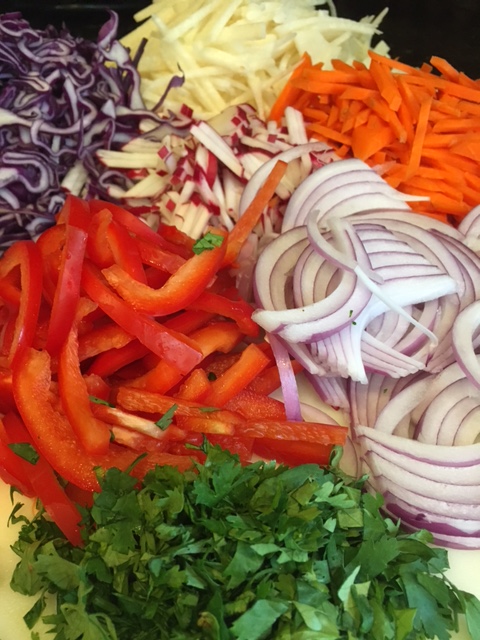 2. Prepare dressing. Combine all ingredients for dressing except the oil and whisk together. Gradually drizzle in the oil while whisking constantly.
3. Pour about half of the dressing over the ingredients in the bowl (I always like to start with less. You can always add more); toss. Taste and adjust seasoning to your taste. 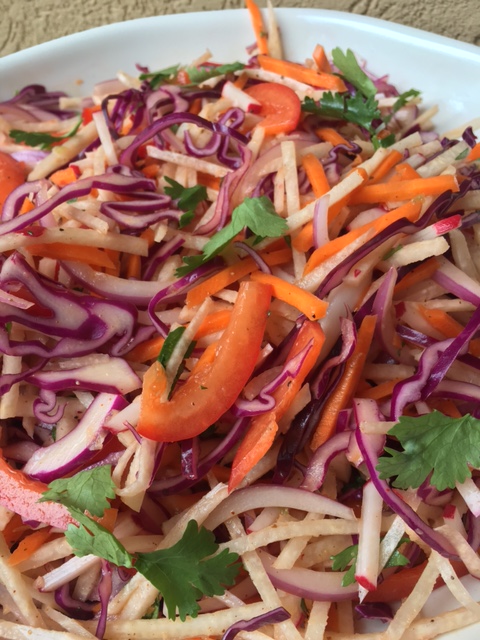 4. Serve on a bed of baby greens, garnished with a few slices of avocado for a main dish (top with some broccoli sprouts? Yes!), or as is for a great side dish. 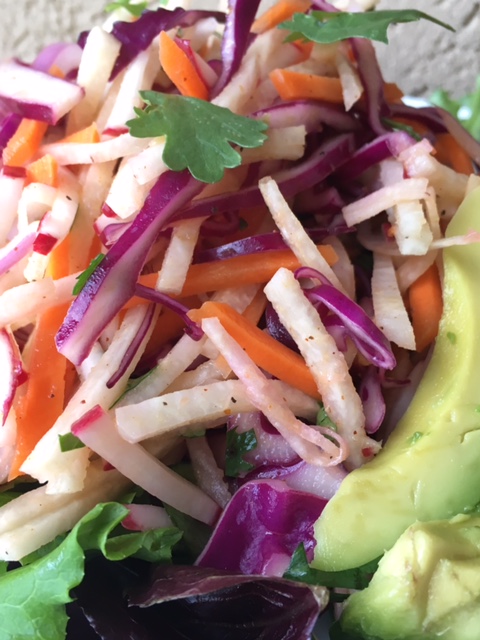 Disclaimer: I am not advocating for a vegan lifestyle, just sharing my story. However I will highly recommend the book Medical Medium if you have a chronic mystery illness (RA, fibromyalgia, Hashimoto's thyroiditis, MS, Lyme and more...) and can not get help with your condition. You CAN heal!
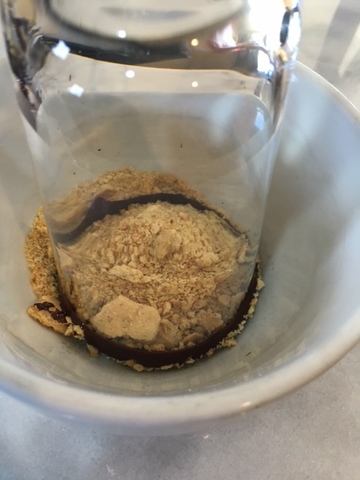
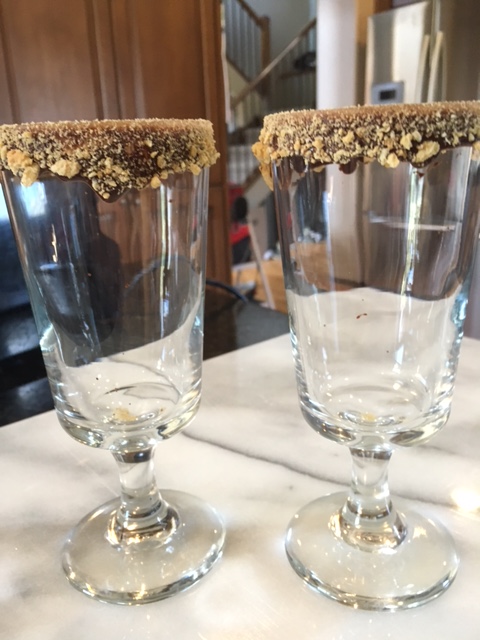
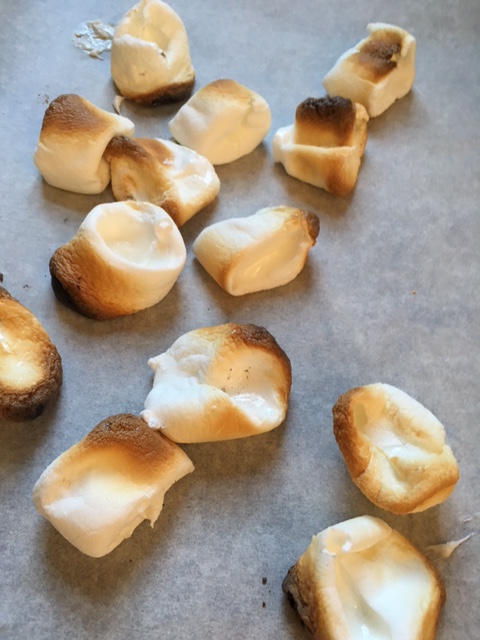
"Don't cry me a river. That's stupid! Cry me a milkshake." -unknown When I was young, for several summers my family was invited up to an Adirondack lake called Follensby Clear Pond by some family friends. The family shared some of their family cabins on a small island with us. There was no electricity, we had to pump our water, bathe in the lake and use an outhouse among other wonderful adventures. We all fell instantly and permanently in love with the place. We swam, fished, water skied, fed the chipmunks peanuts, and every night, weather permitting, we had a campfire with singing, popcorn and our most favorite treat of all, "shutemuppers" (pronounced: shut 'em uppers). I had never heard of them before then and have never heard of them since. They were basically s'mores with the addition of a Kraft caramel square inside. I believe the adults coined the name "shutemuppers" as the children's mouths were too busy chewing through the gooey sticky layers to speak thus affording the adults a moment, maybe two, of quiet. Isn't that a great story? I have only the fondest , most beautiful memories of that very simple, wonderful time. So this shake is my nod to that campfire treat of long ago. But maybe now the Shutemupper part is that it is so tasty you will be speechless, if only for a moment! I hope you enjoy it as much as I treasure my memory. ; ) Shutemupper Shake -makes 2 large 2 ounces melted semisweet or bittersweet chocolate* 1/8 cup coarse graham cracker crumbs 2 cups chocolate ice cream 2 cups vanilla ice cream 1/2 cup whole or 2% milk 16 very well toasted marshmallows (I like Jet Puff better than store brands)** 2 double rectangles of Hershey's Milk Chocolate (or better) 2 tablespoons caramel sauce (see step #9 in recipe) 1. Dip the tops of your glasses into the melted chocolate and then into the graham cracker crumbs. Place in fridge to harden. 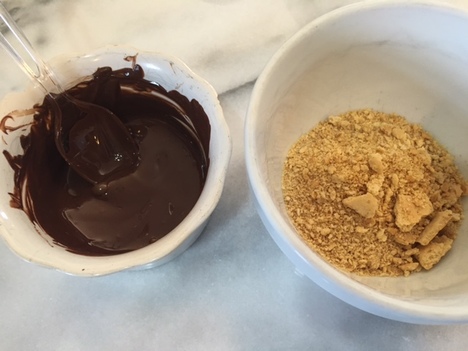
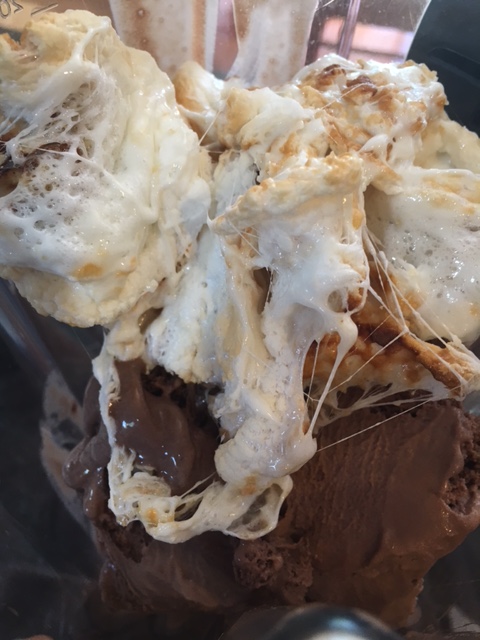
2. In jar of blender, pour in milk and scoop in both flavors of ice cream and 12 of the toasted marshmallows (i know....). Reserve the other 4 for garnish.
3. Right before blending shake, drizzle 1 tablespoon of caramel sauce down the sides of both glasses. 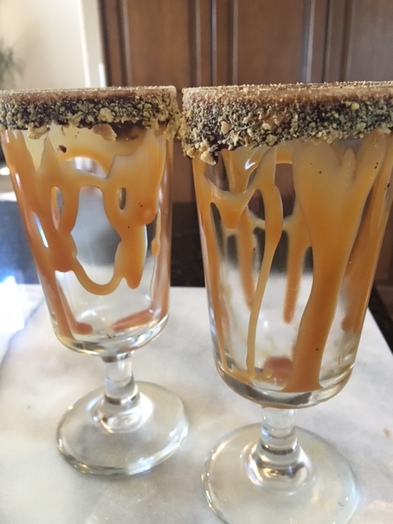 4. Blend the milkshakes well, according to your blender instructions, until thick and smooth. Pour into prepared glasses. Top with reserved toasted marshmallows and chocolate squares. Serve immediately! 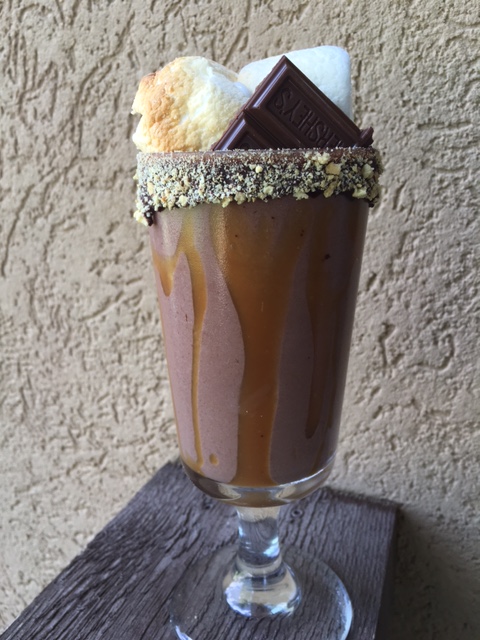 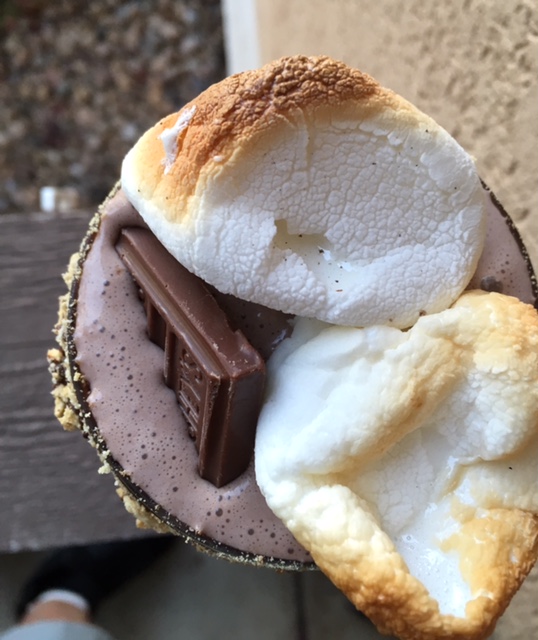 * I melt the chocolate in a small bowl, just large enough for the rim of my glass to fit in so it is deep enough to coat about 1/2" of the rim.
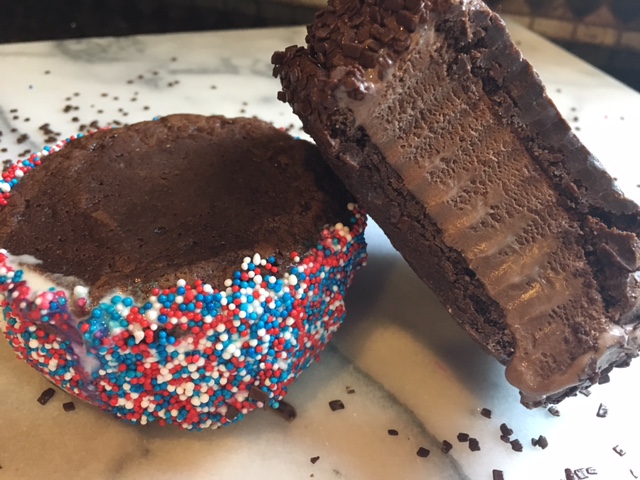
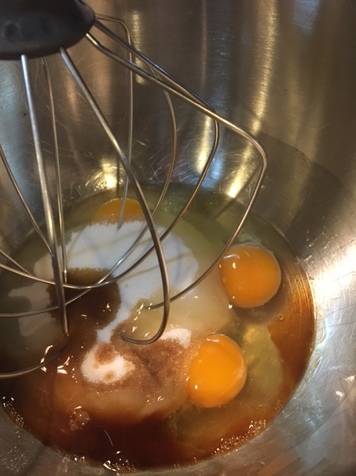
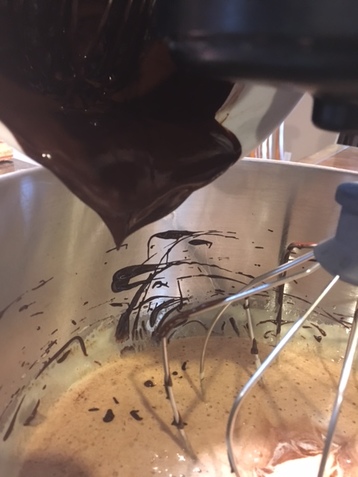
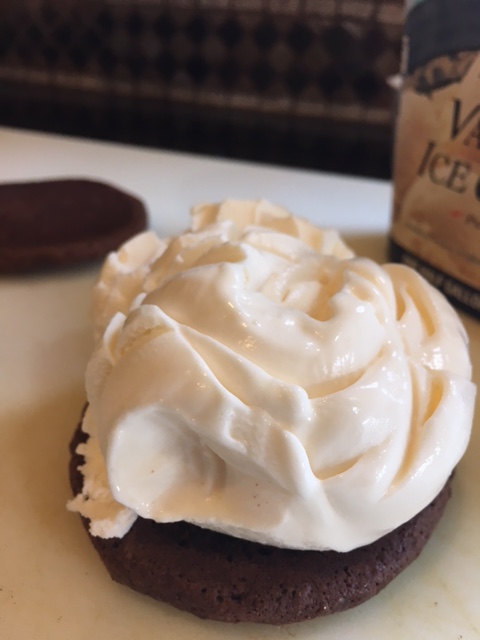
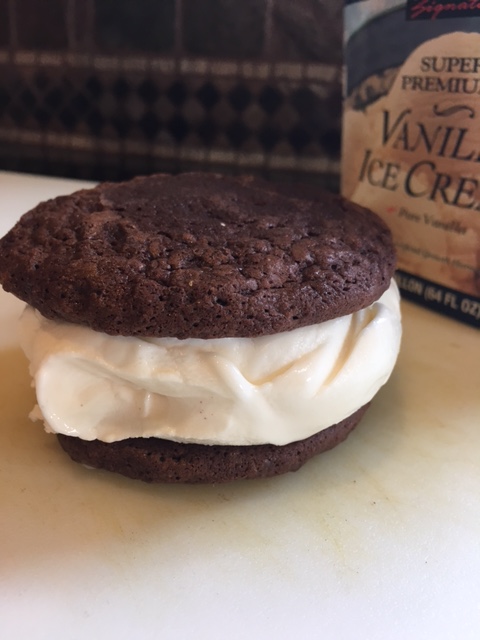
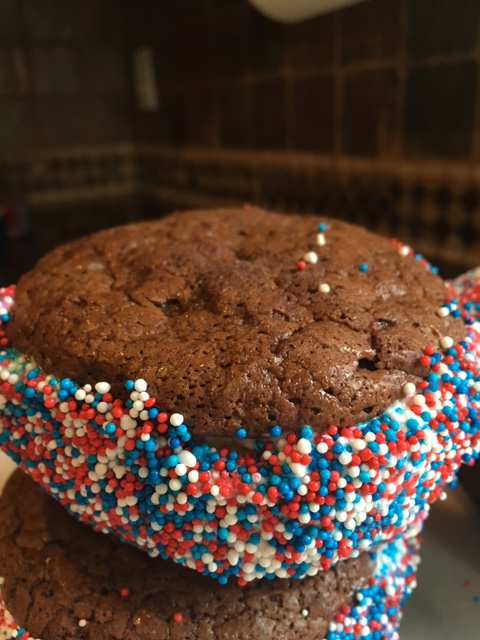
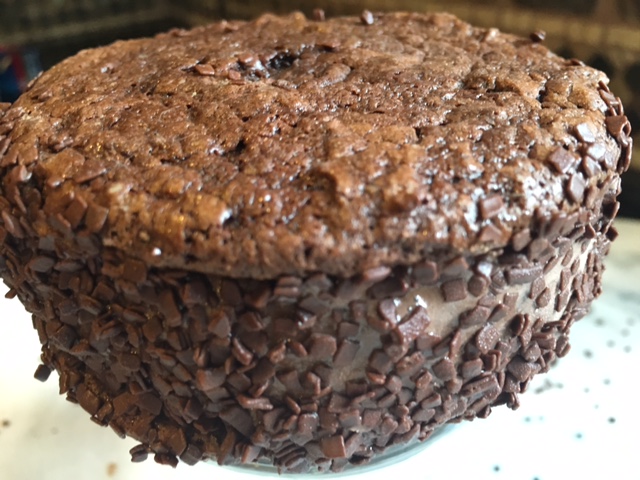
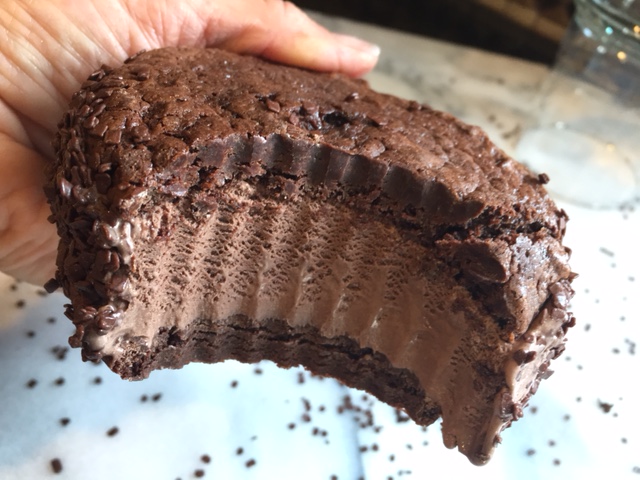
** you want to have your marshmallows very well toasted for flavor, but not burnt. If your grill isn't available you can broil them carefully in your oven, but keep an eye on them. It can go from perfect to bad very quickly! A small kitchen torch could also be used, with care of course, to toast the marshmallows. Remember they will be hot, especially the molten center-handle with care! Cheers! ♥ DISCLAIMER: This is a total sugar bomb. I don't recommend indulging often. You can obviously scale down the portion to make 4-6 small ones. You can also reduce the sugar coma effect by omitting the marshmallows from the shake mixture and using them only for garnish. Enjoy in moderation as with all things! xo "You don't have to cook fancy, complicated masterpieces, just good food from fresh ingredients. "- Julia Child Julia's thoughts pretty much sum up my personal food philosophy. The simpler, the fresher, the better, with some exceptions, of course. Now that summer is here in the northern hemisphere, what better time to embrace fresh, good food than now? Farmer's markets are starting to get in more and more fresh fruits and vegetables and that should last up until some time in October. depending on where you live. I can't encourage you enough to seek out yummy local produce wherever you live. This salsa recipe couldn't be easier and takes full advantage of summer's bounty. It combines all kinds of fresh veggies with a touch of prepared salsa to make a nice chunky and delicious salsa that could almost pass off for being a salad (I have been known to eat it by the bowlful, just sayin'). Couple suggestions- have everything cut into more or less the same size. That makes it easier to scoop and eat. If you are one of those people who can't stand the taste of cilantro, leave it out, or better yet, substitute fresh Italian parsley for it instead. The fresh green is beautiful and tasty. If you are going to serve it right away, feel free to add a bit of chopped avocado as well. You can't save any leftovers though, as the avocado will deteriorate quickly. Pretty much everything in the recipe can be adapted to suit your taste. Look at this recipe as just a guide to get you going. Mostly it should be chunky, delicious and fresh. Have that bag of chips on standby and let's get chopping! Black Bean and Corn Salsa 2 heaping cups cherry or grape tomatoes washed and diced 1/2 cup red onion, peeled and diced 1/2 jalapeno pepper, seeded and minced, or to taste juice of 1/2- 1 lime, to taste 1/3 cup lightly packed, cilantro leaves, chopped (or Italian Parsley if you are a cilantro hater) 3/4 cups cooked corn kernels off the cob (or frozen, thawed) 1/2 cup diced colored bell pepper (red, orange or yellow) 1 heaping cup black beans, rinsed and drained very well 3/4 cup prepared salsa (your favorite one) small pinch of kosher or sea salt 1. Prep all of your ingredients and admire how beautiful and fresh it all is. 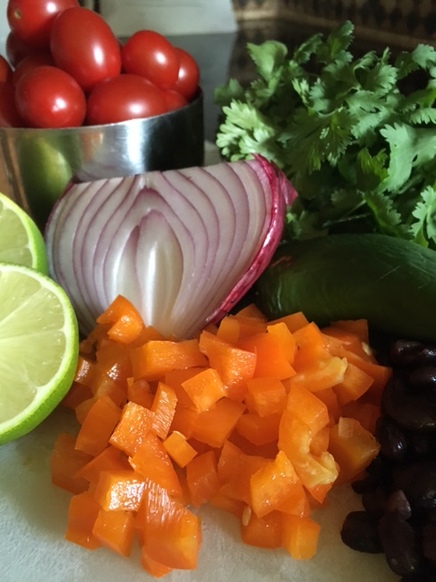 2. Place all the ingredients in a medium sized mixing bowl. Stir to combine. Taste and adjust seasoning (Salt, lime juice and jalapeno) as desired. I suggest tasting the salsa on the corn ship you will be serving it with before adding any more salt as the chips tend to have quite a bit of salt themselves. 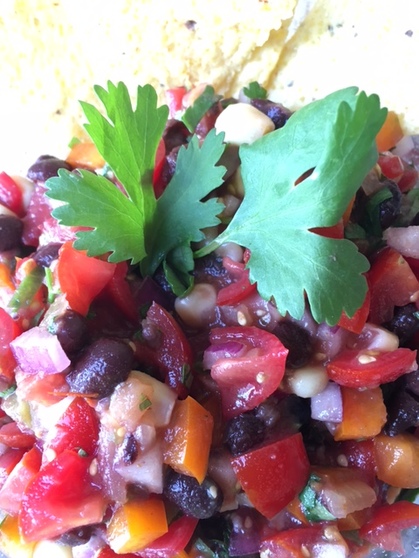 3. Serve immediately with your favorite chips (also tastes great on grilled chicken breasts). Any leftovers can be refrigerated in an air-tight storage container for up to 3 days. Ole! 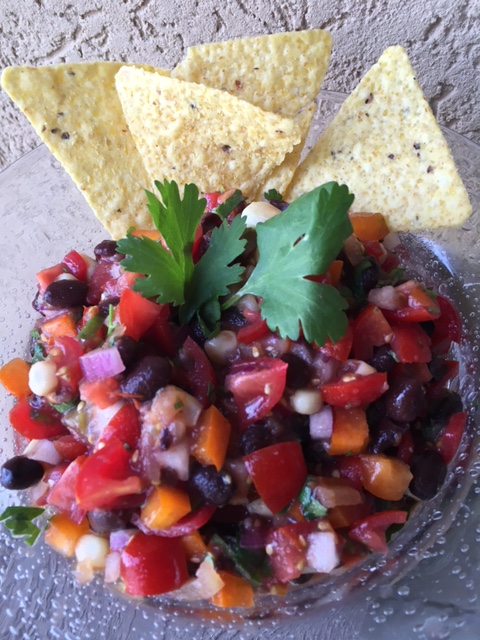 "It is always sad when someone leaves home, unless they are simply going around the corner and will return in a few minutes with ice-cream sandwiches. " Lemony Snicket Ice cream sandwiches...I remember so fondly eating them up as a kid with the soft cakey-cookie outside and the meltingly delicious inside. The only problem is that they weren't actually all that good. Ah, nostalgia! Lol! The idea of them, however, is very good. And they are not so hard to improve upon. I start with a flourless (and therefore gluten free...bonus!) brownie cookie and sandwich premium ice cream in-between two cookies. Roll them in sprinkles and you are good to go. The brownie cookie is a good base for almost all of the flavors you could imagine- from plain vanilla to everything but the kitchen sink (maybe not so great with an apple pie flavored ice cream, but you get the idea- peanut butter, coffee, cookie dough, strawberry, butter pecan, mint chocolate chip....) The brownie cookie stays somewhat soft even when frozen so it makes eating pretty easy. These are pretty big so you might want to split yours with someone special. You can make them any size just watch the baking time in the cookies if you go smaller. As for the decorations, finely chopped nuts, sprinkles or non-pareils, finely crushed candies.... use your imagination for endless combinations. Great project to make with the kids, too, so why not get the whole family involved! Brownie Ice Cream Sandwiches-makes approx 14-16 3" cookies, enough for 7-8 sandwiches 12 ounces 70% bittersweet chocolate, choppped 4 ounces (1 stick) unsalted butter, cubed 3 extra large eggs 1/8 tsp. instant espresso powder 1 1/2 tsp vanilla 1 cup granulated sugar (7 ounces) 3 ounces almond flour 1/2 tsp baking powder 1/4 tsp kosher salt approx 1/2 gallon your favorite ice cream(s), slightly softened sprinkles, nuts or other garnishes for the sides, optional 1. Combine the almond flour, baking powder and salt. Set aside. 2.In the top of a double boiler or in the microwave gently melt the chocolate and butter together. Once melted, stir to combine and set aside for a few minutes to cool slightly. 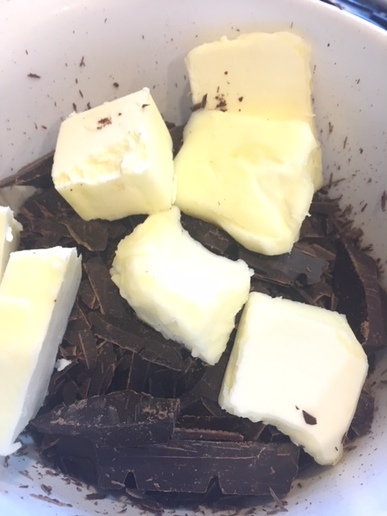 3. Using an electric mixer with the whisk attachment on medium speed, beat the eggs, sugar, vanilla and espresso powder until increased in volume and lighter in color, about 2-3 minutes. 4. Reduce speed to low and drizzle in chocolate. Combine well.
5. On low speed stir in almond flour mixture, until just combined. Remove bowl from mixer and cover with plastic wrap. let set on counter for 45 minutes or refrigerate for up to 30 minutes to firm up a bit. 6. Preheat oven to 350 degrees F. Line two baking sheets with parchment paper; set aside. 7. When ready, using an ice cream scoop that holds approximately 1/4 cup, scoop dough onto parchment lined baking sheets about 3 inches apart. Pat dough down slightly using moistened fingertips.  8. Bake for 10-12 minutes until just set and tops no longer appear wet. Remove from oven and cool on baking sheet. Once cool transfer to freezer for 30 minutes (can be made up to a week in advance, store airtight in freezer for longer storage). Repeat with any remaining dough. 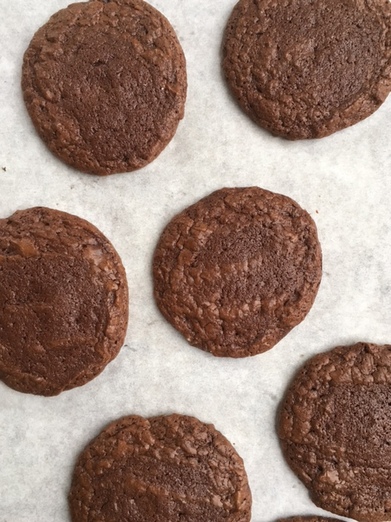 9. When ready to assemble sandwiches, place any sprinkles or other garnish in shallow bowls or pie plates. Remove ice cream from freezer to allow it to soften slightly. Place a parchment -lined baking tray in your freezer. 10. Working with a pair of cookies at a time, scoop a generous amount of ice cream onto the base (Flat side) of the cookie. Top with the second cookie, pressing down slightly to push ice cream to the edge of the cookie.
11. With a small off-set spatula, smooth edges of ice cream, sandwich (Working quickly). Roll edges in desired garnishes (sprinkles here) and immediately place on tray in freezer. 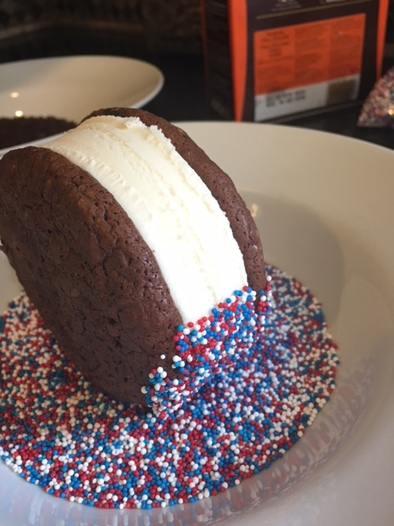 12. Repeat with remaining cookies, until all have been filled and garnished, if desired.  13. Serve immediately or wrap individually in wax paper or plastic wrap and store air-tight in a freezer bag in the freezer for up to a week or two. 14. Share! : )
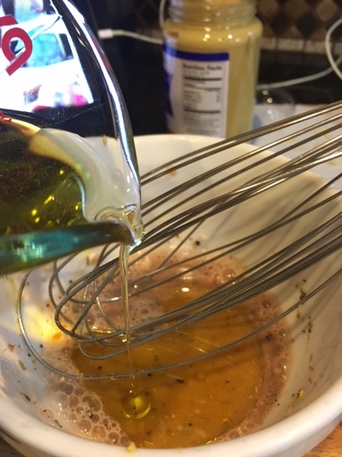
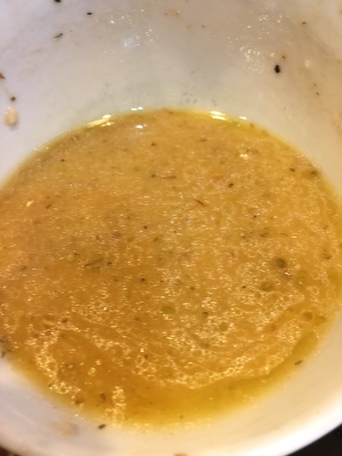
 "But, for my own part, it was Greek to me." - William Shakespeare Greek salad , isn't something that has been too tinkered with that I can tell. It is pretty much universally the same tomato, cucumber, red onion, feta and olive mixture the world over, drowned in some kind of vinaigrette, some better than others. And I love it (minus the drowned part). It is like a summer garden in a bowl- colorful, fresh and delicious. However, when I make it at home,. I think, well, why not add.... and thus Greek Salad MY way! It's super easy to make, just dump, dress and mix, and you'll have a great summery salad to enjoy any day! Greek Salad My Way 12 ounces Grape or cherry tomatoes, halved 1 English cucumber (about 10" long) washed, halved lengthwise and cut into 1/2" half moons 1 1/2 Yellow Bell Peppers, seeded and cut into 1 " chunks 1 c. red onions, peeled and sliced 1/4 " thick into half moons* 1/2 cup canned chick peas, rinsed and drained very well (pat dry if necessary) 4 ounces fresh green beans, stemmed, briefly blanched and cut in half or thirds cross-wise 1/2 cup Castelvetrano olives, pitted and drained (so yummy!) 1/2 cup Kalamata olives, pitted and drained 2 Tablespoons fresh basil leaves cut in a chiffonade** 3/4 cups cup Cubed feta cheese (or to taste) -omit of you want a vegan version Romaine lettuce leaves, washed and dried Vinaigrette: 1 clove garlic, minced 1 Teaspoon Dijon Mustard 3 Tablespoons Red Wine Vinegar 1/4 teaspoon kosher salt 1/4 teaspoon coarse ground black pepper 1/2 teaspoon dried oregano, crushed with your fingertips juice from 1/2 lemon 3/8 cup extra Virgin Olive Oil 2 Tablespoons avocado oil 1. For Vinaigrette: In a small bowl whisk together garlic, Dijon, vinegar, salt, pepper, oregano and lemon juice. This will help dissolve the salt. 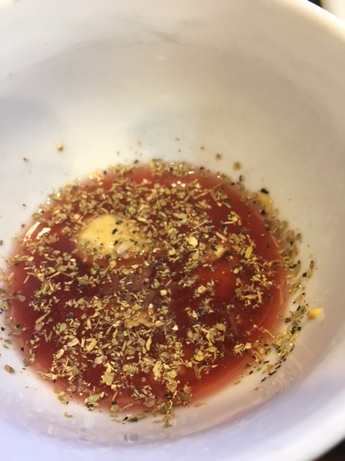 2. Combine the olive and avocado oils in a measuring cup with a pour spout. Slowly whisk the oil into the vinegar mixture. Whisk well.
3. If not using right away (or for leftovers) store in a glass jar with a lid. Use within a week. 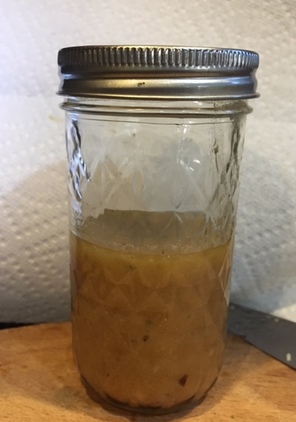 4. For Salad: Place all ingredients in a bowl, except the feta and vinaigrette. Toss gently to combine. 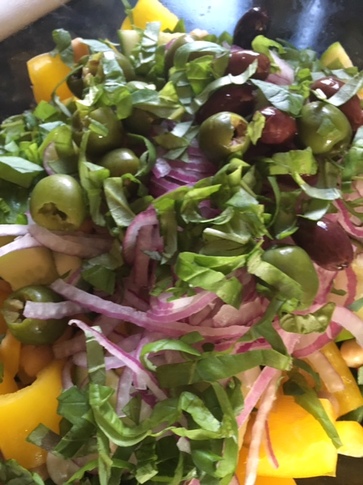 5. Top with feta, add vinaigrette (if it's been sitting mix well once again) judiciously, toss to combine. Taste and adjust seasonings and vinaigrette to your taste. 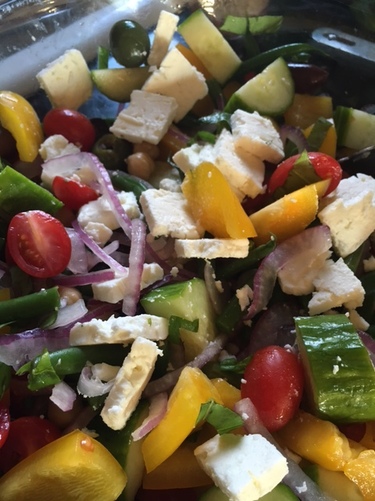 6. To serve, place a few romaine leaves on each plate and top with a generous portion of salad mixture. 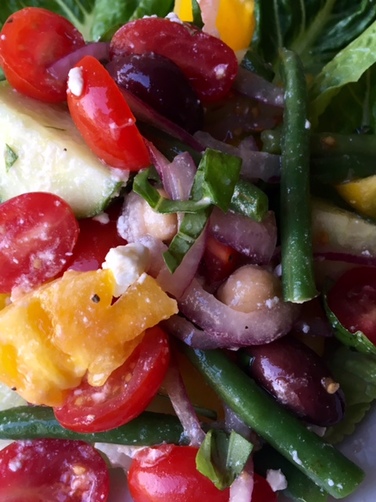 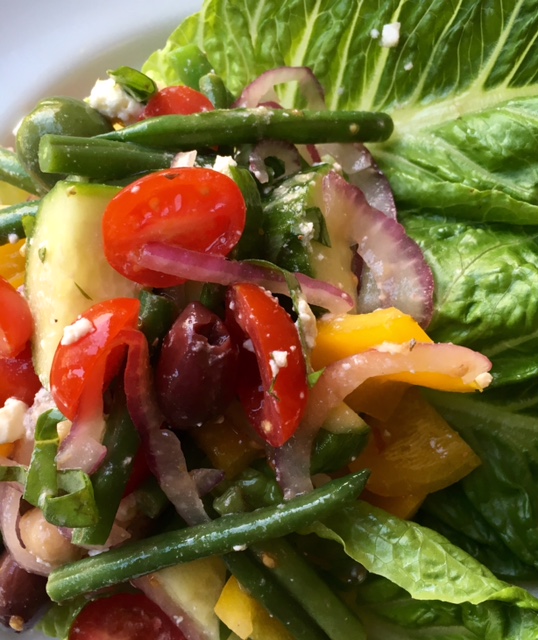 * to take the bite out of red onions, soak the sliced onions in a bowl of ice water for 30 minutes, drain, pat dry and proceed with recipe.
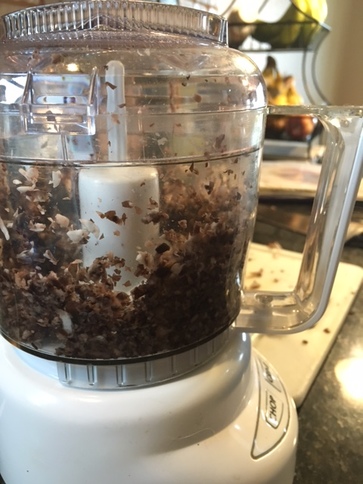
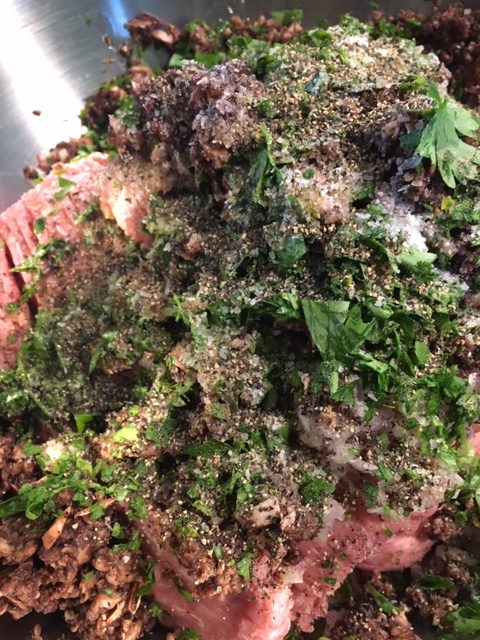
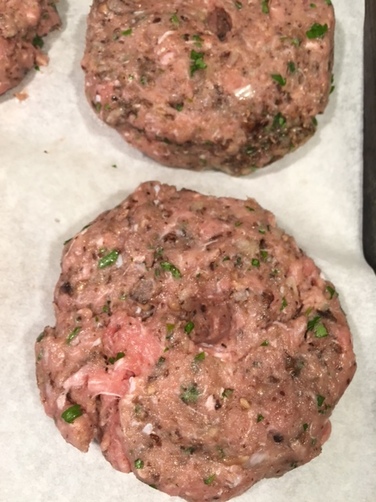
** to chiffonade basil, roll whole basil leaves into a cigar shape and then cut across the roll cross-wise with a very sharp knife into thin strips. "I was supposed to get a nice body for summer, but there's a small problem...I like food." -Unknown Well, maybe just maybe, we can change that! I am sharing one of my all-time favorite burgers today made from lean ground turkey. They are moist and delicious (really) and full of portobello mushrooms. Don't tell anyone though, they'll be none the wiser (yes, even your biggest meat lovers). I have never had anyone not love them, they are that good. Before I get to the meat of the matter (pun intended), I must give credit where credit is due. This recipe came to me via Food Network Magazine many years ago now. It quickly became a staple in our house. I make them year round, grilling them in the summer and cooking them in my cast iron skillet in the cooler months. Either way you can't go wrong. I suggest you make extra to have on hand in the freezer. You will be glad you did! Portobello Turkey Burgers- makes 8 burgers adapted from Food Network Magazine 2 large Portobello Mushroom caps, stemmed and gills removed, cut into chunks 2 Tablespoon coarsely chopped shallot 6 Tablespoons lightly packed Italian Parsley leaves 2 1/2 lbs. lean (93%) ground turkey 1/4 cup Extra Virgin olive oil, plus more for brushing 2 teaspoons worcestershire sauce 2 teaspoons kosher salt 1 1/2 teaspoons coarsely ground pepper 8 slices of cheese (your favorite!)-optional buns (Iused brioche buns here, griddled, before serving)-optional Sliced avocado, mayonnaise, thinly sliced red onion and lettuce for serving -optional 1. Place ground turkey in a large bowl; set aside. In the bowl of a food processor, add the chunks of portobello, shallots and parsely and pulse until chopped. Add to the turkey.
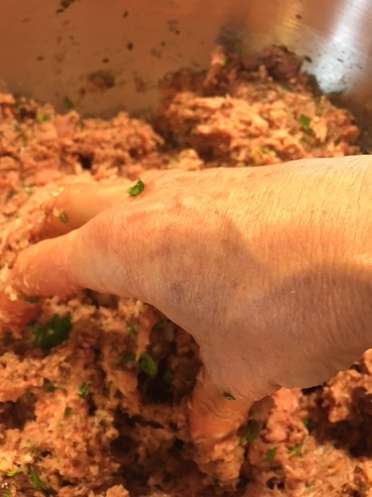
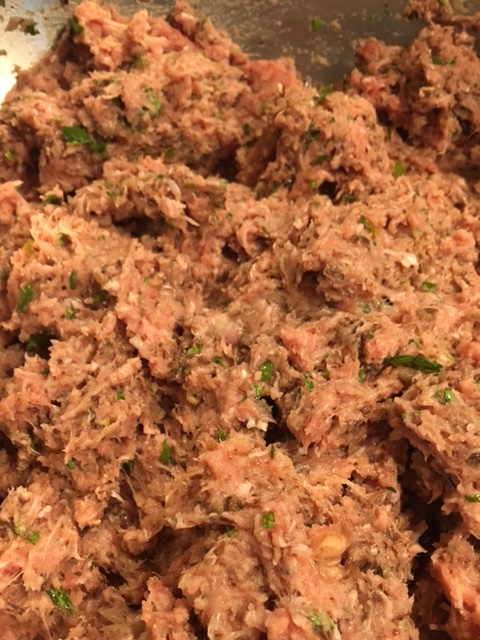
2. Add in the worcestershire sauce, 1/4 cup olive oil, salt and pepper and mix well, using your impeccably clean fingertips, in a stirring motion so you don't compact the mix.
3. Gently shape mixture into 8 large patties, about 4" in diameter and approximately 3/4 inches thick . Poke your index finger through the middle to make a hole (helps prevent the burger from puffing up in the middle, promoting more even cooking).
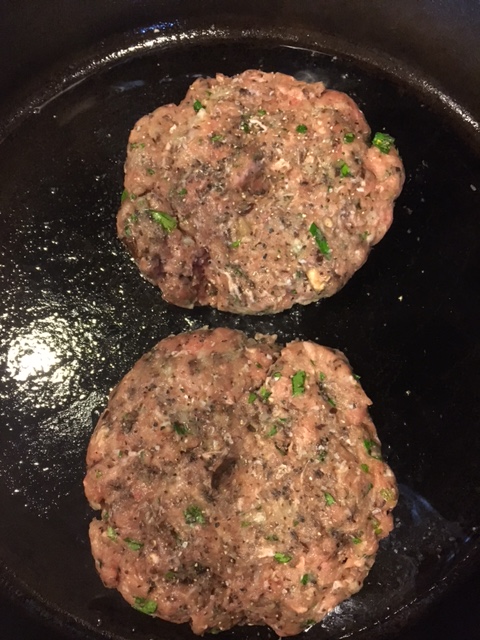
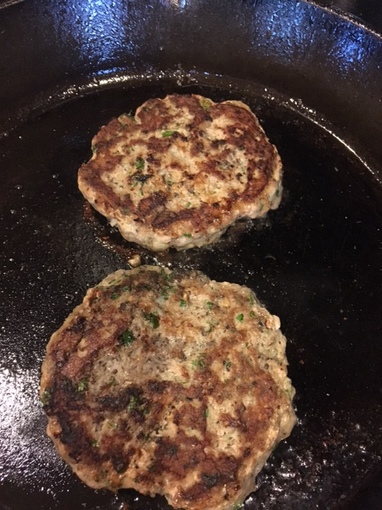
4. Preheat a large cast iron skillet over medium heat or your grill to medium high. Brush the burgers with olive oil and sprinkle with a touch more salt and pepper (just a pinch!). Cook your burgers about 5-7 minutes a side, or until done (165 F internal temperature), topping with cheese during the last minute or so.
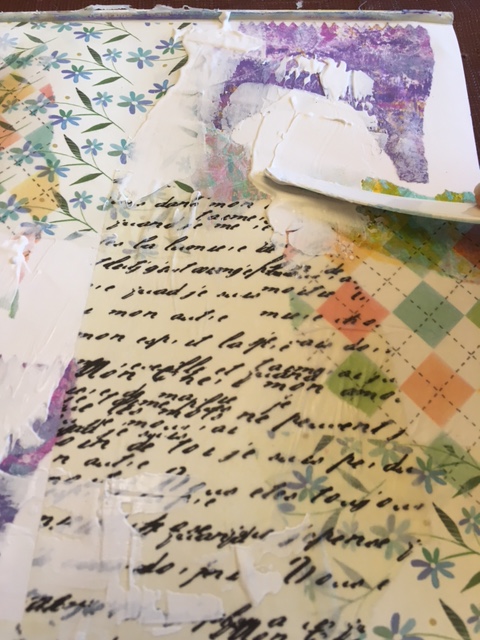
5. Toast or grill buns if desired. Build your burger with your favorite toppings. 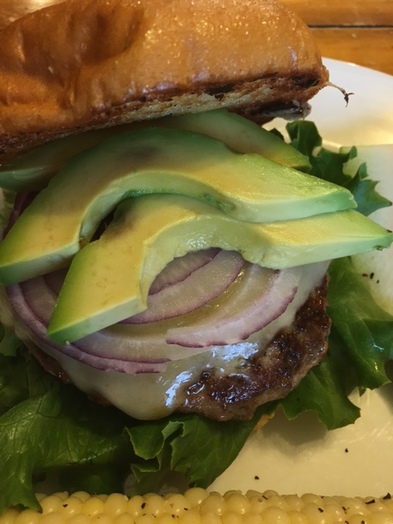 6. Dig in- so yummy! ♥ 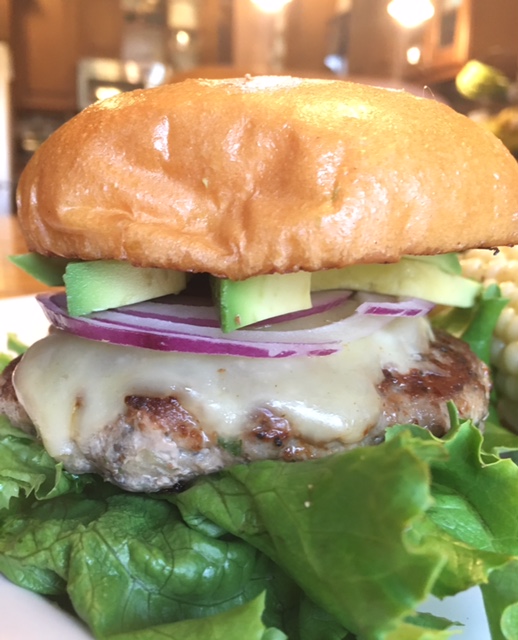 "I'm always thinking about creating. My future starts when I wake up every morning... Every day I find something creative to do with my life. " - Miles Davis If you have been following my blog for the past several months, you may know a little bit about my art journey. If not, and you want to know more, you can read about it here. Ifeel like my growth in art has taken a leap and that has me very excited. I am very much still in student mode and learning and trying all kinds of things. I find I am a lot less nervous to try new things than ever before. I think that helps. I am especially intrigued by intuitive painting, especially in the style of Tracy Verdugo, Flora Bowley and others.I have been super scared to try it on my own. Then I found this YouTube video from Willowing (artist Tamara La Porte) that is leaning in that direction (Donna Downey also has a couple), and thought I could tackle that. If you want to watch it, you will find it here. So that's what I attempted to do and here is the result. I kind of love it.  If you are newish to art like I am , I want to encourage you to try things. In the end it is only paint and paper and can be covered up and re-tried. I know I have gone into creating something with the expectation that it comes out "good." It's ok if it isn't good. I know I learn so much just by trying (yes I'd still like all my art to be good, but I will get there eventually!). What do you say we give this a try together? 1. First I started by collaging a variety of papers (gelli prints, tissue paper, scrapbook paper, book text...) to a piece of Bristol Vellum paper using Liquitex Liquid Matte Medium (you can use a glue stick, mod podge, etc.) The order and choice is completely random, though I did try to repeat the type of paper in a few places around the paper as you will see. 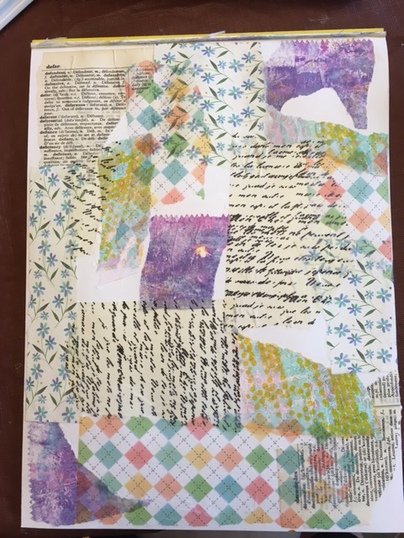 2. Then with a palette knife, I spread some Liquitex gesso over most of the piece, letting it have some texture here and there. It helps push the patterns back into the paper and also provides some "tooth" for the upcoming paint layers to adhere to.
3. Then I added some scribble text here and there on any white space, alternating horizontal and vertical placement. It's completely optional, but I like the way it looks. I learned about this style of writing from Dina Wakely. Its scribble journaling. All my thoughts and feeling are there, but you can't really read it. most of it will be covered up anyhow. 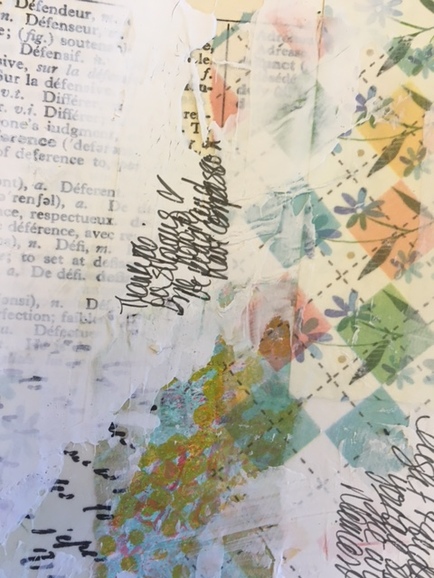 4. Then with a palette knife and a brayer, I started adding some paint layers.I used Golden Artist acrylics and Martha Stewart Craft paint. 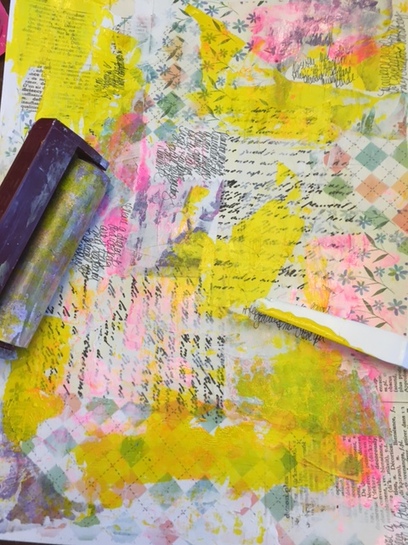 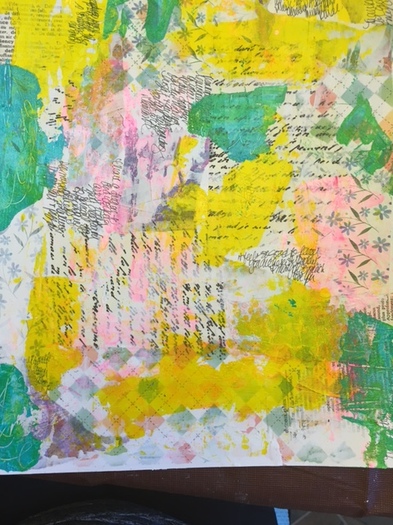 5. I also made some marks with the tip of a wooden skewer for added texture as I went along, completely random. Obviously you have to do that in wet paint.. 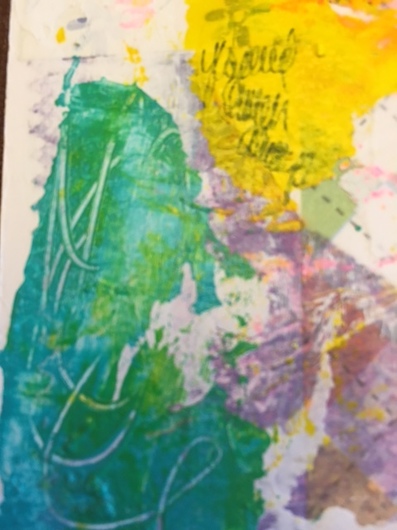 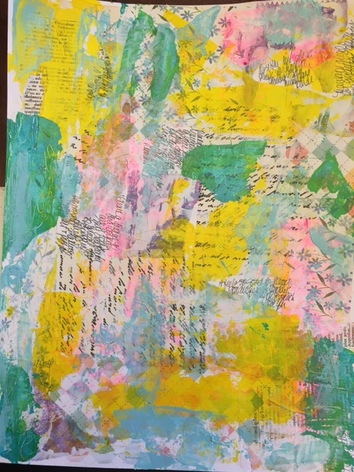 6. Next I added white paint with a brayer to once again, punch back all this craziness and give the piece some cohesiveness. It makes a big difference, don't you think? Next I added some more paint, this time through a stencil, using a make-up sponge (I buy them at the dollar store). 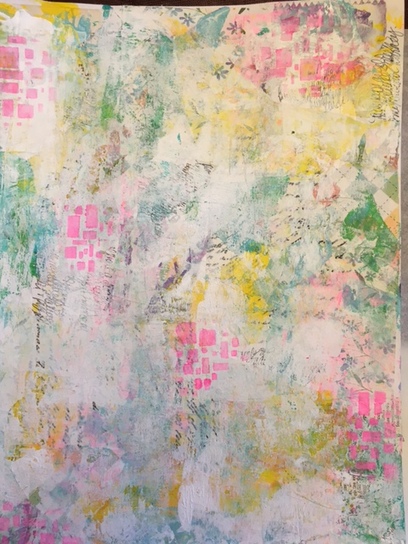 7. Then I added some drips using a Golden Fluid acrylic in Green gold spritzed with water and added some more paint with my palette knife.
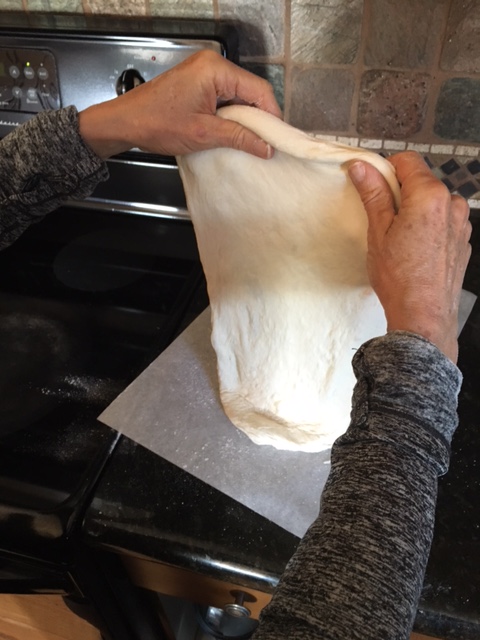
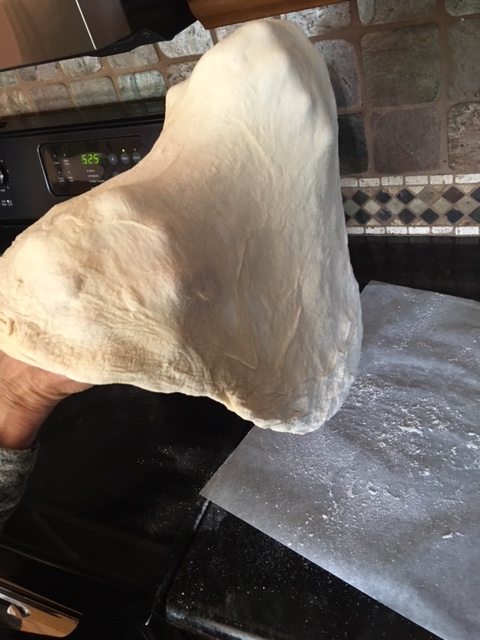
8. I patted back some of the drips with a baby wipe before proceeding with more stenciled paint. It's looking kind of crazy again (but so fun to do all this!). 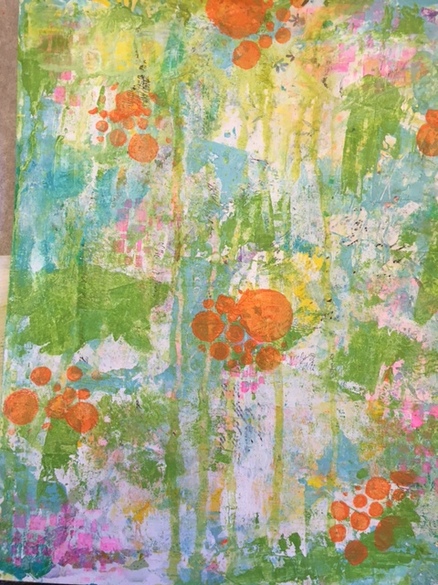 9. Next I added some washi tape pieces then a layer of Liquitex clear gesso. It helps glue the tape down and adds a little grit to the surface for future layers, but dries absolutely clear and matte. You could use regular matte medium here, too. 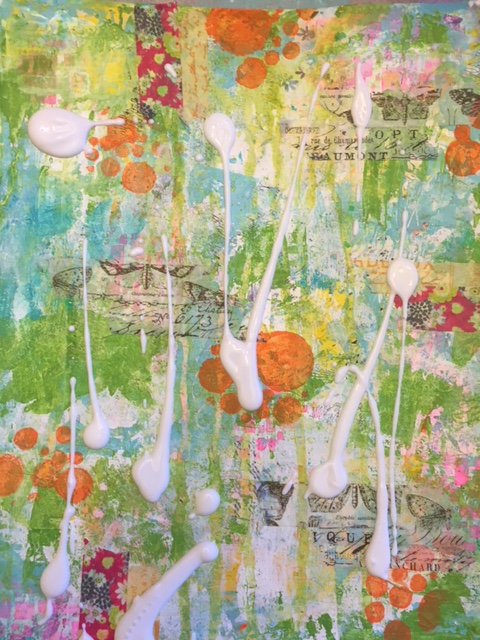 10. Up next some more white paint applied with my brayer or maybe just my fingers (I love to use my fingers) to try and unify the piece once again. 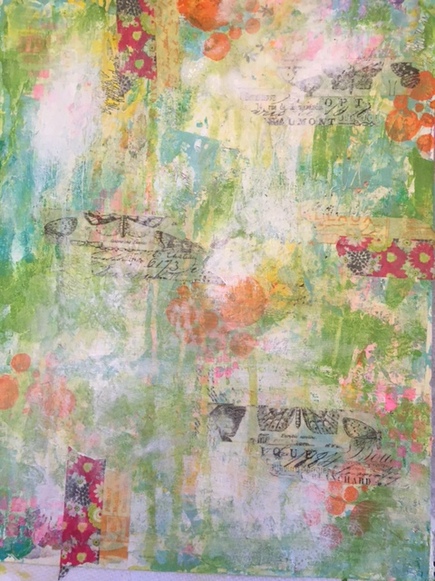 11. Now for the scary part- doodling the design. I used a Stabilo marks all penicl in black which reacts with water. More on that later. I ended up also adding another funky flower half in the lower left hand corner of the piece before adding more paint.  12. Now I started adding paint in blocks, paying attention, to the best of my ability and untrained eye, to lights and darks and using Golden's Fluid titanium white paint for some blending, too.I used my fingers and brushes for this. I was careful to try and not get paint on the Stabilo lines as even the paint would activate the pigment in the pencil. I wasn't perfect. Later on I went in and activated the pencil lines to make them darker using a waterbrush. 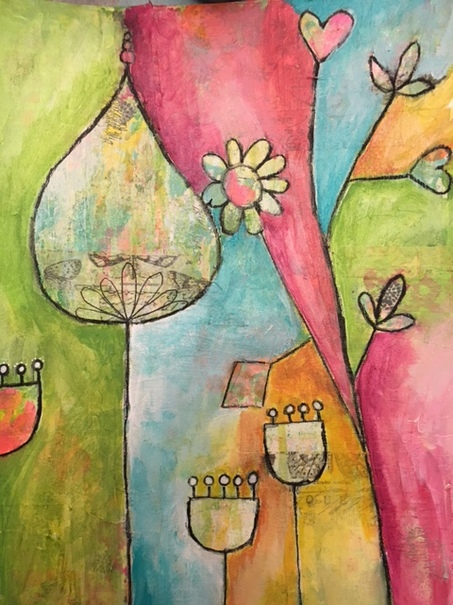 13. i continued adding/blending paints and added some doodles (let your imagination fly) with my Sharpie White paint marker and my black Sharpie (posca pens would be another great choice). Here is the finished piece as seen earlier.  14. Here are som close ups of different sections so you can see how the layers still show through, giving visual interest to the piece (so says me!). Isn't that fun?!! 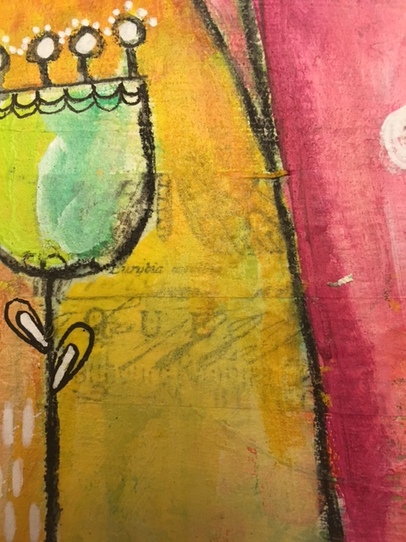 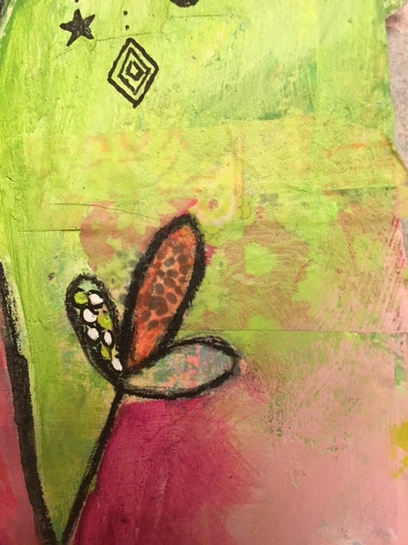 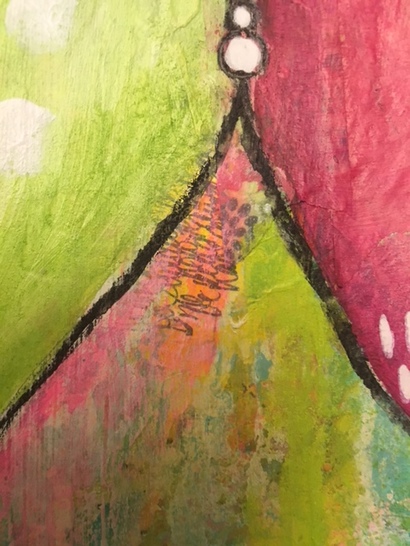 "Unless you are a pizza, the answer is yes, I can live without you. "- Bill Murray I think I agree with Bill Murray on this one. Pizza eating has been tops on my list forever, since eating pizzas (round, no thank you to Sicilain style-blech) from the now shuttered Joe's Pizzeria in Rotterdam, NY not far from where I grew up. It was exceptionally wonderful, made by "imported hands." It was so wonderful in fact, that we actually had it along with other Italian fare for our rehearsal dinner when we got married. It wasn't until I moved to California that I discovered how bad pizza could be made. That has since changed, of course, but nearly 30 years ago, California wasn't doing pizza all that well in a wide-spread fashion. For me any pizza won't do. It has to be excellent. The thing is, it isn't difficult to achieve pizza excellence, especially at home, if you follow a few simple rules. I have been doing it this way for years and years with consistently good outcome. Pictorial instructions follow. 1. Use good dough. It can be store-bought or homemade, but make sure it's high quality. If you are buying it pre-made, seek out an Italian deli or pizzeria that you know has good dough. I sometimes like to buy the dough from Whole Foods, if you happen to have one near you. Most of all I like to make my own. This is my favorite recipe .* What isn't good dough? Avoid tubes of pizza dough you pop open from the refrigerated case at the supermarket, pizza dough mixes and frozen bread dough thawed to use as pizza dough, and any recipe that says the dough will be ready in a couple hours. Stop. Just don't even go there. No. 2. Preheat your oven to 550 degrees (good idea to make sure the oven is clean first) an hour before you plan on baking the first pie. 3. Use a Pizza Stone (or two, if you have them) and preheat it in the oven for the hour above. The pizza stone is part of the oven, not part of the assembly process. You don't make your pizza on a cold stone and tranfer it to the oven. You slide (more on that later) your assembled pizza onto a preheated stone to bake. That's what makes it cook fast and helps avoid doughy middles by transferring the heat from the oven quickly to the pie. If you don't have a pizza stone you can still obtain pretty good results using an inverted half sheet pan (I buy mine at Sam's Club), but it doesn't need to go in the oven 1 hour in advance. 15 minutes before baking will do. If you have a commerical oven like Viking or a Wolf, for example, you may be able to fit a full size sheet pan in your oven and increase your baking surface. Just note , the baking sheet may warp at that high temperature. It won't affect baking, but may not be suitable for using for things you want to bake level , such as cake layers, in the future. 4. Shape your dough out by hand. Never roll it out with a rolling pin! Ever! The yeast in the dough, whether homemade or purchased has worked very hard to make wonderful little gas bubbles in your dough. This is what gives a great dough character and lightness. Handle the dough gently and you will be rewarded with great texture. You use a techniqe that uses gravity to help you by spinning it around like you are turning a steering wheel and then using the backs of your hands/knuckles to further stretch it out. All the beautiful air "blisters" stay intact. It's a beautiful thing! Pictures of techniques below. 5. Shape and assemble your dough on parchment paper. If you've read any of my baking entries here, you know that I am a fan of parchment paper. It is essential for baking. Yes, I know paper burns at Farenheit 451 and your oven is set for nearly 100 degrees F above that. Here's the thing, you trim the paper so that it is not exposed to the heat. The dough is insulating it. I have been using high heat and parchment paper to make my pizzas for years and years and have never once had a fire in my oven. This is the secret to figuring out how to transfer the pizza to the oven easily, no cornmeal, no worries about it getting stuck on the counter. It makes all the difference in the world. You'll see. 6. Season your dough. I know- how elementary! But it will taste even better with a pinch of kosher or sea salt sprinkled lightly over the top of the dough before adding your other toppings. If your topping are excessively salty, you may skip this step. 7. Use great toppings. Just like the dough, if you settle for sub par ingredients, you will get sub-par pizza as a result. Use the best quality ingredients your budget will allow, especially on the cheese. Shred your own cheese, use fresh herbs, all meats should be pre-cooked. Use fresh veggies, thinly sliced. If you are using anything with a lof of moisture (pineapple, canned olives or jarred artichoke hearts, for example) drain and pat it as dry as possible with several layers of paper towels first. 8. Top sparingly. This one is a golden rule. You want the top and the bottom of the pizza to cook at about the same speed. If the pizza is heavy with toppings,. the bottom crust will not bake as fast as it should. This will result in a doughy, undercooked and possibly soggy pizza. Just say no! Put your favorite things on the pizza, but limit the quantity. Less is definitely more in this case. 9. Use a rimless baking sheet or metal pizza peel. THe easiest way to get your pizza in (and out) of the oven and onto the stone is to slide it off one of the two. Think of it as a giant spatula. Only caveat? make sure it's large enough to accommodate the diameter of your pizza. When removing the hot pizza from the oven onto the rimless baking sheet, using a good pair of stainless tongs is a good idea for safety. Here's the pictorial I promised: 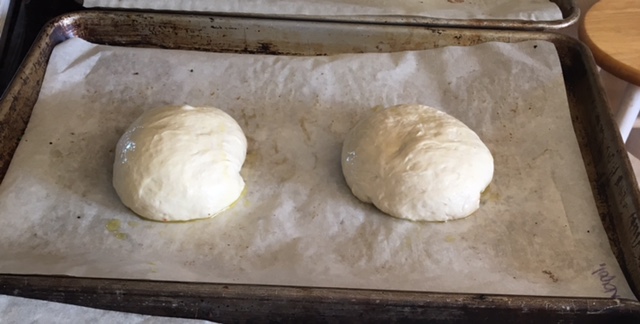 Use good dough. Let it sit at room temperature for an hour or so before shaping and baking. These are approx 8 ounce balls of dough (I coated them lightly with olive oil), which make about a 10" round pizza each. 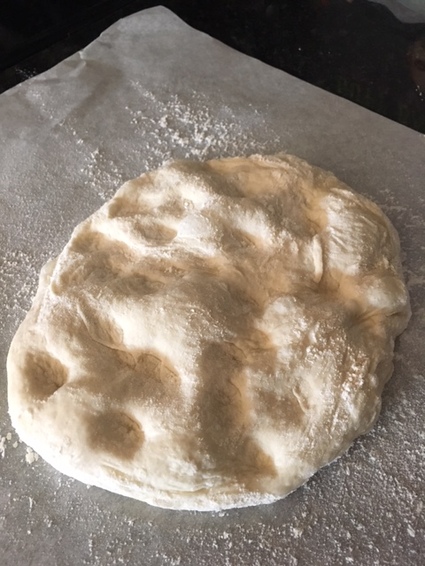 When ready to shape dough, place on a piece of parchment paper which you have sprinkled lightly with flour (in professional circles we call this "bench" flour, in case you want to throw some terms around-lol!). Gently dimple the tops of the dough with your finger tips to get started. You want to leave all those air bubbles in tact.
DO NOT roll out the dough. Gently lift dough up by the edge and start turning it with your hands like a steering wheel in clock-wise direction allowing gravity to help you stretch the dough. Do this fairly quickly to keep an even shape. You can go around several times, if needed. To stretch the dough further, drape the dough over the backs of your hands. Start with your hands fairly close together and gently pull them apart to stretch out the dough, while continually turning the dough in a clock-wise fashion as before. Take your time. You can move your hands to the thicker parts of the dough as necessary. If it should tear, lay the dough down and pinch together the hole. If you don't get a perfect circle, don't worry, it will still taste amazing. 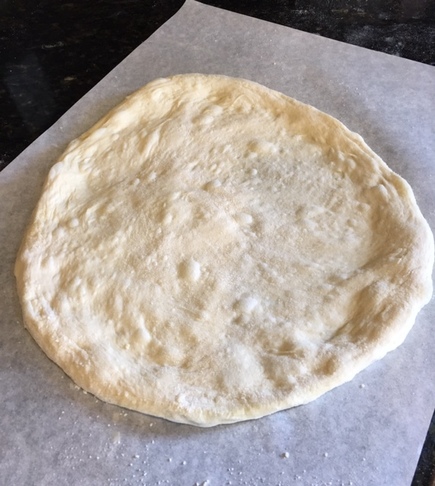 Success! See all those beautiful air bubbles? Your dough is back down on the floured parchment and ready to assemble. Sprinkle the top with a tiny pinch of kosher or sea salt before continuing. 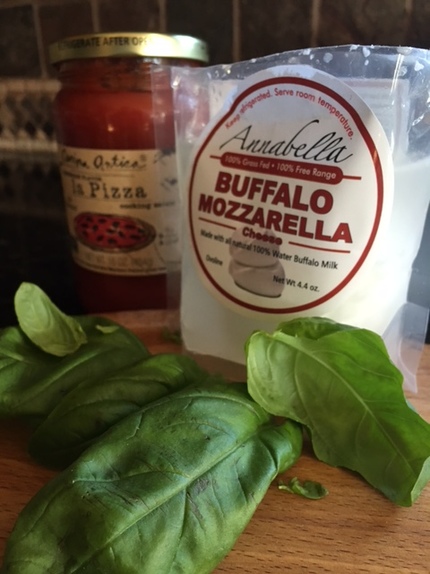 Remember to use fresh, quality ingredients . It doesn't have to be what's pictured here, but your pizza will only taste as good as what goes into it. Remember to use pre-cooked meats and some veggies will benefit from pre-cooking as well. It may take trial and error to discover which you like better pre-cooked.
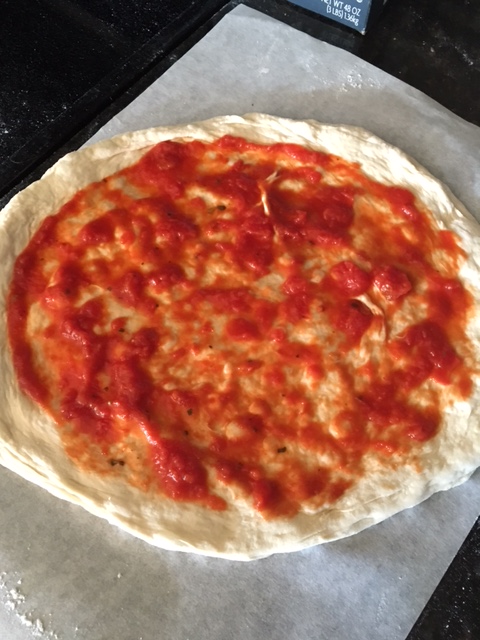
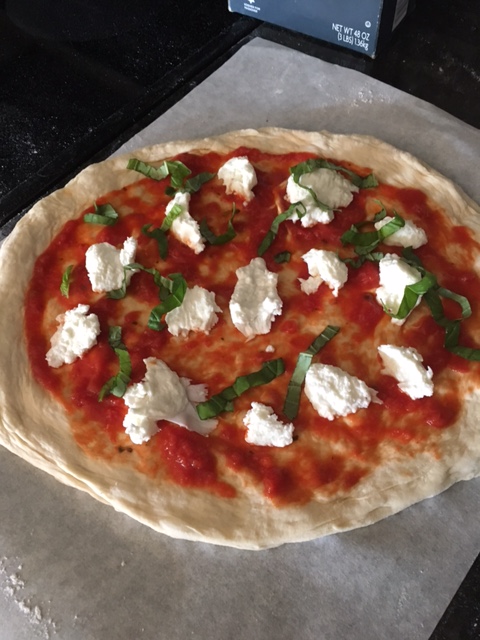
Top your pizza sparingly. That is the right amount of sauce shown (or pesto, or alfredo...whatever you use as the base). You could certainly use more cheese. I was going for a more "authentic" Italian Pizza Margherita presentation here. Just remember the old adage "less is more." Use your imagination and have fun thinking up great combos! 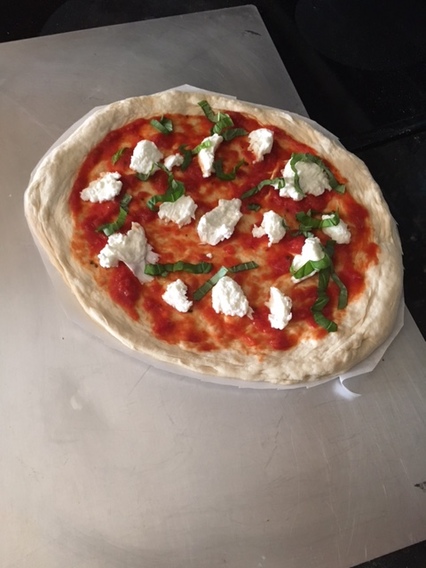 With a pair of scissors trim the parchment all around the pizza and slide a rimless baking sheet or pizza peel under the paper to transfer it to the oven.  Place the edge of the pizza farthest away from you at the back of the pizza stone (which has been in your oven preheating for an hour, right?) and wiggle it off the pan while pulling the rimless baking pan (or pizza peel) back towards you as quickly as you are comfortable with. With practice you will gain more confidence and execute this step quickly and flawlessly. For some reason this picture makes the pizza look like it's hovering above the stone, when in fact it is on the stone. Bake away (Check on it once during baking and rotate it as needed for even baking. Be quick so you keep all that hot air in your oven where it's needed). Caution: you may want to let the first blast of hot air escape the oven before putting your face down into it. So lean slightly away as you open your oven door.  After about 6-10 minutes, depending on how your oven operates, you will remove a pizza that looks something like this! You can see the puffy edge , the toppings are fully melted and cooked, the rim of the pizza is golden and the bottom (if you were to peek) is nicely browned and crisp. Pizza perfection in my book! 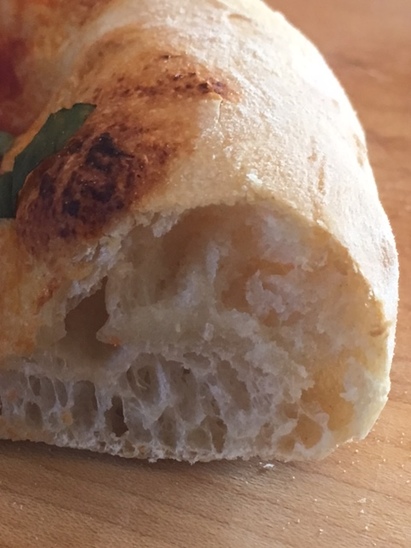 See how allowing the dough a nice slow rise and being gentle with the dough to retain the air pockets paid off here? Yummy good stuff, I tell you! If you'd like to try my salad topped pizza, you can find it here.
Be sure to let me know how you get on with your pizza making. I'd be interested to know! ♥ * Note: If you care to experiment, links to other dough recipes I like are here (time consuming but extremely flavorful-for the more advanced cook), here and here. Happy pizza making! "Love is a fruit in season at all times and within the reach of every hand." - Mother Teresa Back in November I came across a book called Medical Medium, by Anthony William. At the time I had been dealing with a very rare, so-called auto-immune condition called Granuloma Annulare for about 2 1/2 years. In that time I had tried treatments recommended by my dermatologist that only made things worse and left me with unsightly scarring. Dietary changes suggested to me by other practioners also proved fruitless for me for that condition. This book brought me great hope, although it didn't address my condition specifically. I immediately incorporated some of the dietary changes recommended in the book. In January, after the holidays had passed, I started the cleanse. The cleanse is basically a raw, vegan diet , heavy on the fruits, with no fats, including nuts and seeds, allowed for 28 days. I never thought I'd make it 28 days. Every day I told myself just get through today. Then it just got easy to follow, and I ended up doing the cleanse for almost 35 days. The best news of all is that my Granuloma Annulare that had been speading like wildfire, was an angry red color and very itchy, disappeared as did my hot flashes (a bonus). I found it wasn't really all that hard to adhere to the eating plan after the first few days. The food was delicious, life-giving and satisfying. Smoothies like this one became the cornerstone of my eating plan, and I mostly still eat raw vegan because I feel so much healthier and even lighter emotionally. Chronic illnes or not, this smoothie is simply delicious. My whole family loves them (thank goodness for Costco's organic frozen fruit department)! I have a Vitamix blender, and I still need to let the frozen fruit thaw partially. If you don't have a high speed blender, adapt the recipe to suit the power you have. Anthony WIlliam recommends using all organic produce for best results, but use what your budget allows. The hemp and chia seeds add fiber and bulk to the smoothie as well as protein. THe spirulina will alter the color into a bluish greenish shade, but won't affect the taste. Hawaiian Spirulina is a super food that helps take heavy metals out of the blood stream and also has a small amount of protein. Green Tropical Smoothie- makes 2 2 cups (slightly heaping) frozen mango chunks 1 cup fresh or frozen pineapple chunks 1/2 cup coconut or filtered water* 1 banana, peeled and chunked 1 cup loosley packed baby spinach (organic) 1 cara cara or other navel orange, peeled 2 Tablespoons organic hemp seeds (optional) 2 teaspoons organic chia seeds (optional) 1 teaspoon Hawaiian Spirulina (optional) 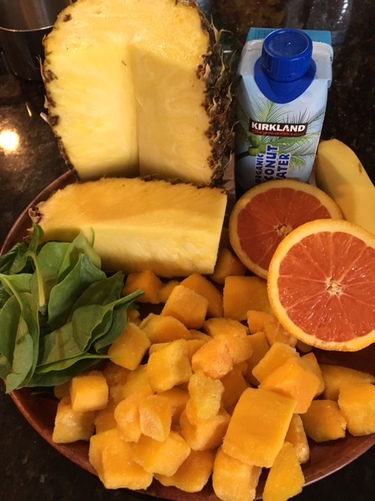 1. In your blender jar, layer coconut water, banana, orange, spinach, hemp, chia and spirulina (if using) and frozen fruits. 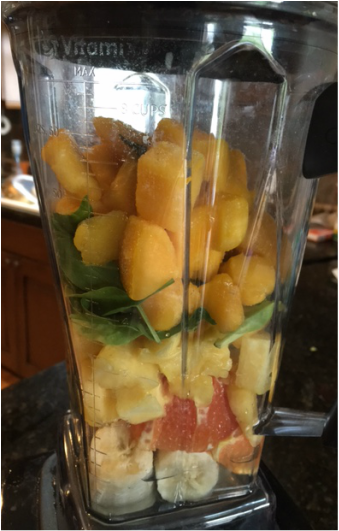 2. Blend according to your blenders instructions, until smooth. 3. Pour into glasses and enjoy! 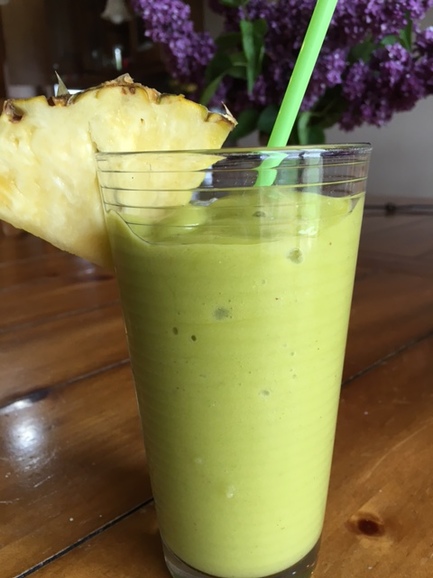 * If using all fresh fruit and you want a slushy consistency to your smoothie, omit coconut water and substitute ice cubes (go into blender last) to get the desired consistency. I'd start with about a cup to start. Here's to your health! ♥
|

Archives
December 2019
Categories
All
|


 RSS Feed
