|
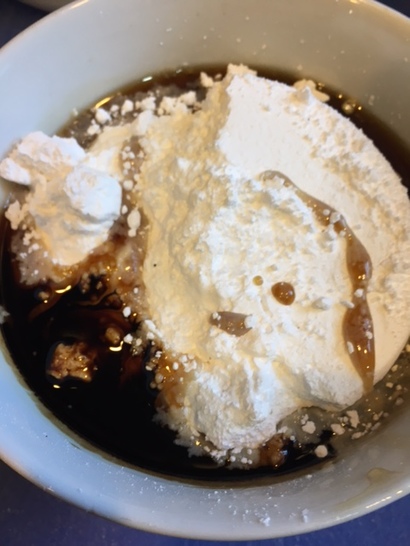
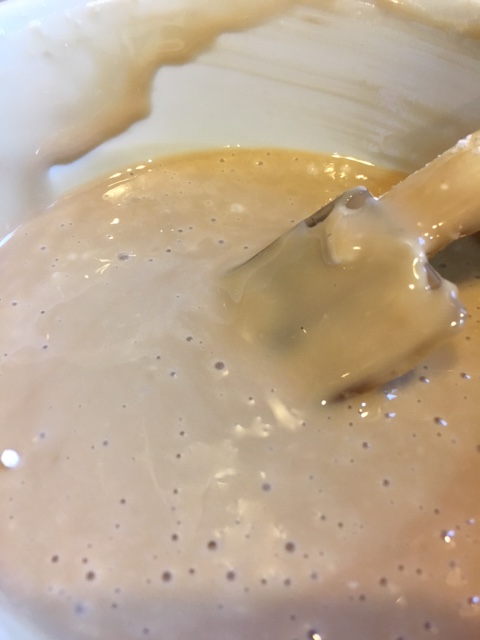
“Empty?! You took all the cookies!. They were crying to get out of the jar... Cookies get claustrophobia too, you know!” -Charles M. Schultz You know what makes me mad? Here it is National Cookie Month and nobody, I mean nobody, is talking about it! There's all this talk about this candidate and that candidate and which celebrity is doing what where, but no one is talking about cookies (well, except for Dorie Greenspan, noted cookbook author, who has a new book coming out at the end of the month on the subject). Cookies deserve a little more respect than that, I think. So I'm here to give it to them. Cookies are magical. They are little discs of flour, butter and sugar in some variation that you can hold in your hand, no matter how young or how old you are. Who doesn't love a cookie? One little cookie can transport you back to your childhood in an instant (think Proust's madeleines), help you make a friend, make a bad day better, are essential to any Christmas celebration worth celebrating and can create world peace (who could be angry over cookies and milk, right?). Name one other food with that much power and influence. Just as I thought.... So here is my first cookie worth celebrating this month. I created this cookie, Glazed Maple Oatmeal Cookie with Walnuts after trying the recipe for Maple Oatmeal scones in The Barefoot Contessa Cookbook by Ina Garten (p 222). Though I love Ina's scones, generally speaking I am not a scone gal. I am, however, a completely devoted cookie gal. I love this cookie with it's chunky texture full of toasted walnuts (I say the walnuts are essential to this recipe- they temper the sweetness and add crunch) and drizzled with that sweet maple glaze. I hope you will love it, too! Glazed Maple Oatmeal Cookies with Walnuts- makes about 2 1/2 dozen 8 ounces ( approx 1 1/2 cup plus 1 Tablespoon) all-purpose flour 3/4 teaspoon kosher or sea salt 3/4 teaspoon baking soda* 1/4 teaspoon ground cinnamon 8 1/2 ounces (2 sticks plus 1 Tablespoon) unsalted butter, room temperature 4 ounces (approx 1/2 cup plus 1 Tablespoon) granulated sugar 7 ounces (1 cup firmly packed) light brown sugar 1 large egg 2 teaspoons pure vanilla extract 1 fluid ounce (2 Tablespoons ) PURE maple syrup (grade B if available) 1/2 teaspoon maple extract 4 1/2 ounces lightly toasted walnuts, coarsely chopped 7 ounces ( 2 cups) old -fashioned oats Glaze: 1 1/2 cups powdered sugar 3 Tablespoons PURE maple syrup (grade B if available) 1/4 teaspoon maple extract teensy pinch (just a few granules) sea salt 1. Preheat oven to 350 Degrees F. Line a couple baking sheets with parchment paper; set aside. 2. in a medium bowl whisk together the flour, salt, baking soda and cinnamon. Set aside. 3. In the bowl of a stand mixer, on low speed, cream together the butter and sugars until combined well . Mix in the egg, syrup and extracts and combine well, increasing speed to medium for about 30 seconds. 4. Return speed to low and stir in the flour mixture until almost completely absorbed. Add in oats and walnuts. Mix well. The results will look like this: 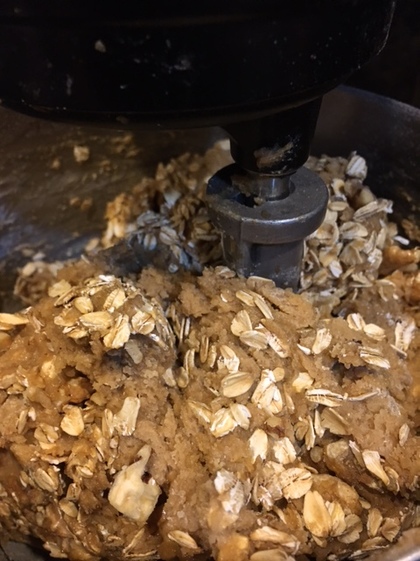 5. Scoop out dough using an ice cream scoop about 3 " apart on prepared baking sheets.**  6. Bake in preheated oven for about 10-12 minutes until edges are nicely golden and middle seems set. Cookies will have puffed up a bit in center and then flattened out. Let cool about 4 minutes then glaze. 7. To make glaze, combine powdered sugar, 3 Tablespoons maple syrup, 1/4 teaspoon maple extract, teensy pinch of salt and enough hot water to make a smooth icing with a drizzling consistency.
8. Using a spoon or spatula, drizzle the tops of the cookies Jackson Pollack style with icing ( as much or as little as you'd like), but you want to see cookie beneath the glaze, not have it completely covered). 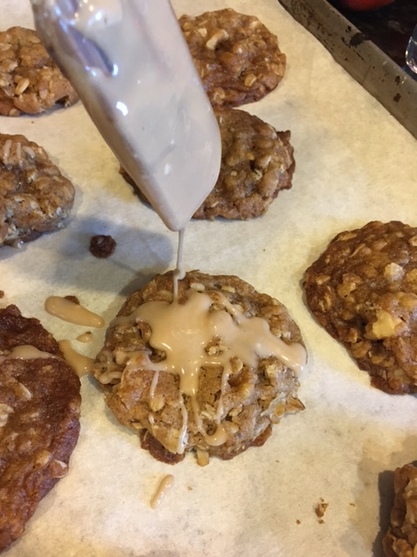 9. Let icing set before eating or storing, about 15-20 minutes (it's ok if you have to try one sooner, I won't tell). 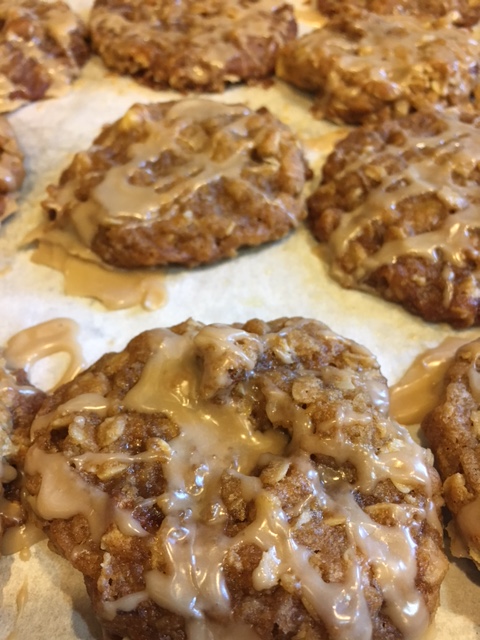 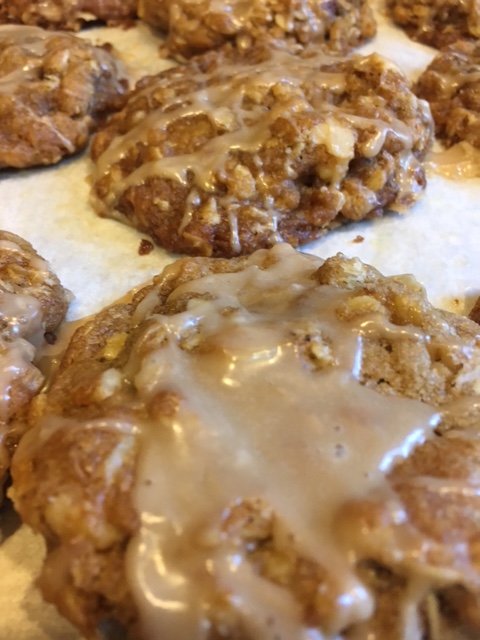 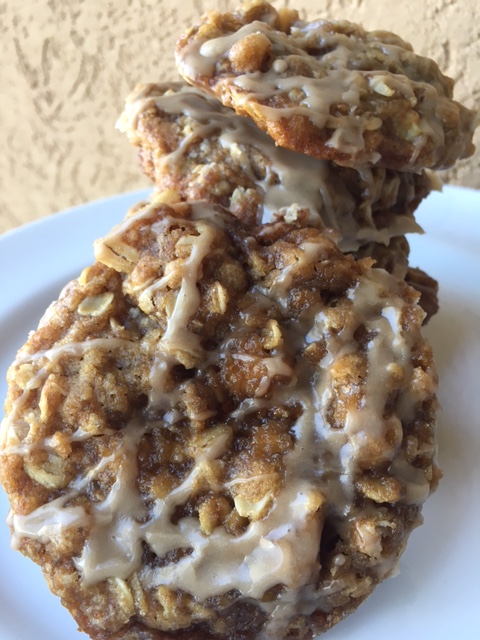 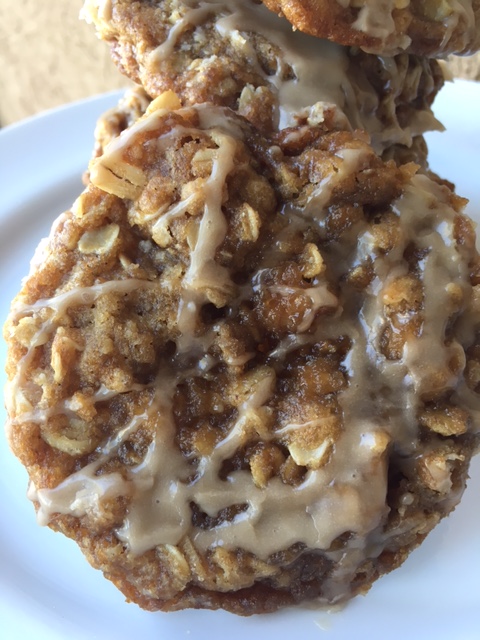 Promise me you'll share some, right? #cookiesandkindness ♥
*NOTE: I developed this recipe at higher altitude ,at around 5000 feet above sea level. If you live closer to sea level and the cookies are not spreading to your satisfaction, you may need to increase your baking soda to 1 teaspoon. Try it and see.They will taste great either way. **If refrigerating the dough before baking, you may need to pat the dough balls down a bit before baking. Try one or two first and see what you think. It's generally what I do.
0 Comments
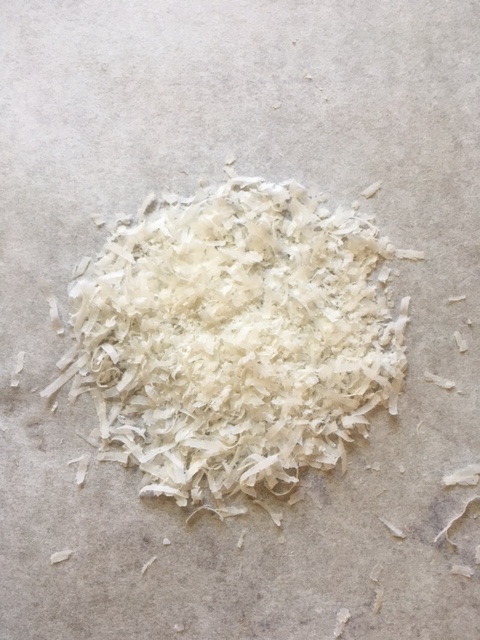
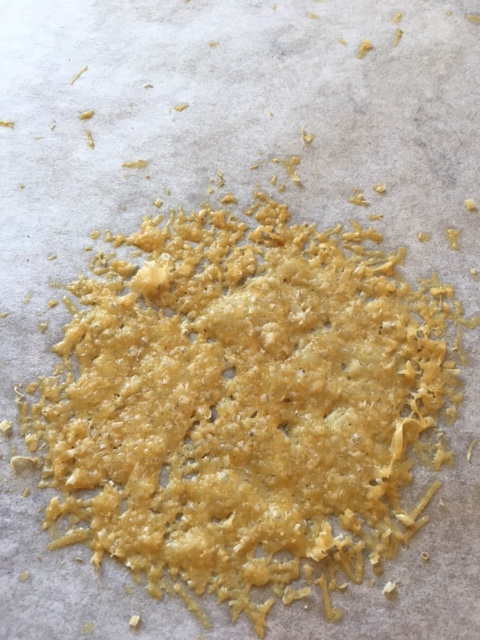
“Had a cold hummus with pita bread, Under a delicious food, yellow or red. Might just have the appetite to cook- Urgent dinner by hook or crook. So that's just a humus humor spread.” -Ana Claudia Atunes I wanted to post a cookie recipe, because October is National Cookie Month (happy dance!). However, I have been a little short on time and so I am not quite ready to post my first cookie recipe. So instead, I will appease you with something super healthy and delicious- hummus! This past Spring I went back to upstate New York where I grew up, and on one occasion my mom, aunt and I went out for a little drink and a snack at a wonderful little wine bar in Delmar, NY called the Twisted Vine. We ordered several things off their appetizer menu, but the one thing that I really loved was their hummus. It came in a cute small crock surrounded by veggies. It was chunky, rustic and lemony. I was determined to come up with something similar. This is the result. Right now my favorite way to eat it is with tiny cooked fingerling potatoes in all colors. But of course, you could just as easily eat it with your favorite crudite veggies or pita chips. It's easy and keeps well for a week in the refrigerator. Of course it's super versatile and can also be made into your favorite flavors-drizzle with extra virgin olive oil(it doesn't have any added in) and some chopped fresh parsley , swirl in a little pesto to taste and sprinkle with toasted pine nuts, fold in in some roasted garlic to taste, or roast and finely dice a red pepper then stir in... whatever suits your taste best! For me I just keep it simple and sprinkle Smoked Paprika on top. Soooo good! Oh and it's so much fresher and vibrant tasting than anything store-bought that probably has preservatives and who knows what else. It's so easy to make, there is no excuse not to. Rustic Hummus 2- 14.5 ounce cans garbanzo beans (chickpeas), rinsed and drained well 6 Tablespoons Organic Tahini juice from 2 Lemons (about 4 Tablespoons) 3 cloves garlic 1/3 cup water 1. Place all ingredients in the bowl of a food processor. 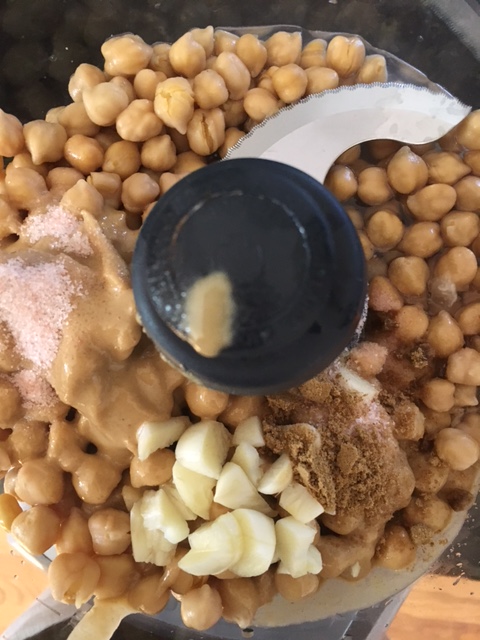 2. Pulse to combine until well mixed but rough textured. 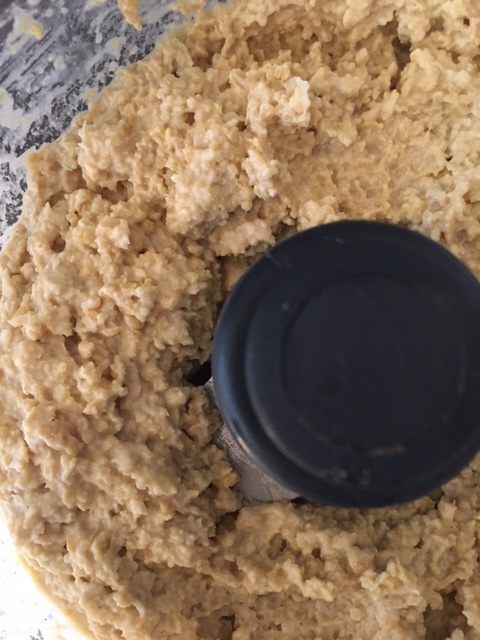 3. Scrape into a bowl, sprinkle with smoked Paprika and serve with your favorite dippers. 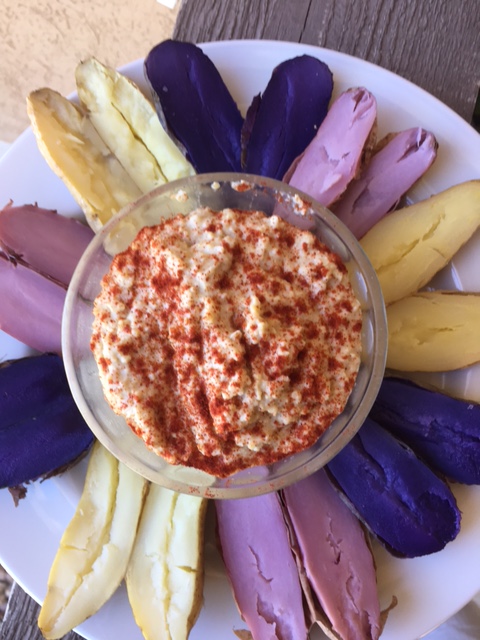 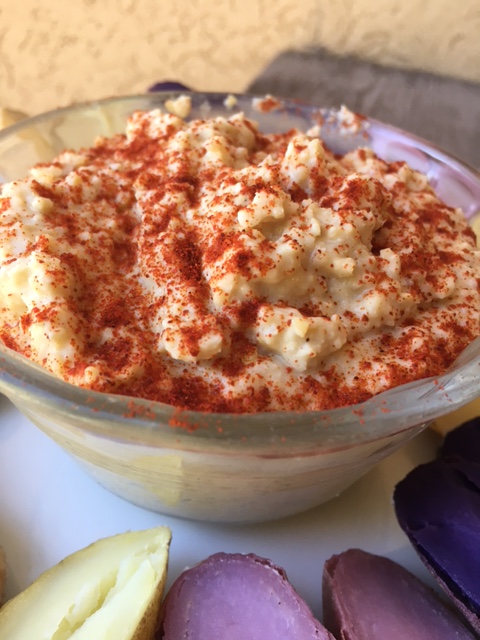 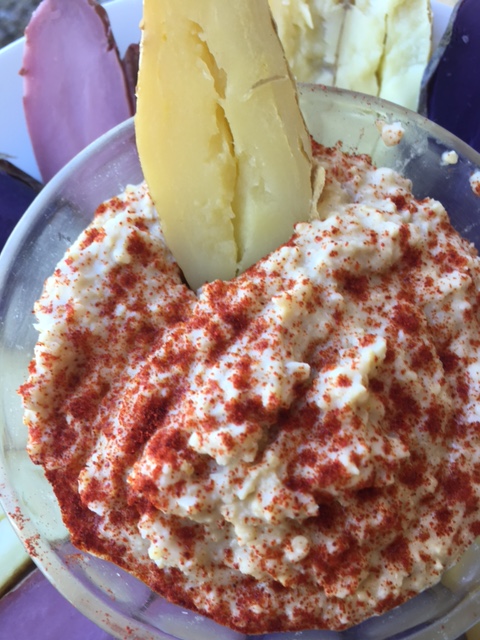 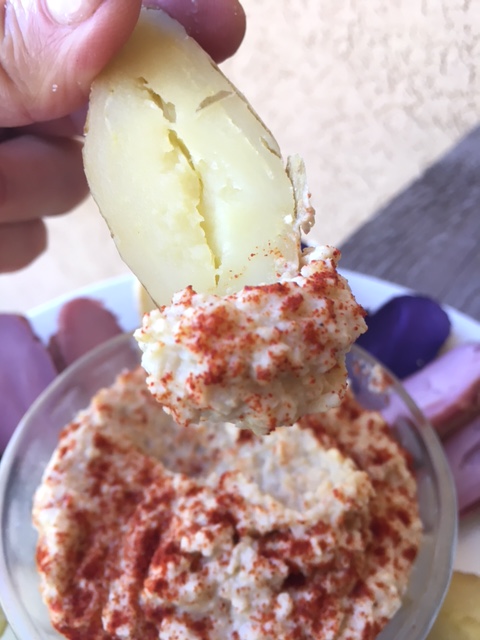 "I live on good soup, not on fine words. " -Moliere One of my first blog posts when I started this thing about a year ago, was an ode to farm fresh tomatoes. You can see those recipes here and here. Truly, a fresh tomato off the vine, picked and sold locally, if not harvested from your own garden, is a treat for the senses that no supermarket tomato can come close to approximating. There are variations in juiciness, sweetness and acidity , size and color. The anticipation of getting these fresh tomatoes mounts and mounts as the growing season progresses. Everyone thinks tomatoes are a summer vegetable (well fruit actually), but the truth is it is quite close to summer's end before the best tomatoes appear, and then poof- they are gone. Recently I was able to get some tomatoes from the local farm I volunteer at and I decided to turn them into Roasted Tomato Soup. This recipe is one I adapted from Tyler Florence. It is so delicious. His original recipe calls for much more fat than I use and also calls for basil. Personally I can't stand basil in tomato soup because it makes me feel like I am eating a bowl of marinara. I grew up on Campbell's Condensed Tomato Soup, did you? And I loved it....at the time, with the requisite grilled cheese sandwich on the side. Now the sweetness of the soup really does not appeal to me, but the memory lingers. This soup is a nice grown up version to appease the memory. It's creamy, fresh, beautiful and delicious, with or without the grilled cheese sandwich. So quick, grab some fresh grown tomatoes and make a batch. Better yet, double it (or triple even if you have a soup pot large enough) and place a container in the freezer for another time. Roasted Tomato Soup- serves 4 2 1/2 pounds of assorted ripe tomatoes (large, small, plum, heirloom...), cored, seeded and halved* 1/2 cup extra virgin olive oil 5 small cloves of garlic, peeled 4 cups thinly sliced onions, packed 1 1/2 teaspoons kosher salt 1 teaspoon coarsely ground black pepper 5-6 sprigs fresh thyme 3-4 cups chicken or vegetable stock (low sodium, if canned) 2 bay leaves 1 tablespoon unsalted butter (optional if vegan) 2 Tablespoons heavy cream (optional) Parmesan crisps (optional) 1. Preheat the oven to 450 Degrees F. Line a baking sheet with foil then lay a piece of parchment paper on top. 2. Arrange the tomatoes on top of the paper (don't you just love all that variation?). 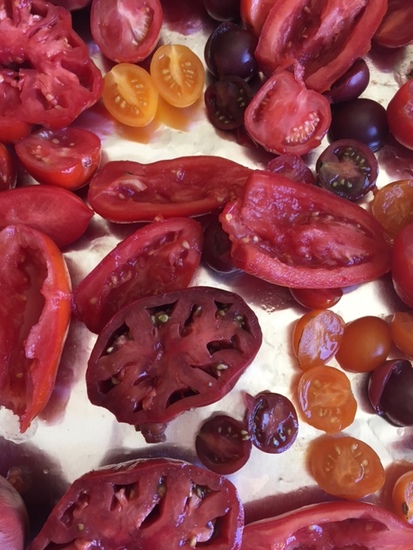 3. Place the sliced onions and garlic on top of the tomatoes. Sprinkle with salt and pepper. Drizzle with olive oil and toss to combine. Top with fresh thyme. 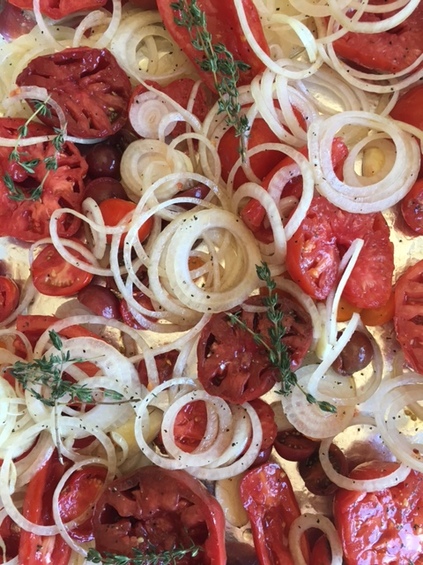 4. Place tray in hot oven and roast for 30-40 minutes until cooked down and slightly caramelized.. If making Parmesan crisps, reduce oven to 375 degrees F. 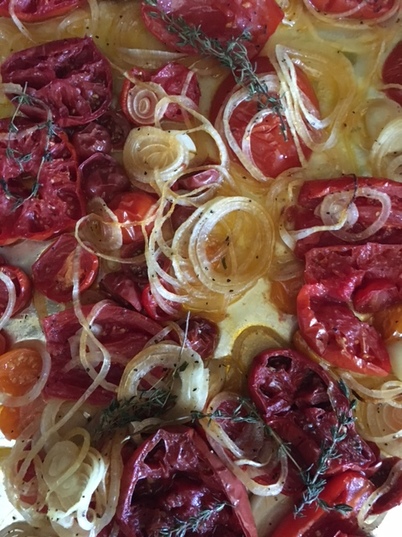 5. Remove the thyme sprigs, leaving some of the leaves only behind with the tomatoes. Transfer the roasted tomato mixture into a soup pot large enough to hold the ingredients. Add in bay leaves, stock and butter, if using. Bring mixture to a boil, then reduce heat and simmer, until liquid is reduced, about 20-30 minutes, stirring occasionally. 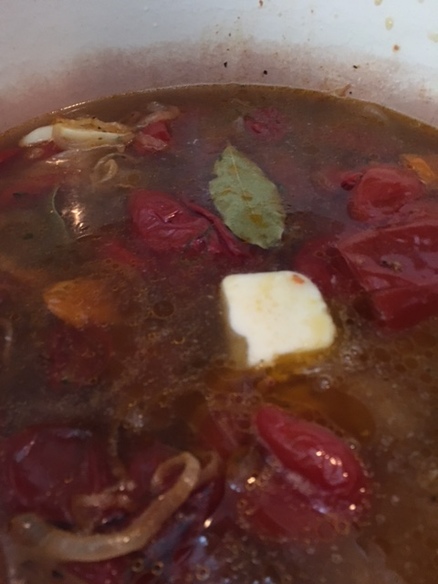 6. Remove the bay leaves and discard. 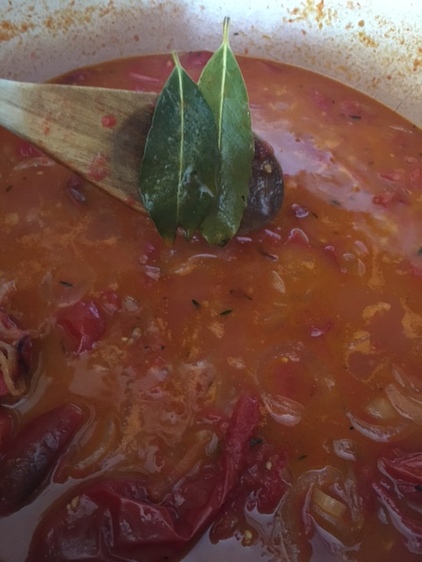 7. Using an immersion blender (one of my favorite tools), puree soup, right in the pot, until smooth. If an immersion blender is not available, carefully use a stand blender, filling jar no more than half-way full. You may have to puree in batches. Be careful, contents are HOT! 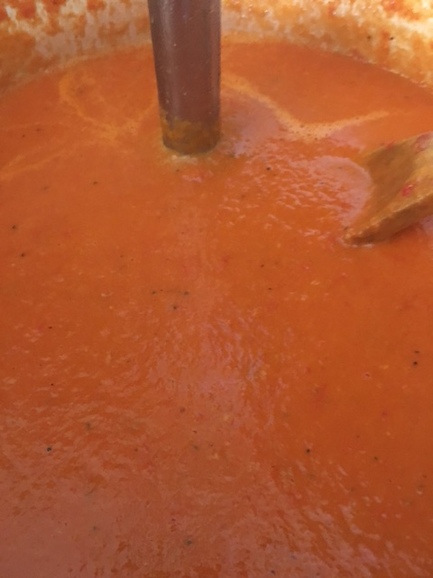 8. Taste for seasoning and adjust to taste. Add in additional stock, if desired, for thinner soup. Stir in cream if using. (I personally think it's not needed at all- sometimes more fat muddies the flavor instead of heightening it IMHO). 9. To make Parmesan crisps, line a baking sheet with parchment. For every Parmesan crisp you'd like to make , place 1 Tablespoon of grated Parmesan cheese onto the baking sheet and pat down into a circle, leaving 2-3 inches between mounds. Bake for 3-5 minutes until golden. Remove from oven and cool completely before removing from tray (they can be a bit fragile).
10. Ladle soup into bowl and float a Parmesan crisp on top. Serve hot!  And it was good to the last drop! ; ) ♥ 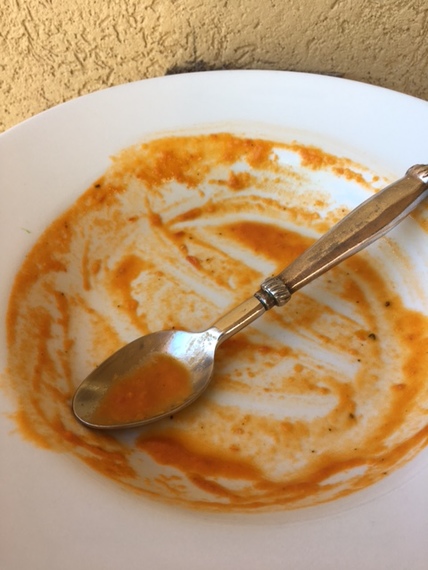 * Note: To seed the tomatoes, core them first (only needed with the larger tomatoes). Cut the tomatoes in half cross-wise. hold the tomatoes cut side down over a bowl or the sink. Give a gentle squeeze and a little shake and the seeds will fall out, not all of them, but most. Good enough.
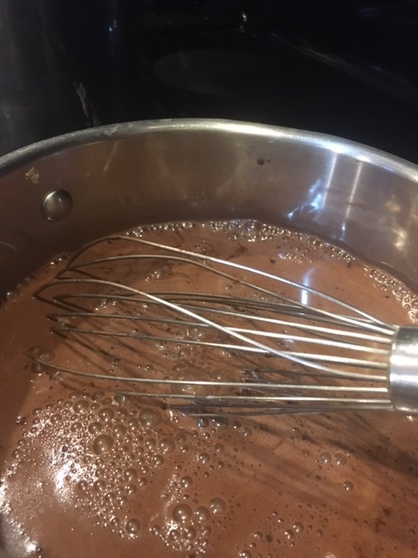
PS: If you'd like another great fall soup recipe, please visit this link here. "Chocolate, I am sure, is the concrete manifestation of love. " -Geneen Roth Yesterday was International Chocolate Day. I'm not sure who keeps the calendar of such things, but seems I'm always out of the loop until after the fact. Oh well... And anyways, when it comes to chocolate I'm more in the let's celebrate it often camp. Giving just one day to the original "food of the Gods" hardly seems adequate. So in the spirit of all things chocolate and seeing it was a rainy, chilly day around here yesterday, stirring up a pot of chocolate pudding (because it is delicious warm, too) seemed like just the right thing to do. Divinely Delicious Chocolate Pudding- serves 2-6 (well, yeah) 2 1/4 cups whole or 2% milk* 3/4 cup whole or 2% milk 1/4 cup plus 2 Tablespoons Lightly packed brown sugar 1/4 cup plus 1 1/2 teaspoons granulated sugar 1/4 cup plus 1 1/2 teaspoons cocoa powder** 1/4 cup plus 1 1/2 teaspoons Cornstarch (non-gmo preferably) 3/8 teaspoon sea or kosher salt 6 ounces high-quality chocolate (60-62% cocoa content is my preference), chopped 1 1/2 teaspoons pure vanilla extract 1. In a medium sized bowl whisk together the 3/4 cup of milk, brown sugar, granulated sugar, cocoa powder, cornstarch and salt until smooth. Set aside. 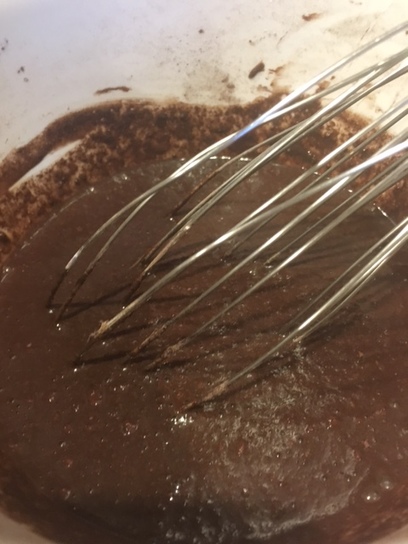 2. In a medium sized saucepan, bring the 2 1/4 cups milk to a simmer over medium heat. 3. Whisk in cocoa mixture and continue to cook, whisking constantly until mixture come to a boil and is thickened, about 3-5 minutes.
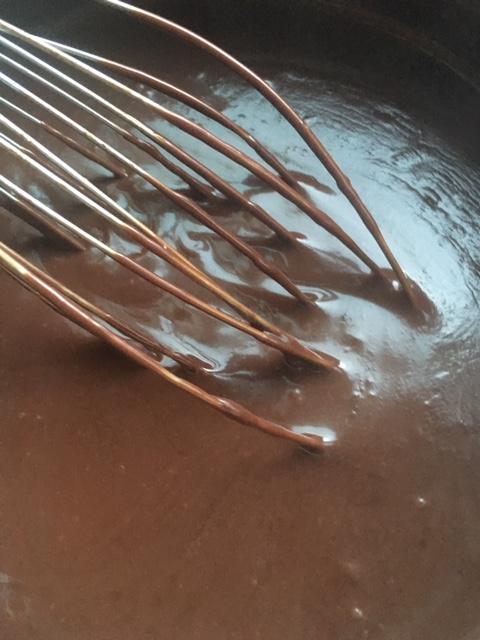
4. Remove from heat and stir in chocolate and vanilla. Whisk until smooth. 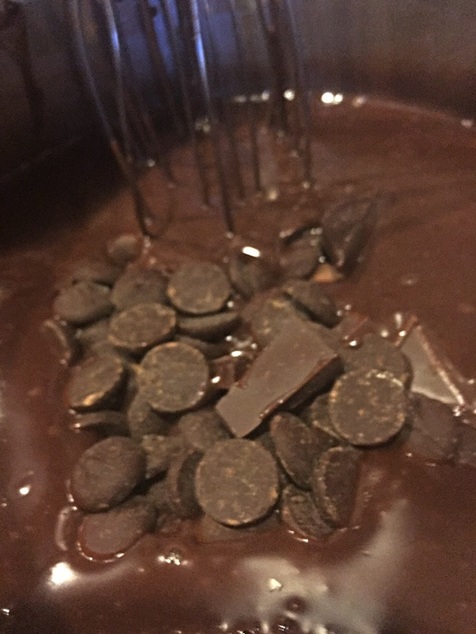 5. Immediately pour it into heat safe serving glasses, a serving bowl or even into a large graham cracker crust (it's so very yummy as a chocolate cream pie).  6. Refrigerate to firm up (a must if making a pie)***, or let it cool off a little bit and eat it warm. It's delicious either way. 7. Top with whipped cream and serve! 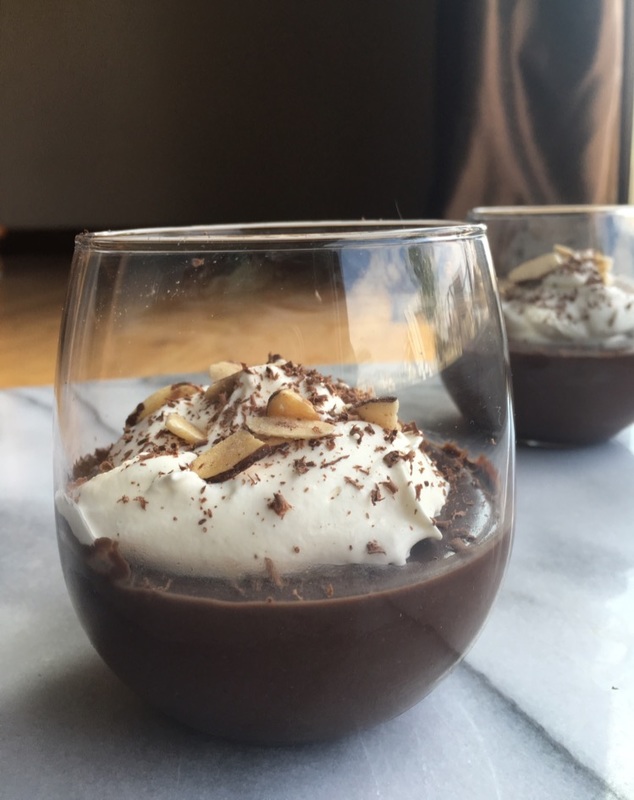 oh, man, was that ever good!  Tips/Comments:
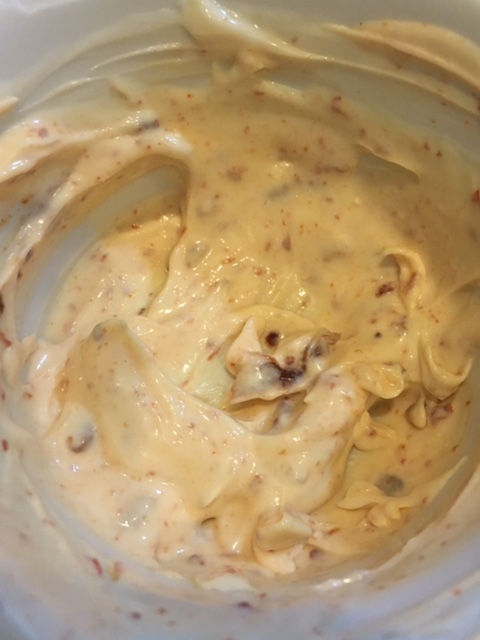
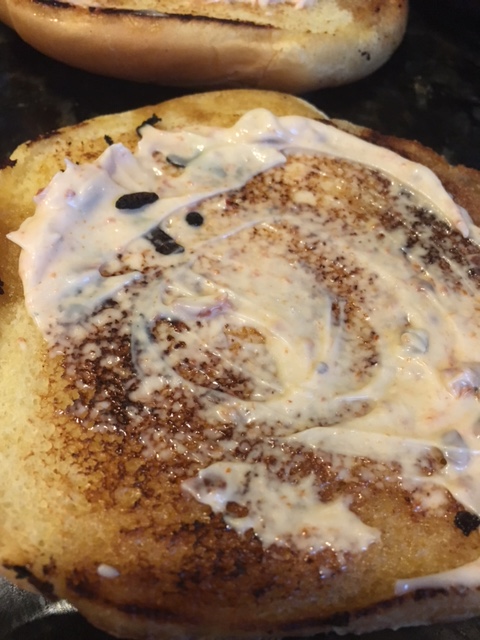
* I have never tried the recipe with dairy-alternative milks, so can't speak to the success that might have. ** Please seek out a really good cocoa powder. I love Valrhona and Cocoa Barry Extra Brute. *** I LOVE pudding skin. If that's not for you, once you pour the pudding into its final resting place, press plastic wrap directly on top of pudding, piercing with a knife in a couple places to allow heat to escape, before refrigerating. “Oh, I adore to cook. It makes me feel so mindless in a worthwhile way.” -Truman Capote By now you probably know that I am really into simple, fresh food.It's unlikely that I will ever give you a recipe for a really complicated, time-consuming culinary masterpiece. I am all about getting a good, fresh, delicious meal on the table without having to spend my entire life in the kitchen (which is pretty much what I do anyway, but that's beside the point...). So something easy, flavorful , and maybe just a bit out of the ordinary, makes me quite a happy cook. This Taos Turkey Burger is no exception. It is made from super simple ingredients. I use fresh roasted chiles from my farmer's market*, you could roast your own or even use canned roasted chiles if that's what you prefer. In any case, in the time it takes to get your grill hot, you can pretty much have these prepared and ready to cook. Grilled or pan-seared, these are a year-round favorite. If burgers are your thing I have a couple others you might like to try here and here. Taos Turkey Burgers- serves 5 1 1/2 lbs ground turkey 1/2 cup diced roasted chiles, peeled, stemmed and seeds removed (or canned, drained) 1/2 cup shredded cheese (pepper jack, cheddar or colby jack) 2 Tablespoons finely snipped chives 1/4 cup finely crushed salted tortilla chips 2 Tablespoons mayonnaise scant 1/2 teaspoon kosher or sea salt 1/4 teaspoon coarsely ground black pepper Chipotle Mayo-optional 3 Tablespoons mayonnaise 1-2 teaspoon pureed chipotle chiles in adobo sauce (smoky medium heat flavor) 5 burger buns, grilled-optional lettuce-optional sliced avocado or guacamole-optional 1. If using an outdoor grill, start the fire or preheat it now. 2. Combine the first nine ingredients in a medium sized mixing bowl. Gently, yet thoroughly, combine all ingredients. I like to use my fingertips and avoid compacting the mixture. Keep it loose! 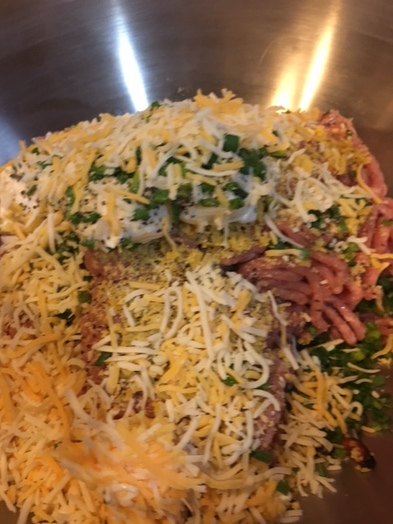 3. Gently form mixture into 5 generous patties. Press a hole in the middle of each burger with your index finger (this helps prevent the middle from puffing up while cooking). 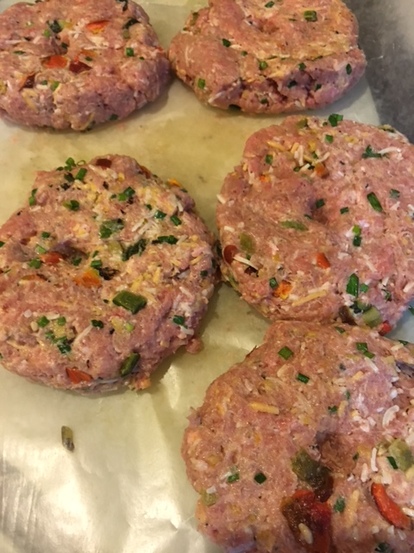 4. Place burgers on hot grill , or if using a heavy-bottomed skillet (cast iron is great), heat skillet with 1 tablespoon of oil in it over medium heat. When hot, add burgers. 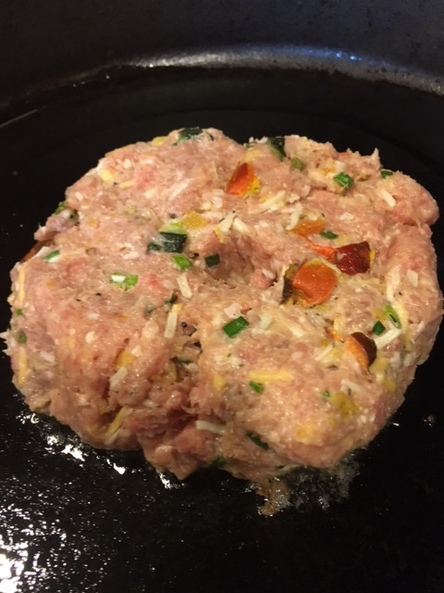 5. Cook burgers, 5-7 minutes per side, or until done, flipping once. 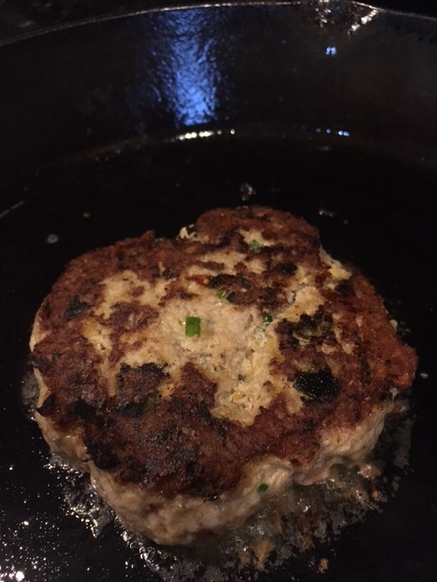 6. Meanwhile, mix together remaining 3 Tablespoons mayonnaise and 1 teaspoon (or to taste) pureed chipotle chiles. Spread evenly on both sides of buns, if using.
7. Assemble burgers using the optional ingredients of your choice and serve! 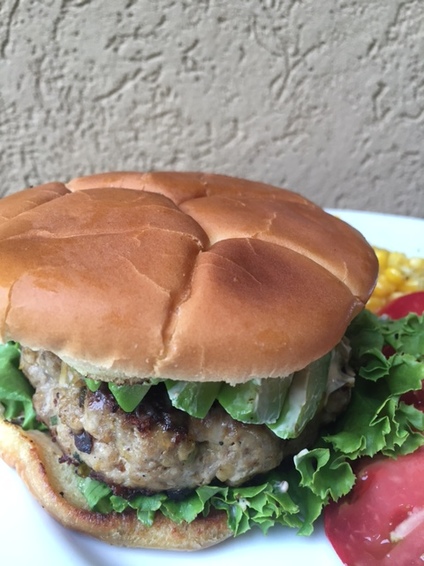 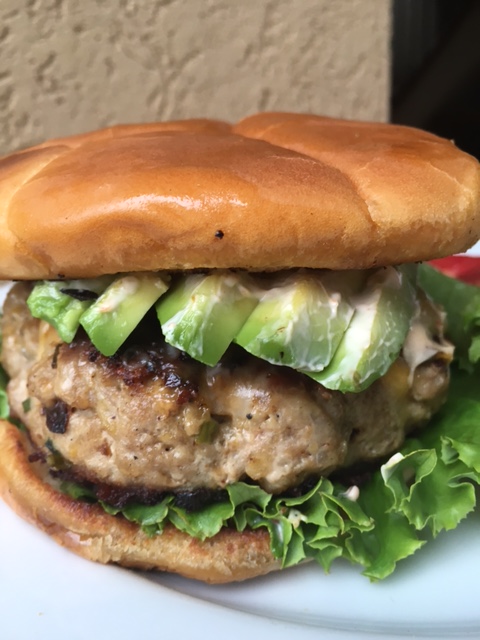 *Tip: I buy the roasted chiles at my farmer's market in varying degrees of heat. When I get them home, I peel , stem and seed them. I then lay them flat in a single layer on a parchment covered baking tray(s). I then place chiles in the freezer until frozen firm. Once frozen I remove them and pack like chiles together in freezer bags which I store back in the freezer. They are ready to use in all kinds of dishes, thaw, chop and go! The taste is superior to canned. If you roast your own, you can also store them in this manner.
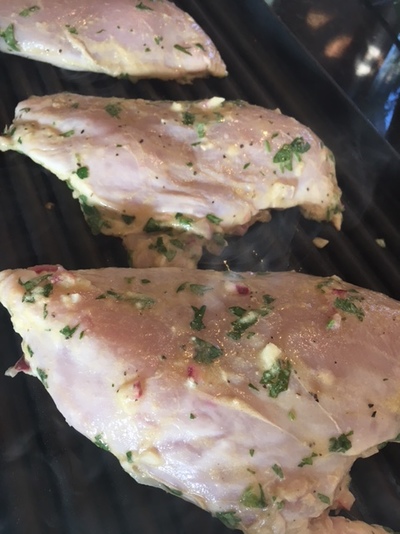
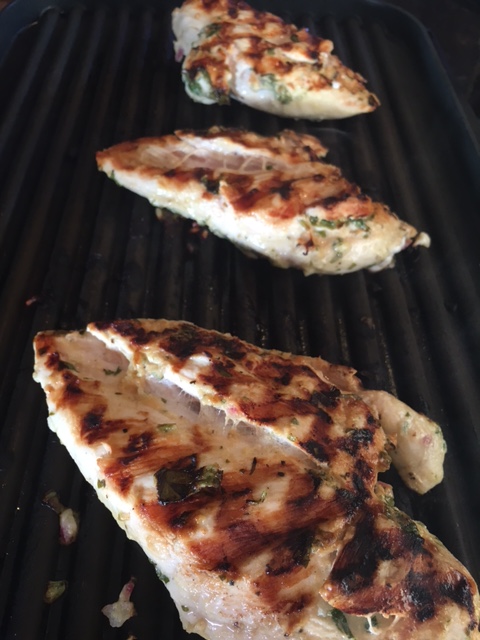
"How could such sweet and wholesome hours Be reckoned but with herbs and flowers." - Andrew Marvel How could such simple ingredients yield such delicious results is really the question! This flavor of this Grilled Herb Chicken (also delicious on shrimp and even on salmon, just don't marinate as long), a staple in my house since my meal prep business days, belies the simplicity of the recipe. Just a handful of ingredients, most of which you probably have on hand or could easily grab at the market, transfer otherwise bland and boring boneless, skinless chicken breasts into a deliciously flavorful and moist entree ready to star in the center of your plate! It is in fact, my most favorite summer grilled chicken recipe. I should have shared it sooner, but there still plenty of nice weather ahead. So fire up your grill and let's get cooking (ideally you will have marinated the chicken over-night or for at least 4 hours prior to grilling). Grilled Herb Chicken- serves 6 6 boneless, skinless chicken breast halves 1/4 cup extra virgin olive oil 3 Tablespoons fresh lemon juice 2 Tablespoons Dijon Mustard 1 large clove garlic, minced 1/4 cup finely minced red onion 1/4 cup minced fresh Italian (flat leaf) Parsley 1/4 cup minced fresh cilantro 1 teaspoon kosher or sea salt 1/2 teaspoon coarse ground black pepper 1. Gather all your ingredients! Fresh is always best! 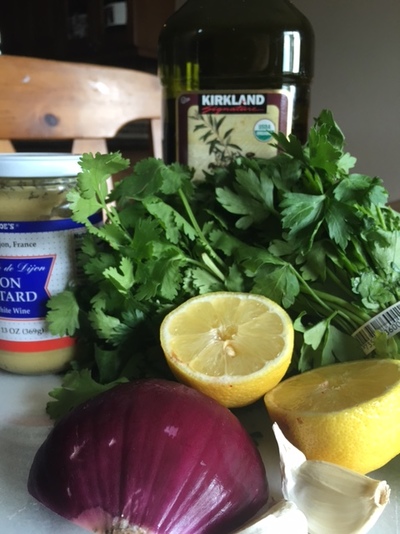 2. In a small bowl whisk together all ingredients, except chicken, until well combined (not so pretty, but just wait)... 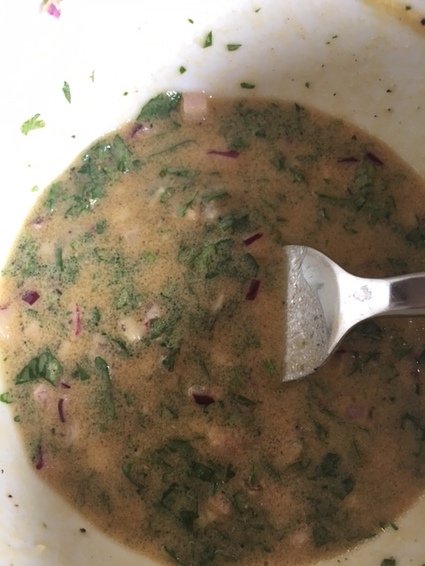 3. Place chicken in a zip top plastic bag. Pour marinade into bag; seal, squeezing out all the air. 4. Massage marinade into chicken to distribute evenly. 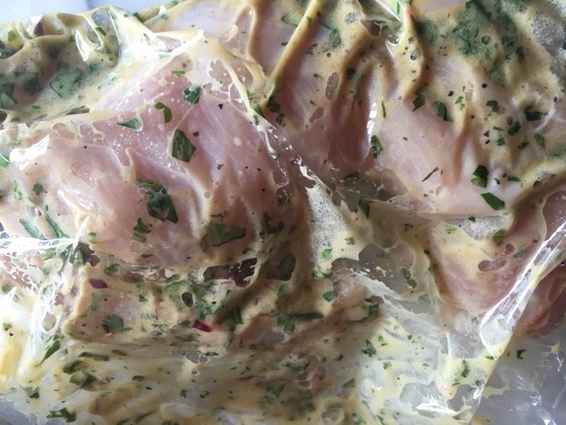 5. Place chicken in refrigerator and marinate over-night or for at least 4 hours. 6. Preheat grill to medium high heat. Clean and oil grates (or use an indoor grill pan). 7. While grill is preheating., remove chicken from fridge. When grill is hot, remove chicken from marinade discarding marinade. 8. Place chicken on grill and cook 5-7 minutes per side, or until done (165 Degrees F internal temp), turning once.
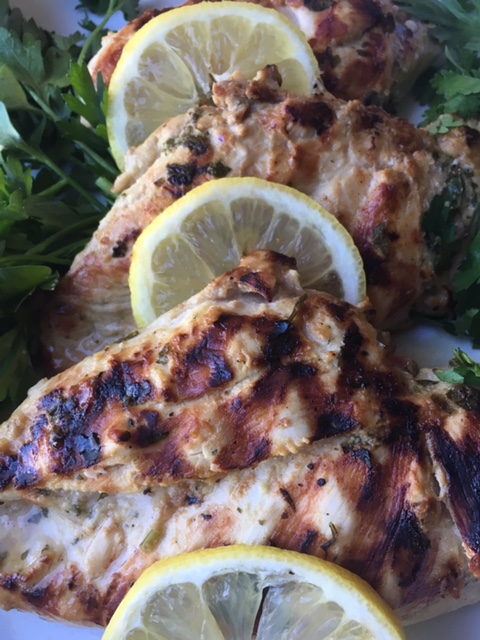 I just know you are going to love it, too! ♥
"If you've ever grown zucchini, you know they all ripen the same day. You wait all of June and July for zucchini. August rolls around, and one day—bam! You have more zucchini than you know what to do with."- Gale Martin In other words, zucchini, as we all know, is prolific! So what to do with all of that abundance? One can only eat so much zucchini bread, am I right? Well I have a versatile, delicious and much healthier alternative to zucchini bread to share with you. This recipe comes courteous of one of the best cooks I know, my friend Suzi. She was my right hand woman in my previous business venture in meal prep. She has an extraordinary palate and great intuition for cooking. Our joke was "... and it's always the same," but it wasn't because she measures nothing and goes by taste and what she has on hand. It was, however, always delicious. The first time she gave me a guideline for making it, it didn't turn out like her's. Come to find out she neglected to share her secret ingredient with me. It's canned EL Pato Jalapeno Salsa. I buy it in my local market, but I live in an area with a pretty big Hispanic population. Once she fessed up, then I was able to duplicate pretty much what she did. I have attempted to standardize the recipes so you can get consistent results, but truth be told, it is still more of a blueprint to play around with. You may like more or less heat with the chiles, more or less tomato, no corn, more corn, etc. It is a very flexible and forgiving recipe. I make bunches of it and keep it in the freezer to eat all winter. The texture suffers a bit, but it is still very flavorful, and I enjoy it very much. You can eat it as a delicious side dish to grilled meats, as a vegetarian pasta topping or as a topping on a roasted spaghetti squash. Sometimes I use it as a soup base for a turkey taco soup I like to make. You can even stir in rinsed and drained black beans at the end to make it a vegetarian main course (think meatless Monday).. Any which way you serve it, it will be a wonderful way to take advantage of summer's bounty. Just do yourself a favor and avoid using those tough baseball bat sized summer squashes. Try to choose the smaller ones that are more tender with small seeds. It makes a difference. Recipe doubles beautifully. Suzi's Stewed Zucchini- serves 6-ish 1 1/4 c. diced onions 3 cloves garlic, peeled and minced 1 1/2 pounds zucchini and /or summer squash (I like a mix), sliced lengthwise and then cut into 1/2" half-moons 1/2 cup diced roasted chiles, seeded (I use poblano, but you can use whatever you prefer, fresh roasted or canned) 28-ounce can diced tomatoes in juice 1 c. low-sodium chicken broth or vegetable broth 4 Tablespoons El Pato Jalapeno Salsa, or to taste* kosher salt and coarse ground black pepper 2/3 cup fresh or frozen, thawed, corn kernals freshly grated Parmigiano Reggiano cheese, optional Freshly chopped Italian Parsley, optional 3 Tablespoons Olive oil 1. Heat olive oil in large skillet over medium heat until hot, but not smoking. Stir in onion and garlic, season with a pinch of salt and pepper. Cook stirring often, until wilted and translucent.  2. Stir in squash, season again with a tiny pinch of slat and pepper and saute, stirring often for about 3-5 minutes. 3. Stir in tomatoes, chiles, broth and salsa*. Bring to a boil, reduce to a simmer. Partially cover and simmer about 30 minutes, stirring occasionally. 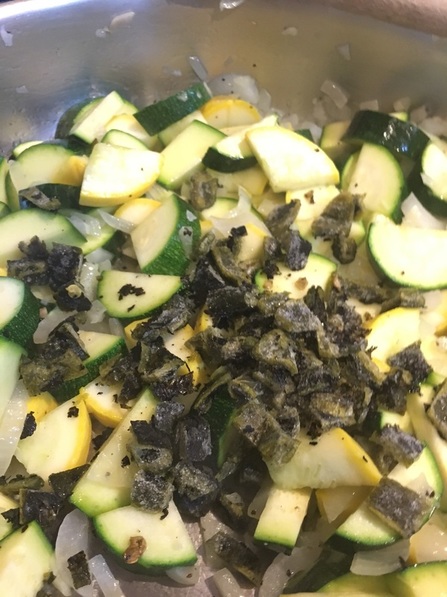 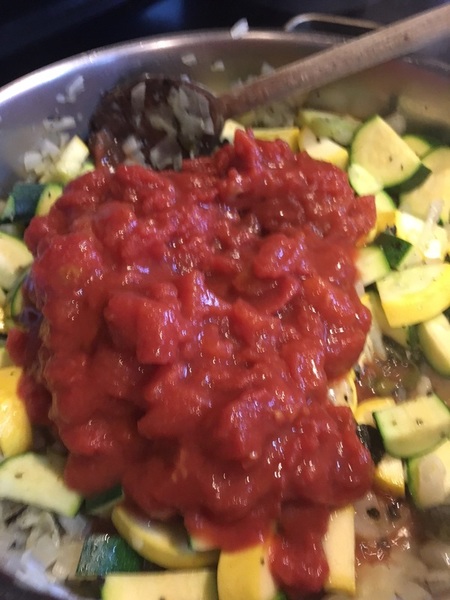 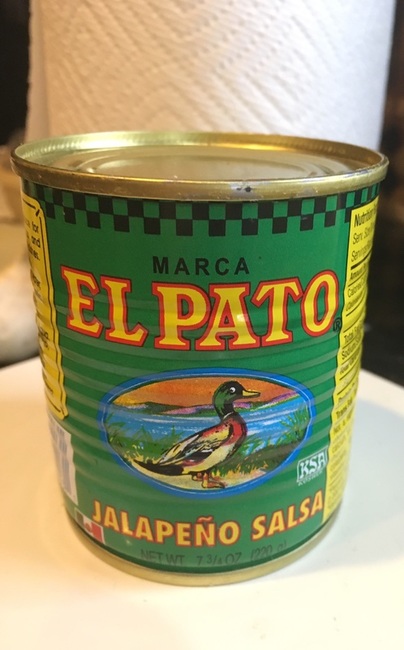 4. When squash are still tender, but not deteriorated, after about 30 minutes, stir in corn. Cook for 1-2 minutes longer, until heated through. Taste for seasoning and adjust according to your taste. 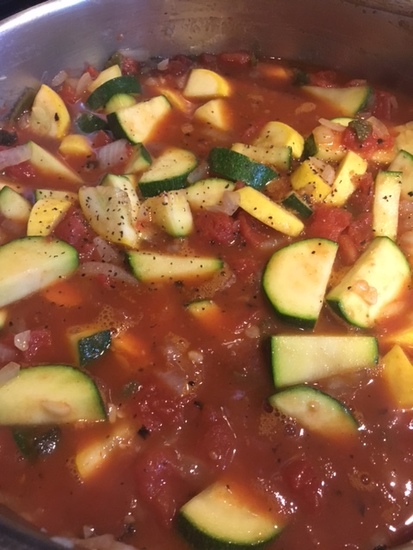 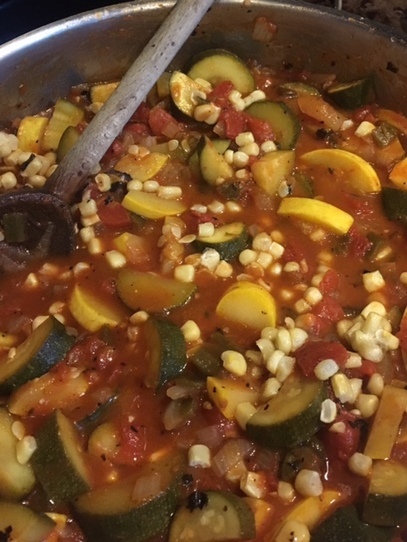 5. Serve immediately, topped with grated cheese and sprinkled with fresh parsley. 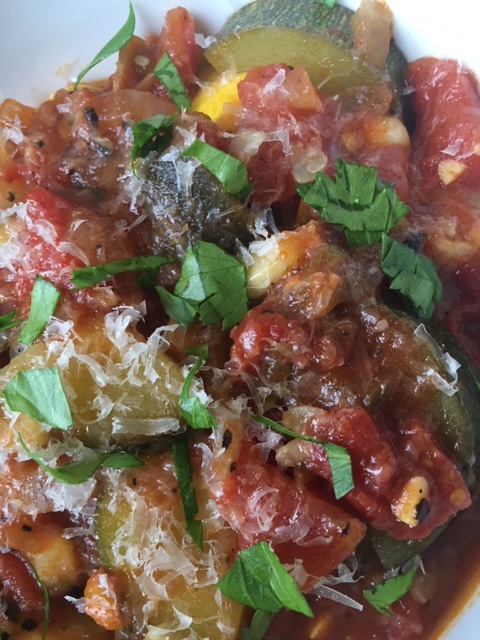 * If you can't find El Pato Jalapeno Salsa in your area, no worries, you can increase the chiles a bit or add a few dashes of your favorite hot sauce (go easy until you are certain of the intensity) and lastly, right after adding the corn, stir in 1 1/2 teaspoons of red wine vinegar to help elevate all the flavors.
“What I say is that, if a man really likes potatoes, he must be a pretty decent sort of fellow.” -A.A. Milne I have been binge-watching Chef's Table on Netflix. It's fascinating to me from a food standpoint, but even more so from a cultural and human spirit standpoint. It has me completely mesmerized. If you haven't watched it, I highly recommend it. Each story is beautiful and inspiring in its own right. The cinematography is stunning. Some of the cooking featured is so earthy and relatively basic, but so inspired as if a spiritual practice. I don't have the means to begin to communicate how it touches me to see these stories and the creativity in action. Though I think these words from Howard Thurman sum up what this series portrays so beautifully- "Don't ask yourself what the world needs. Ask yourself what makes you come alive, and go do that, because what the world needs is people who have come alive." So feeling somewhat inspired (though inadequately skilled by comparison) and having some humble potatoes on hand, I decided to just wing an idea and see what happened. This rustic recipe is the result. It's super easy, really tasty and fun. These potatoes would be a great accompaniment to roasted and grilled meats any time of the year. Salt Roasted Potaotes with Rosemary- serves 4-6 6-8 medium Yukon Gold Potatoes, scrubbed and patted almost dry (leave some moisture) Kosher salt 4-6 sprigs fresh rosemary 2-3 Tablespoons butter, melted 1 tablespoon. approximately, mixed fresh herbs (I used thyme, rosemary, chives and Italian Parsley), minced 10" cast iron skillet 1. Preheat oven to 425 degrees F. 2. Pour a 1/2" layer of kosher salt evenly over the bottom of the skillet. 3. Pierce the potatoes in 2 or 3 places with sharp knife then place the slightly damp potatoes in the skillet and roll in the salt. 4. Scatter the rosemary sprigs on top of the potatoes. 5. Place skillet in oven and roast potatoes for 45-60 minutes, until potatoes are pierced easily with a thin sharp knife. (the house will smell heavenly as the potatoes cook). 6. Carefully remove the skillet from the oven. Using a clean kitchen towel or oven mitts, remove potatoes from skillet and brush salt off. Again, using a towel to protect your hands, break the potatoes in half by hand and place in serving dish. 7. Drizzle the potatoes with melted butter; sprinkle with herbs. Serve immediately. 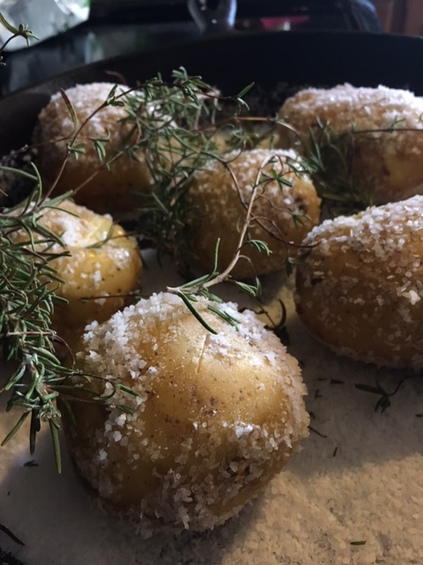  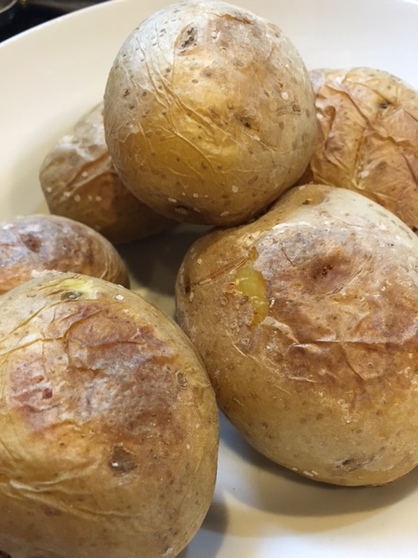 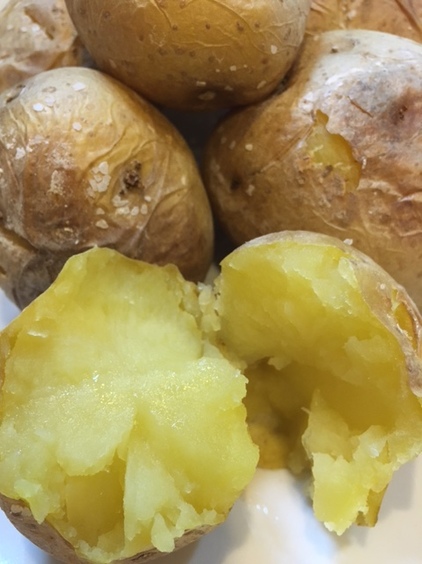 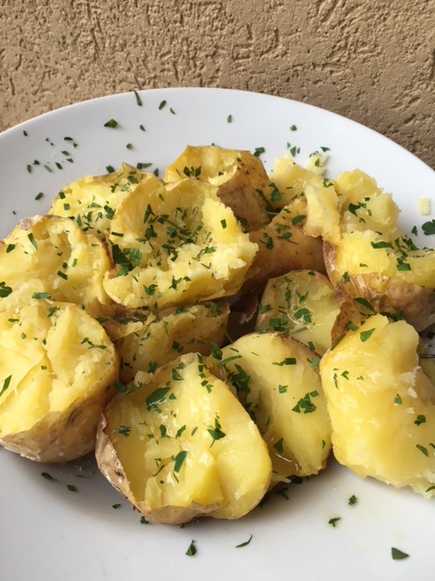 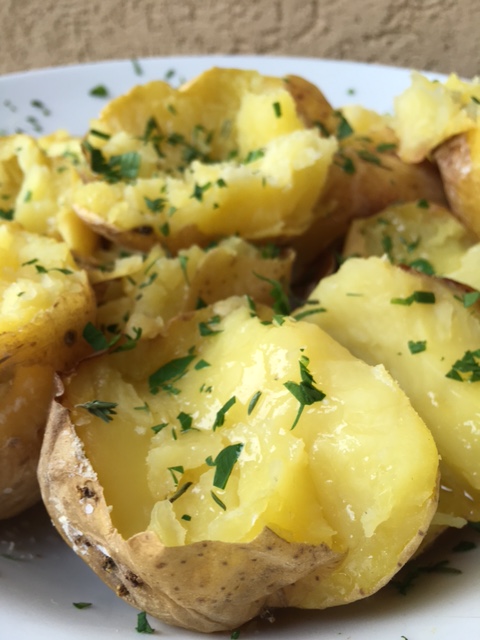 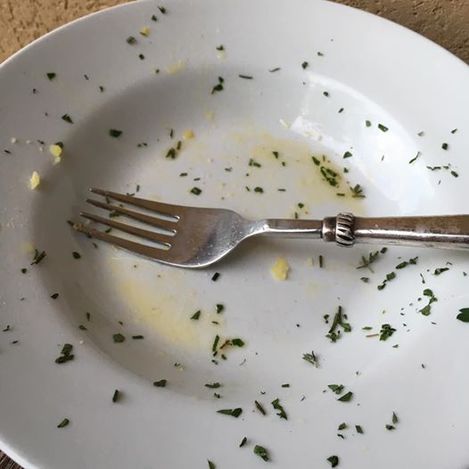 Watch them disappear! ♥
“To make a good salad is to be a brilliant diplomatist–the problem is entirely the same in both cases. To know exactly how much oil one must put with one’s vinegar.” – Oscar Wilde This blog post will be short and sweet. It's tomato season. Do you wait all summer long for those ripe off the vine tomatoes like I do and then eat as many as humanly possible in the few weeks they are available? I have been volunteering at a local farm (Artisan Gardens CSA) one day a week and I have been gifted some beauties- large, misshapen heirlooms so juicy and flavorful they make me giddy! So I did what any tomato loving gal would do and made a caprese salad. I used a vinaigrette to add some flavor. I know a lot of people drizzle caprese salad with balsamic vinegar, but I find it a little too sweet for my taste in this application. But if you prefer Balsamic, by all means use that. I am not the vinegar boss of you, afterall! : ) Deconstructed Insalata Caprese- serves 6 4 medium sized Heirloom tomatoes,any variety, sliced 1/3" thick* 1 16-oz. tub of fresh mozzarella pearls (or fresh mozzarella ball, torn into pieces), drained and patted dry. Dressing: 1 Tablespoon. red wine vinegar 1 teaspoon Balsamic vinegar 3 Tablespoons Extra Virgin olive Oil 1/8 teaspoon garlic powder 1/4 teaspoon dried oregano kosher or sea salt coarse ground black pepper 6 good-sized fresh basil leaves, cut into chiffonade 1. For dressing: whisk together vinegars, garlic powder, oregano and a pinch of both salt and pepper. Slowly drizzle in olive oil, whisking continuously. Set aside. 2. On an oblong platter, arrange tomato slices, slightly over-lapping in two or three rows. 3. Season tomatoes lightly with salt 4. Place mozzarella pearls or pieces evenly down the center of the tomatoes. 5. Re-whisk the vinaigrette and drizzle over the top of the salad to taste. 6. Sprinkle the fresh basil evenly on top of the salad and serve. Served at room temperature for best flavor. 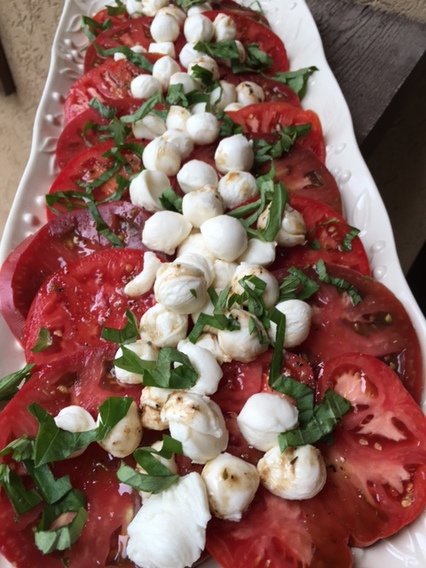 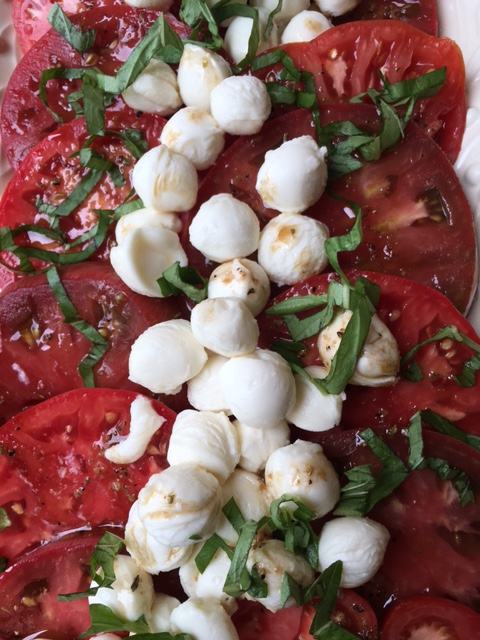 "It's another tequila sunrise, staring slowly across the sky. " -The Eagles Just the word Tequila piqued your interest, didn't it? You can admit it, I won't tell. Well unlike tequila shots, there won't be any regrets the next morning when making this spectacular summer dish I am about to share with you. It's simply lean and quick-cooking pork tenderloin, bathed in a beautifully herbaceous, slightly acidic and gorgeously green marinade. I swoon over it ever summer. Just the color of the marinade gets me going! I did not create this recipe though I tweaked it ever so slightly , increasing the amount of cilantro called for. However I no longer recall the original source, so I apologize for not being able to give proper credit here*. You will be happy to know that once the meat is cooked , the flavors still shine bright. You can slice it and eat it plain or create tacos or quesadillas with the meat as well. It's equally delicious with boneless, skinless chicken breasts, too, so why not try both? Its a great dish to entertain with as well- nothing ordinary about it yet it is so super simple to make! Tequila-Jalapeno Pork Tenderloin serves 6-ish or more depending on how large your tenderloins are 1 cup packed cilantro (leaves with stems ok)- about 1 small bunch 2-3 jalapeno peppers, halved and seeded, depending on your tolerance for spice (I use 2) 1/2 cup roughly diced onion 3 small cloves garlic, peeled 1/4 cup freshly squeezed lime juice (2-3) 2 Tablespoons Tequila (I use Jose Cuervo Gold ) 1/4 cup freshly squeezed orange juice 1/4 cup olive oil 1 teaspoon kosher or sea salt 1/2 teaspoon coarse ground black pepper 1/2 teaspoon ground cumin 1/2 teaspoon honey or granulated sugar 2 pork tenderloins (or try with boneless, skinless chicken breasts) 1. Make Marinade: Combine all ingredients in blender jar. 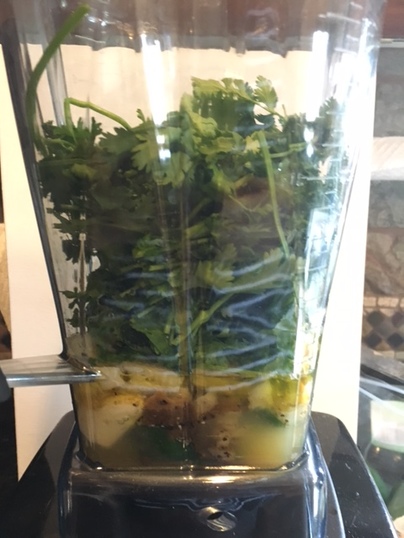 2. Blend on high until mixture is smooth and homogeneous, about 1 minute. 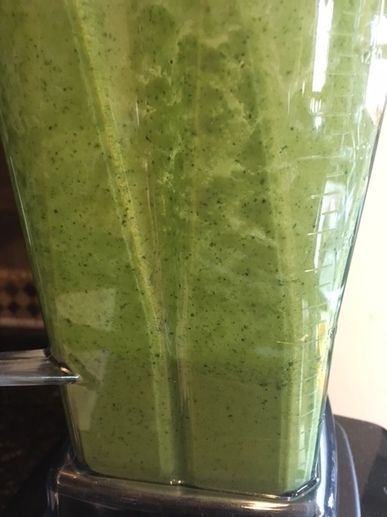 3. On a clean cutting board, butterfly the two pork tenderloins. To butterfly, cut not quite through each tenderloin, lengthwise, with a very sharp knife, so it opens like a book. Do not cut through! 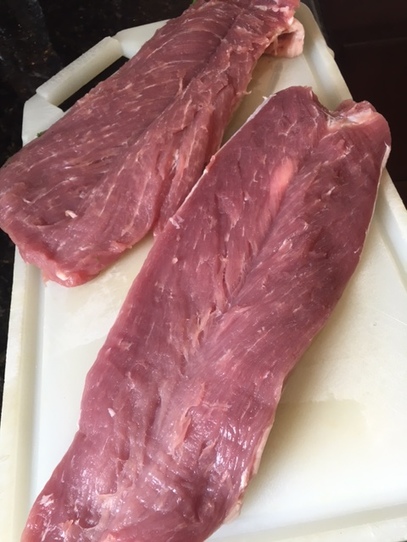 4. Place tenderloins in a ziploc bag or non-reactive dish . If using a dish, pour half the marinade on top. Turn the tenderloins over and pour the remaining marinade on top. Cover with plastic wrap and refrigerate for at least 4 hours or over-night. If using a bag just pour the marinade into the bag over the tenderloins and seal. 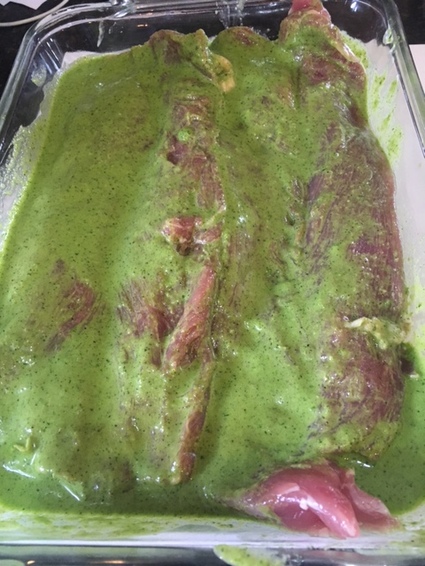 5. When ready to cook prepare charcoal grill or preheat gas grill to medium-high heat. Clean and oil cooking grates. When ready, remove pork from marinade mixture and discard remaining marinade. Place pork onto cooking surface and grill, covered for about 7 minutes per side, turning once. 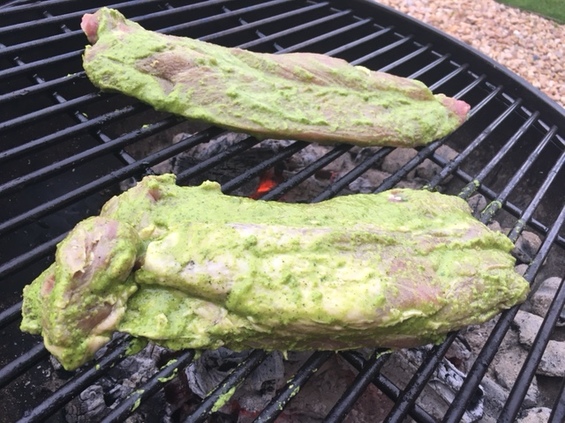 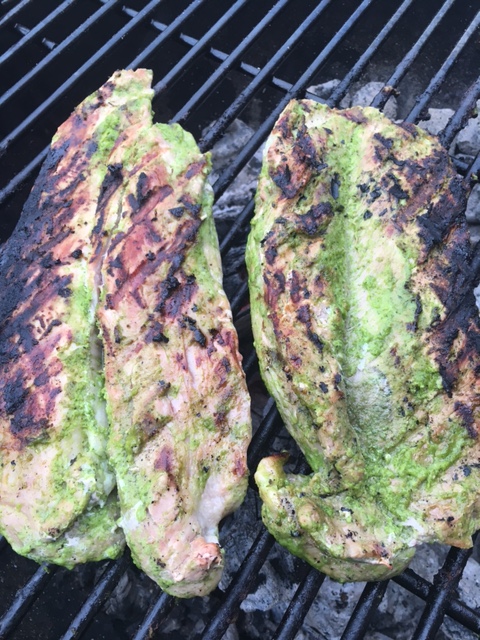 6. When done I cook mine to 145 degrees internal temperature but USDA says cook to 165 degrees F, you decide what seems good to you). Remove from grill and let rest 10 minutes before slicing (cooking will continue with carry-over heat). 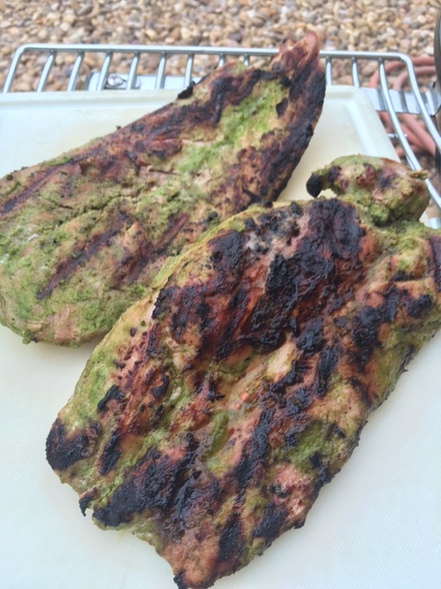 7. Slice thinly cross-wise against the grain and serve immediately with sides of your choice. 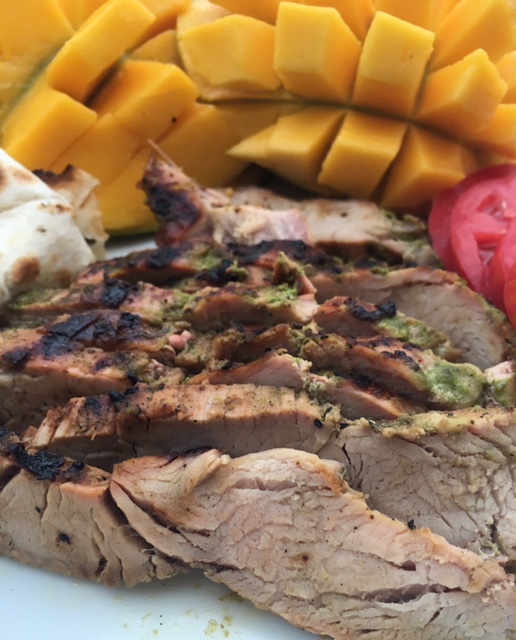 I hope you love it! What's your favorite way to prepare pork tenderloin? Please share in the comments below!
* I was thinking the recipe originally was featured in Fine Cooking magazine, but I searched and searched the web for anything similar and came up empty handed. |

Archives
December 2019
Categories
All
|

 RSS Feed
